---
url: /guide/getting-started/index.md
---
# Platform Tour
The AI Platform is a multi-agent workspace where your team collaborates with AI specialists in channels. Specialists carry defined roles, knowledge, tools, and benchmark history. You chat with them the same way you chat with teammates.
This page is a tour of every major surface in the app. If you want to start using it right away, head to [Installation](/guide/getting-started/installation.md) and come back here once you are signed in.

## The Sidebar
The left side of the app has two areas: the **icon rail** and the **channel list**.
The **icon rail** is the narrow strip of icons on the far left. Each icon opens a different section of the platform — [Chat](/guide/chat/index.md), [Projects](/guide/projects/index.md), [Workflows](/guide/workflows/index.md), [Specialists](/guide/specialists/index.md), [Knowledge Garden](/guide/knowledge/index.md), [Tasks](/guide/tasks/index.md), and [Settings](/guide/settings/index.md) at the bottom.
The **channel list** sits next to the icon rail. It shows your channels — group conversations where you chat with your team and mention specialists with **@** to get AI-powered responses. Create as many channels as you need for different topics. See [Your First Channel](/guide/getting-started/your-first-channel.md) for a walkthrough.
## Specialists
Specialists are AI agents that carry a defined role, preferred models, a knowledge base, tool permissions, and benchmark history. When you ask a specialist to review code, it already has the context, tools, and instructions to do that job well.
Browse the marketplace to find pre-built specialists and add them to your workspace, or build your own using the specialist builder.
The builder lets you define a specialist's persona, tasks, knowledge sources, available tools, and benchmarks for evaluating its performance.
Mention a specialist with **@** in a channel and it responds. Send a message without mentioning anyone and the platform routes it to the right specialist based on the content. See the [Specialists](/guide/specialists/index.md) guide for details.
## Model Routing
The AI Platform is provider-agnostic and model-agnostic. You can connect multiple LLM providers at the same time: OpenRouter, OpenAI, Anthropic, Amazon Bedrock, Cloudflare Workers AI, Hugging Face, or the Zephyr Built-in provider.
The platform picks the right model based on the specialist's configuration and your workspace defaults. You can set a workspace-wide default model, and individual team members can set a personal override. Specialists can also have their own preferred models.
### Zephyr Built-in provider
The Zephyr Built-in provider is included with a paid Zephyr plan. It requires no API key and no external account. If your workspace has an active plan, the provider is available immediately.
 If you do not have a Zephyr plan, connect any of the other providers with your own API key. See [Connections](/guide/settings/connections.md) for setup instructions.
## Chat
Conversations work like modern messaging apps.
**Messages** support rich formatting, file attachments (drag and drop or paste), and emoji reactions. Hover over any message to react, reply in a thread, copy it, or translate it.
**Threads** let you branch off from a message for focused discussion without cluttering the main channel.
**Tool calls** are visible in the chat. When a specialist uses a tool (searching code, reading a file, querying a database), you see what it did and can click to expand the details.
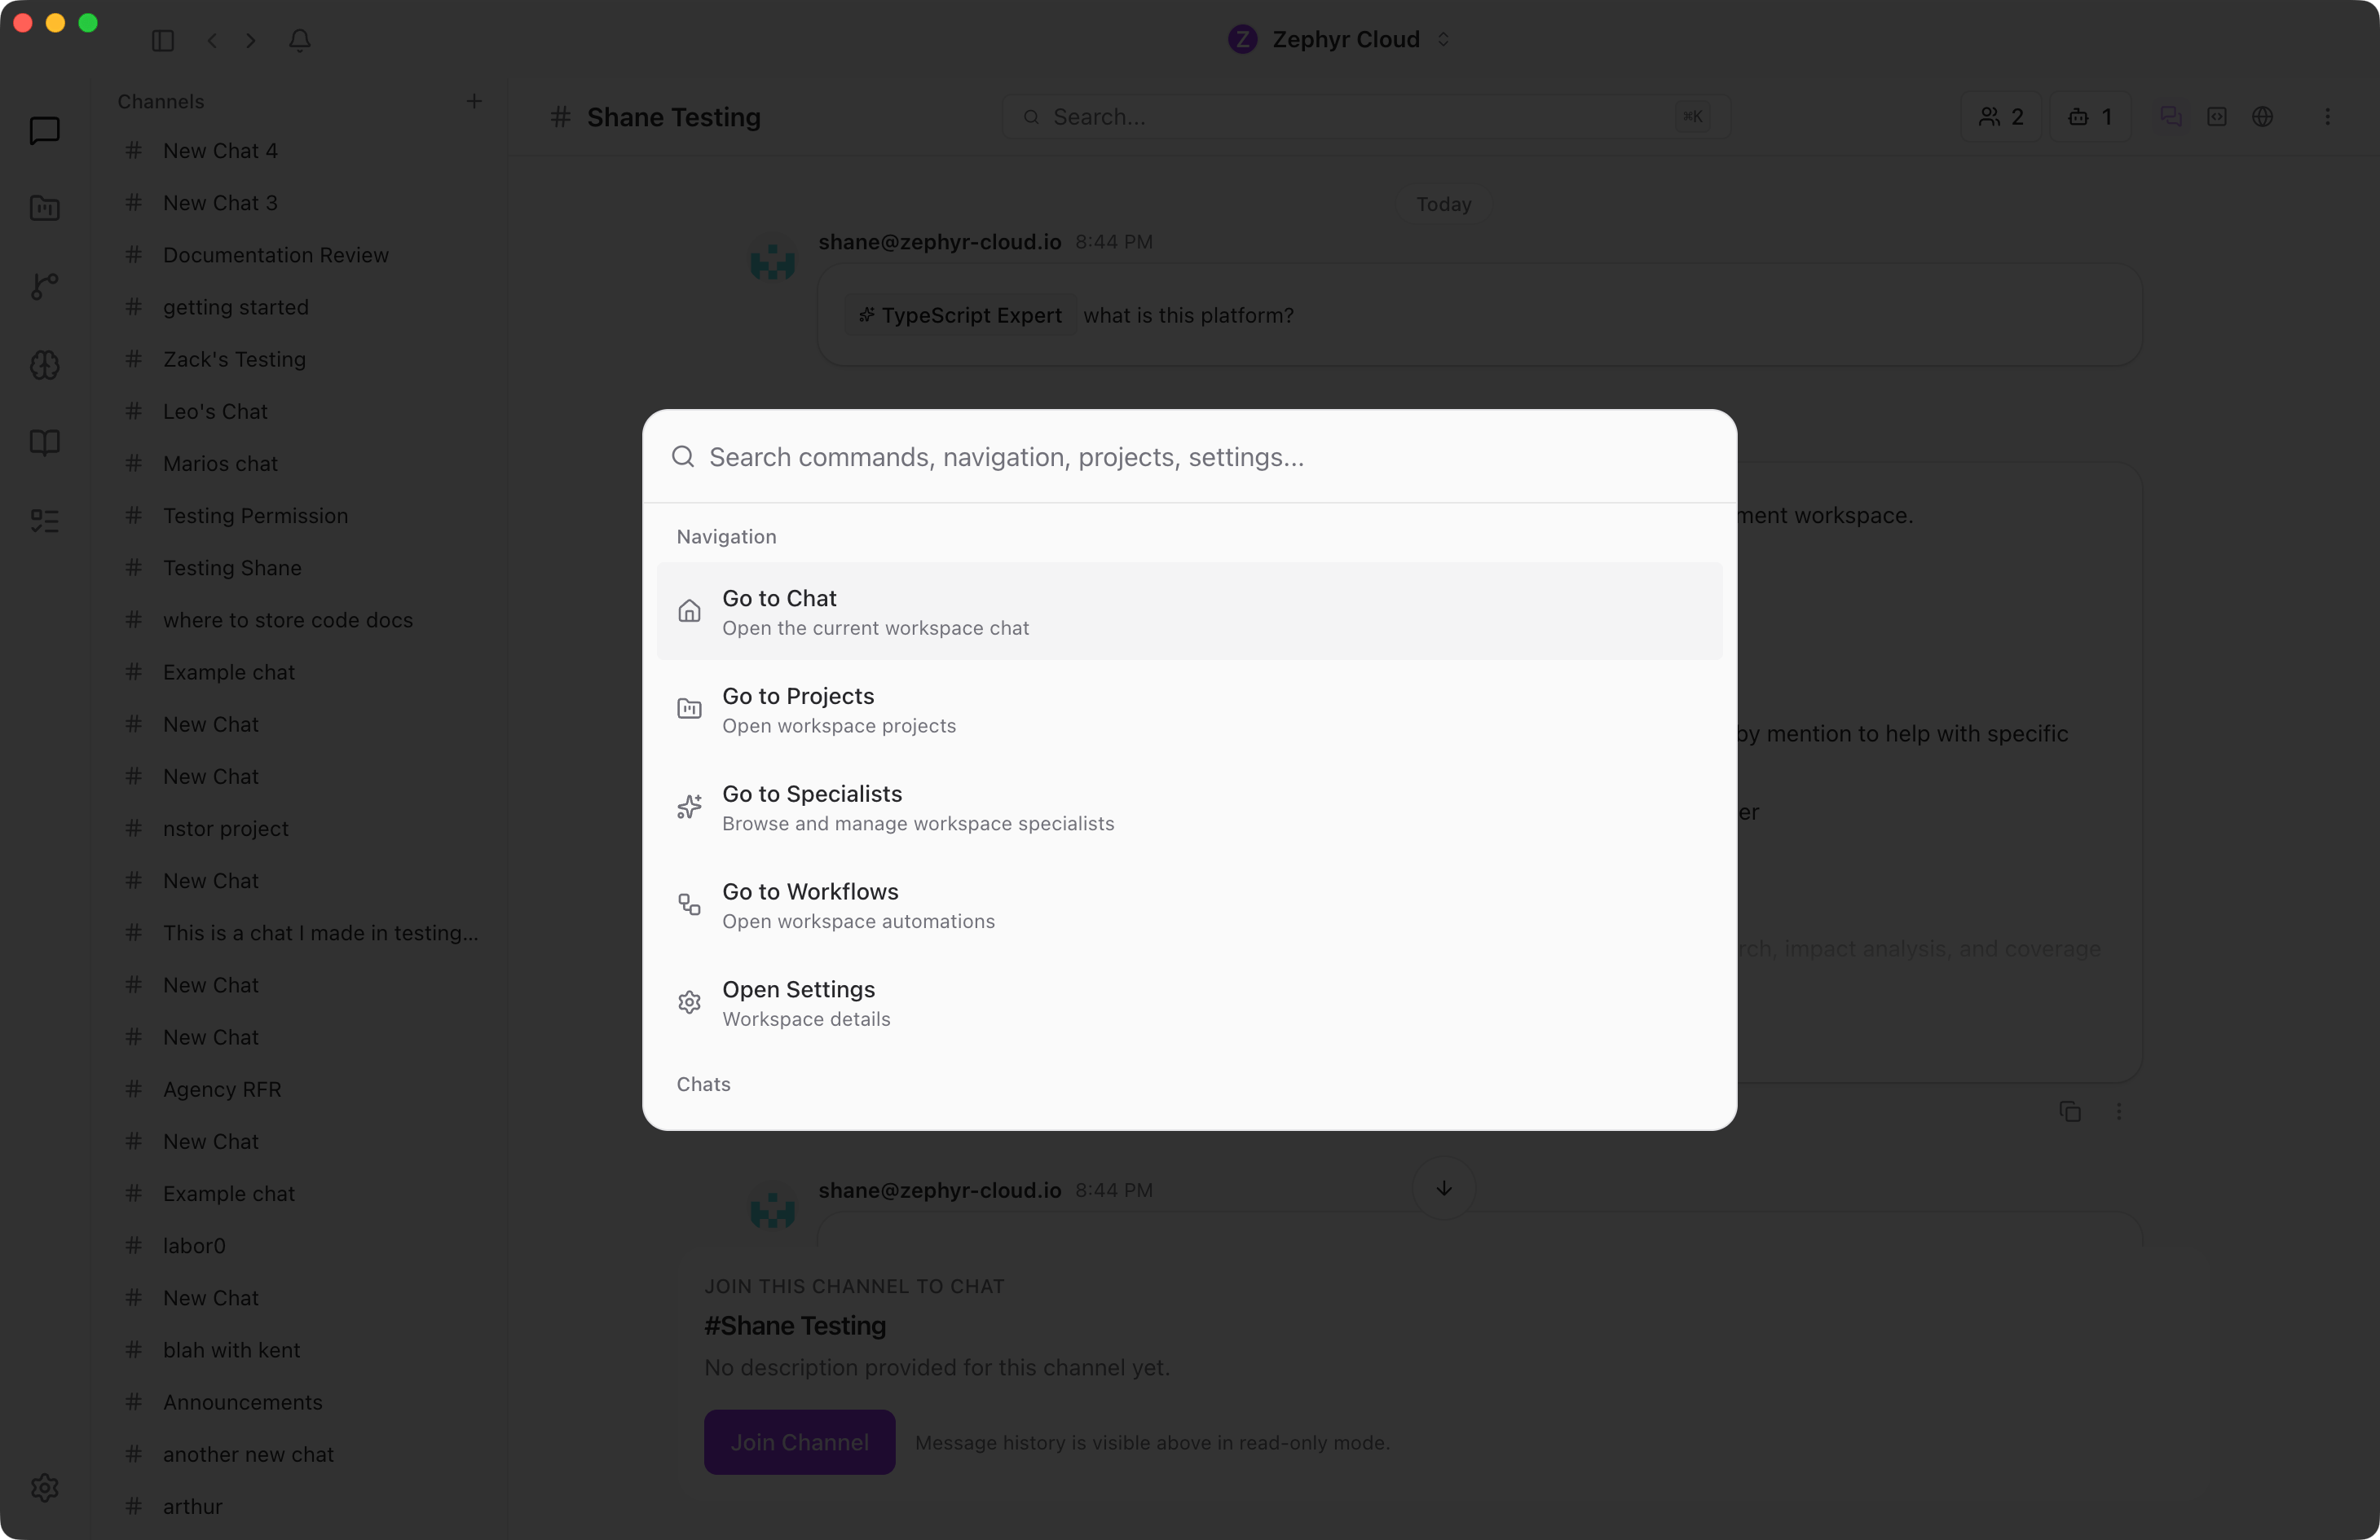
**Search** lets you jump to any conversation or person. Press `Cmd+K` (macOS) or `Ctrl+K` (Windows/Linux) to open it.
## Projects
Projects bring together everything related to a piece of work: a GitHub repository for codebase context, channels for focused conversation, a task board for tracking work, and knowledge sources for reference material.
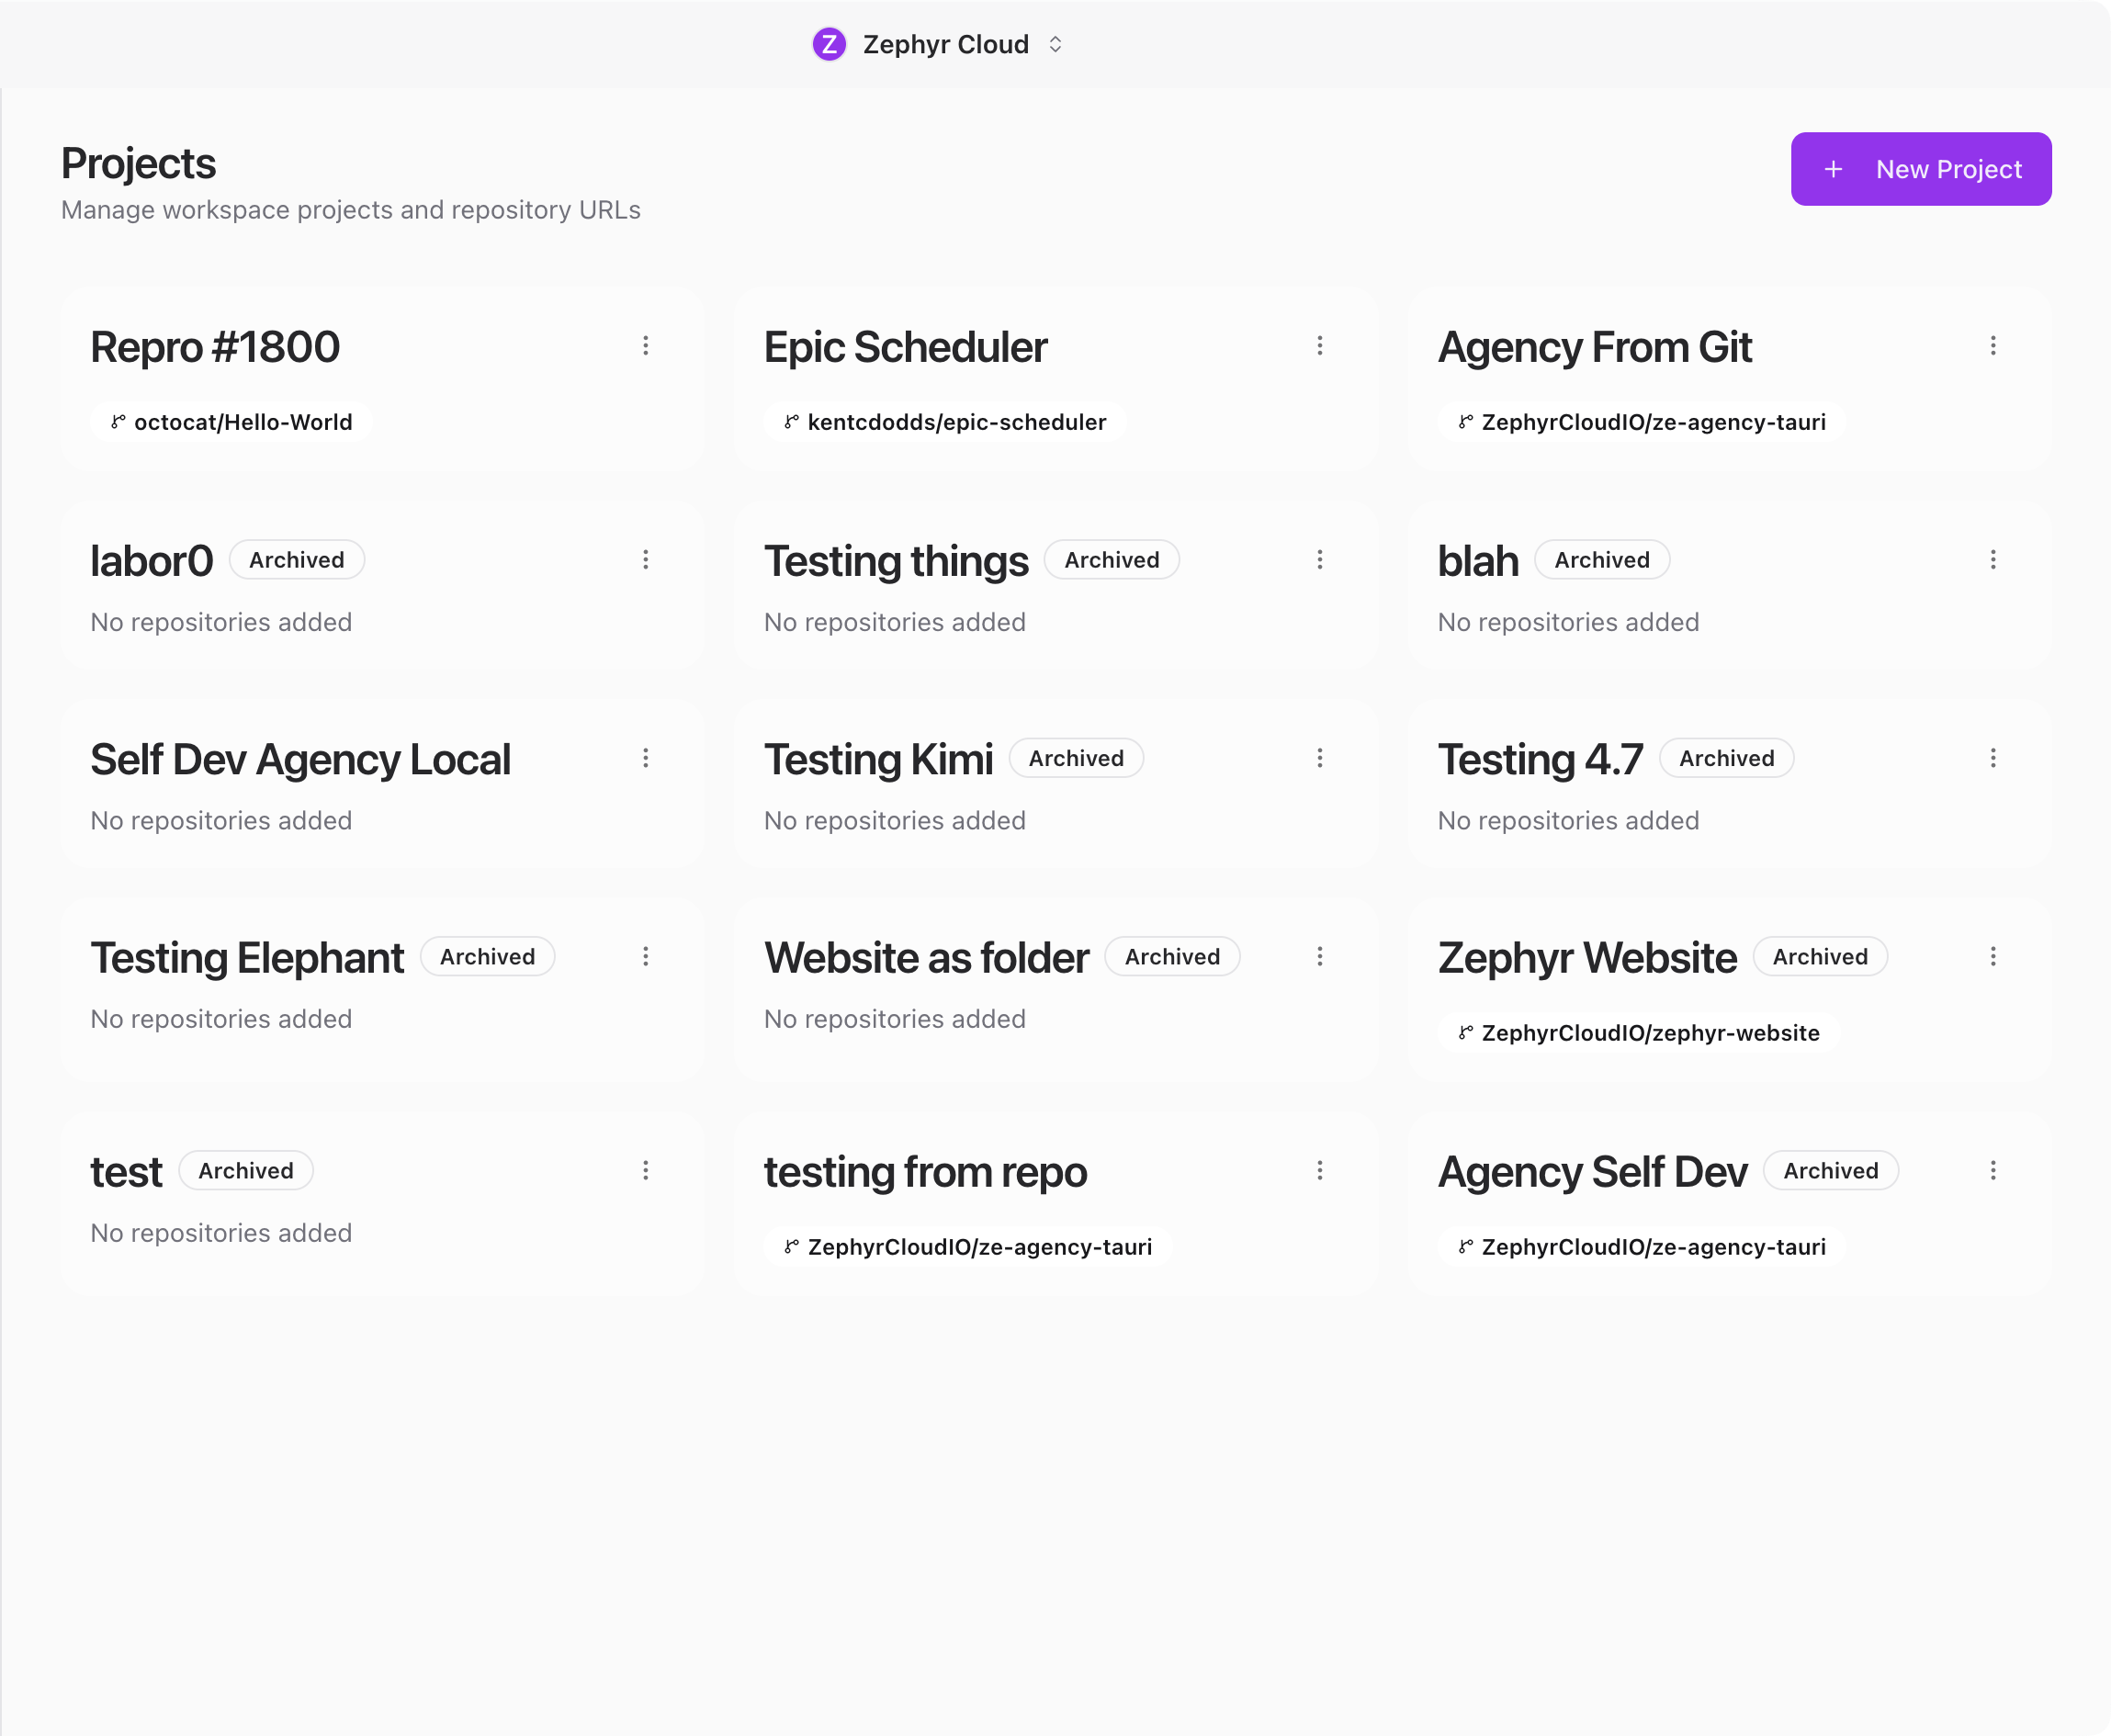
See the [Projects](/guide/projects/index.md) guide to learn more.
## Workflows
The workflow editor lets you build visual automations. Drag nodes onto a canvas, connect them, and define triggers. Workflows can call APIs, transform data, invoke specialists, and send notifications.
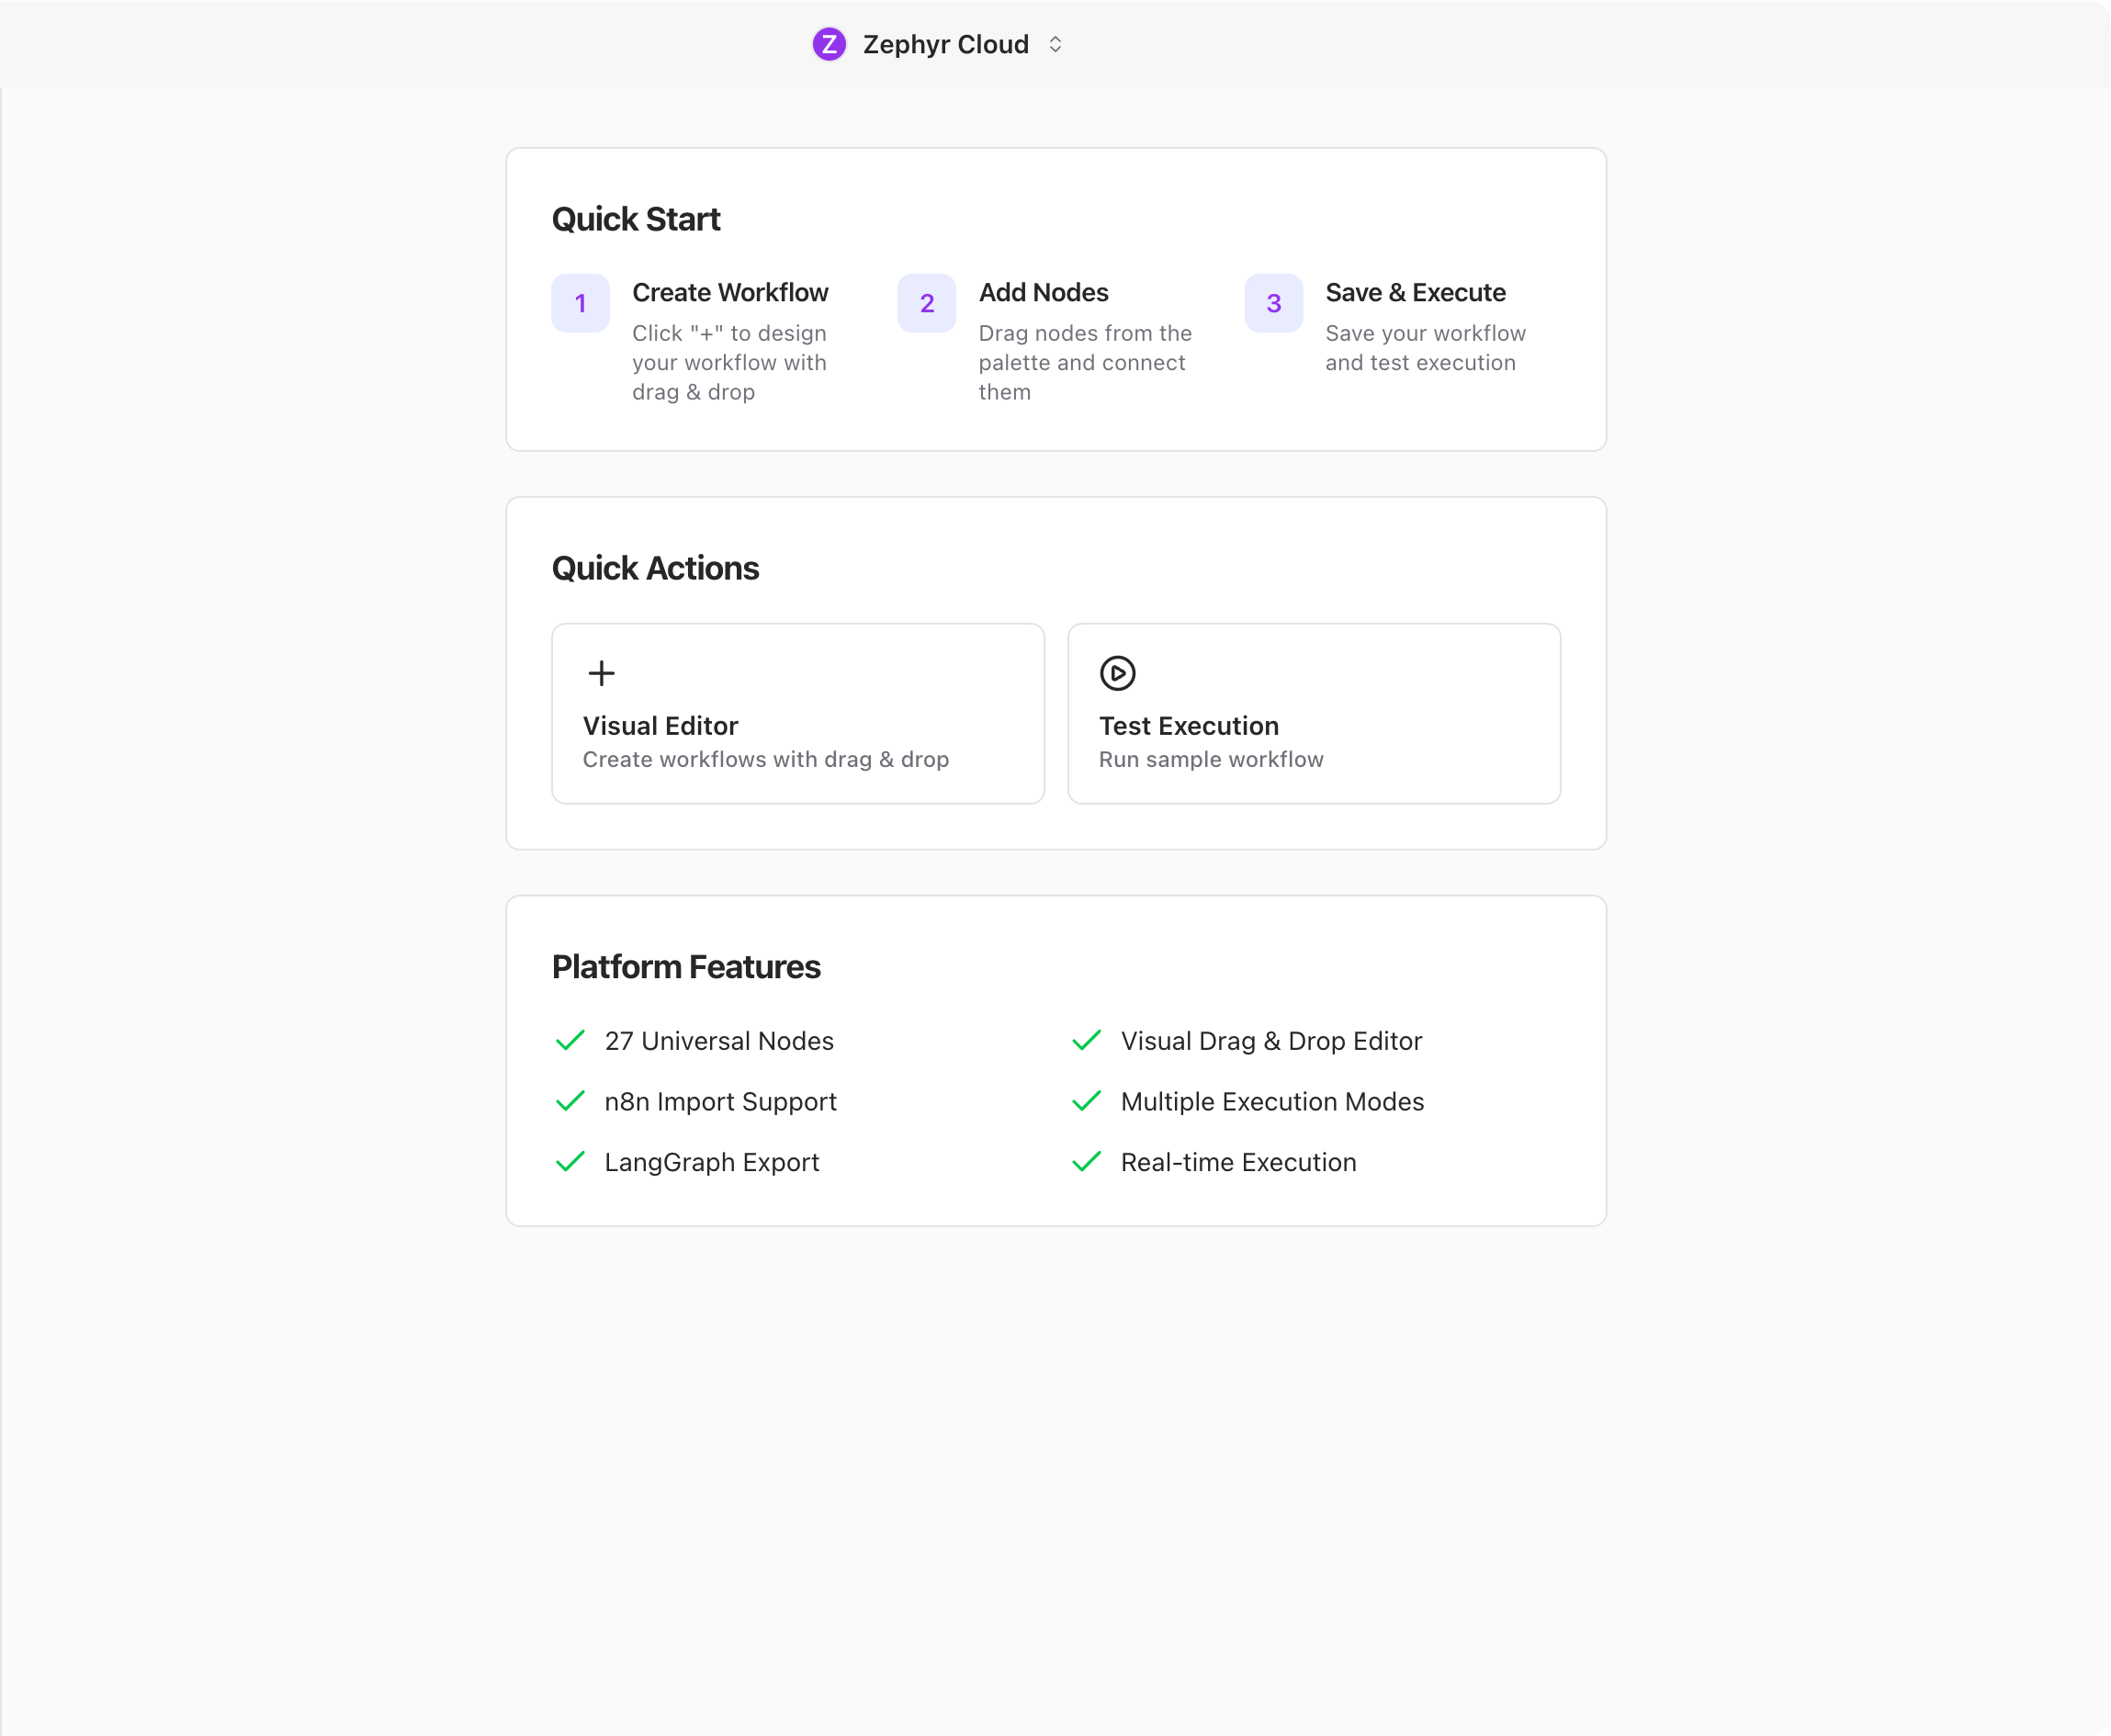
See the [Workflows](/guide/workflows/index.md) guide to learn more.
## Connections
Specialists need at least one LLM provider configured before they can respond. You can also connect external services like GitHub, Slack, Notion, Figma, and Linear to give specialists context from your existing tools.
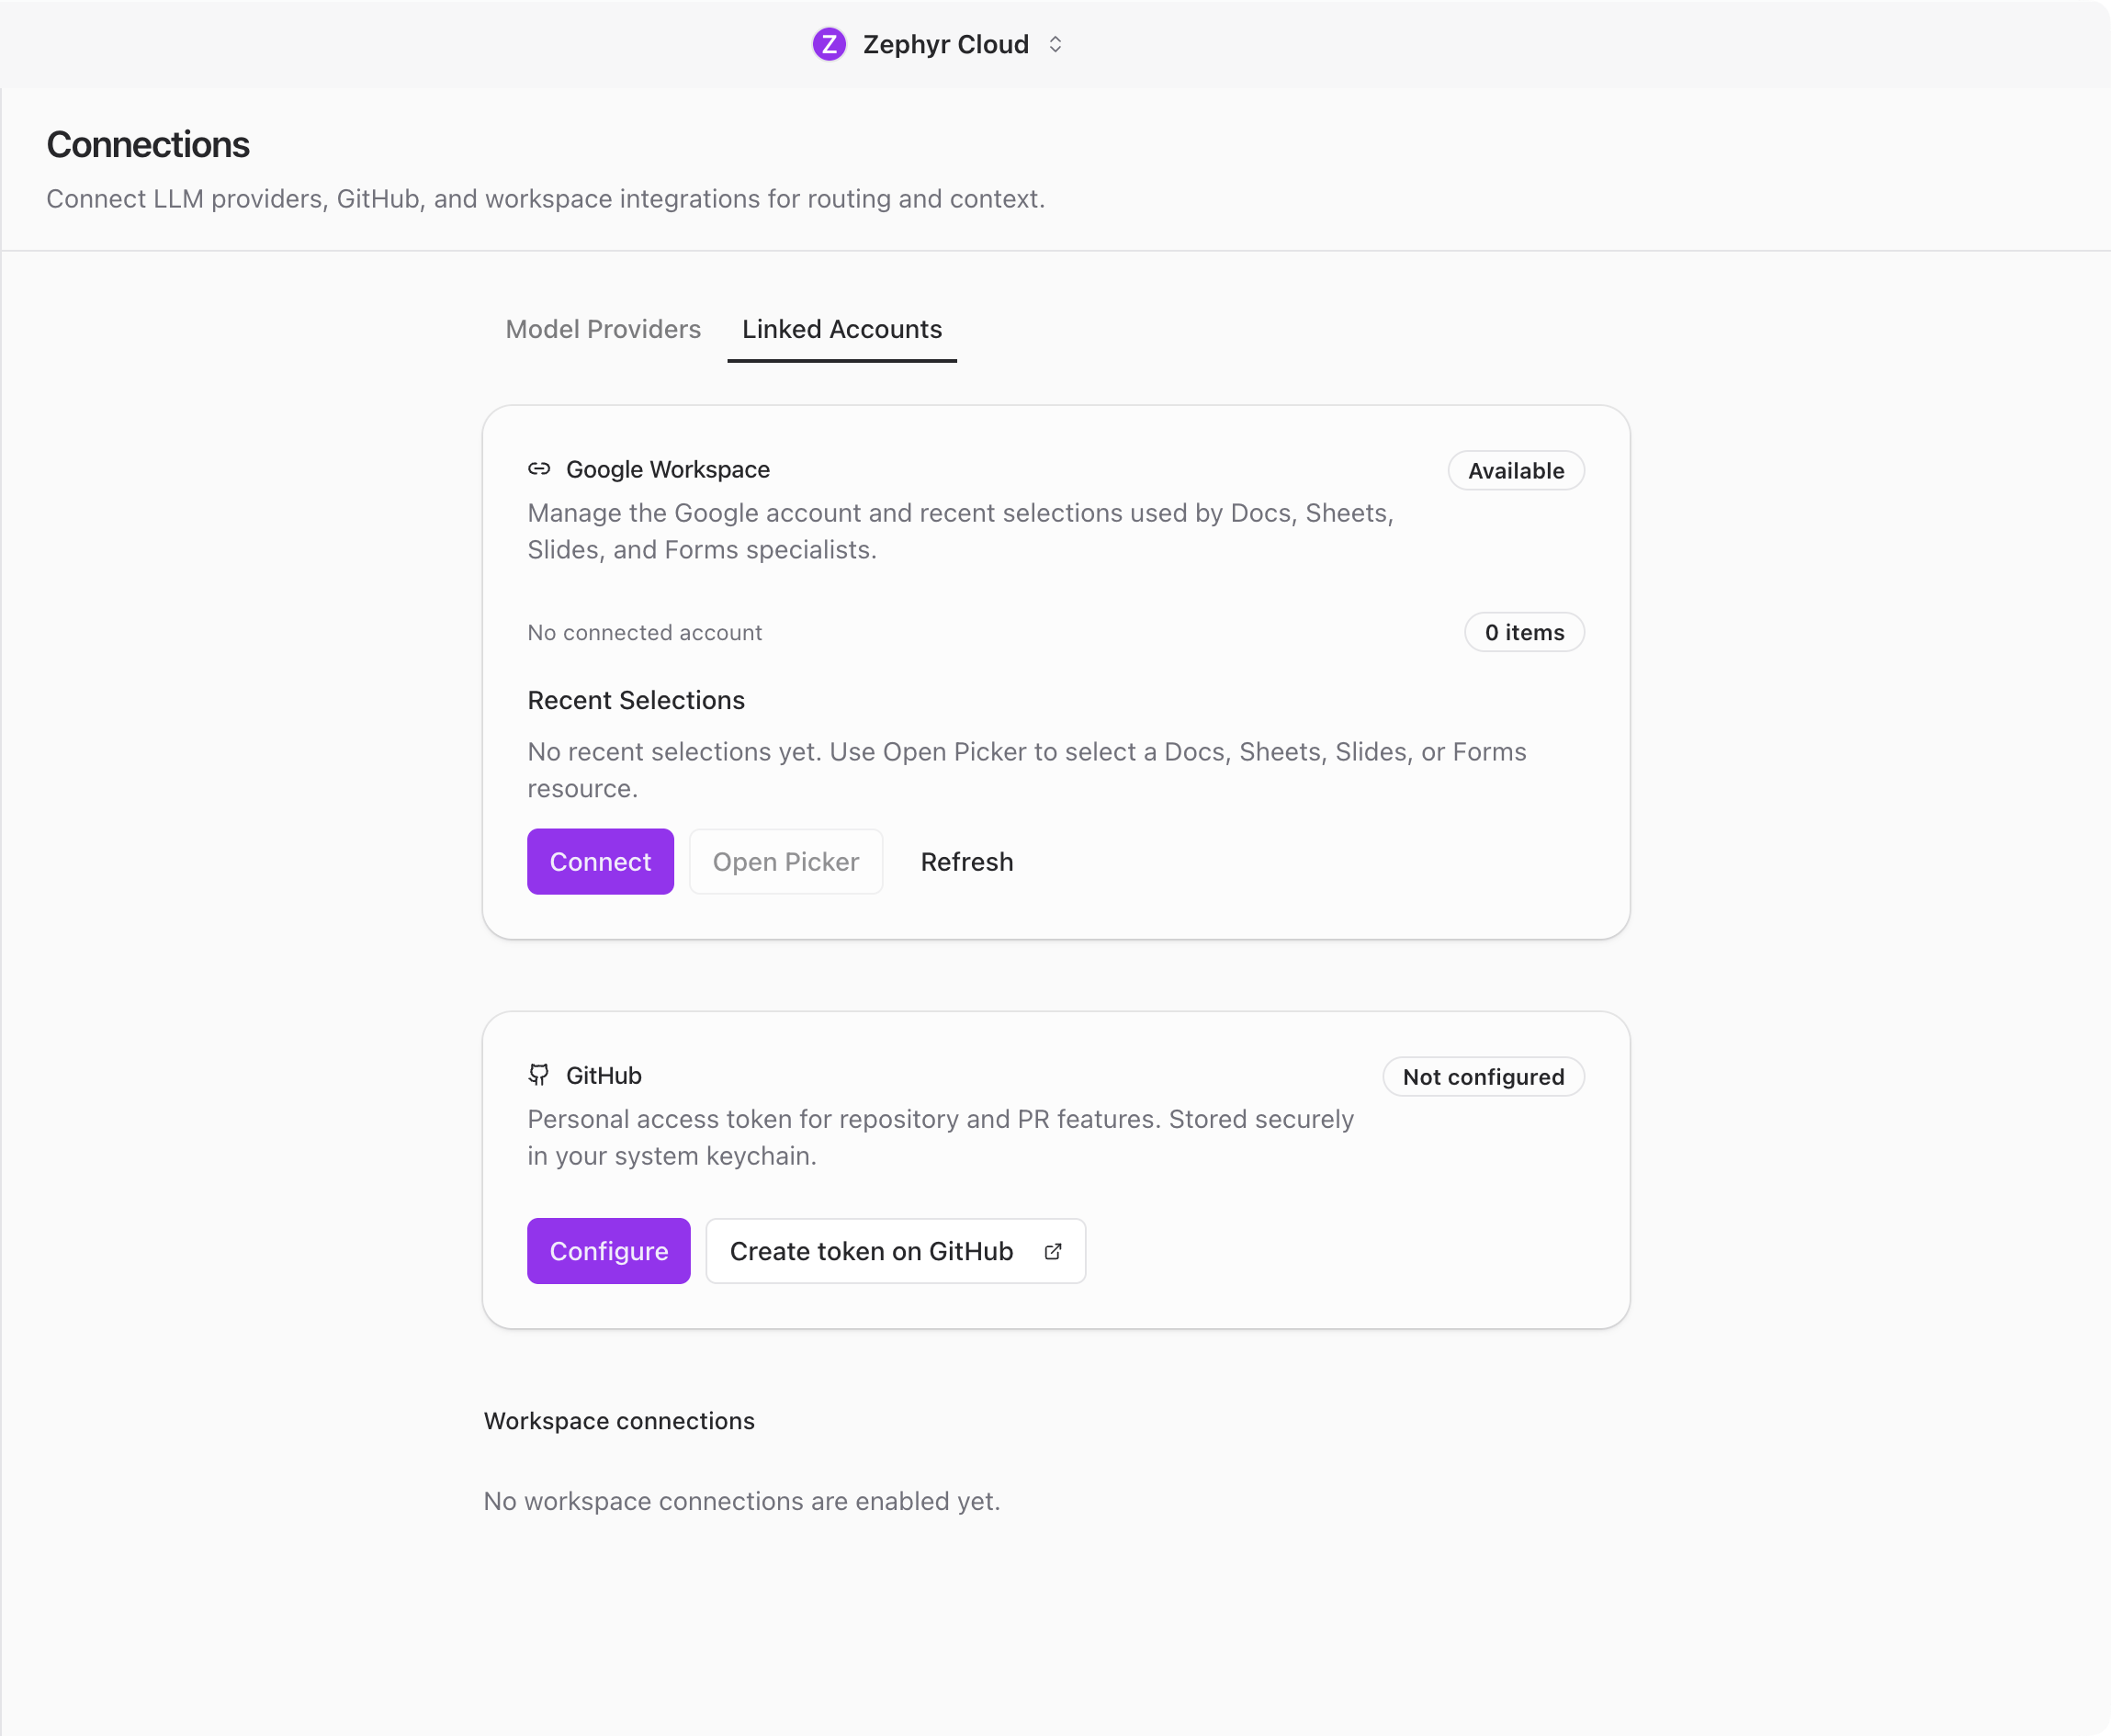
See [Connections](/guide/settings/connections.md) for the full setup.
## What You Will Need
* A Mac (macOS 14 or later) or Windows computer
* An internet connection for sign-up and syncing
* An API key from an LLM provider, or an active Zephyr plan for the built-in provider
## Next Steps
If you have not installed the app yet, head to [Installation](/guide/getting-started/installation.md). Otherwise, dive into the section that matches what you want to do:
* [Chat](/guide/chat/index.md) for messaging, threads, and the channel layout
* [Specialists](/guide/specialists/index.md) for browsing the marketplace and building your own
* [Projects](/guide/projects/index.md) for connecting code repositories and giving specialists context
* [Workflows](/guide/workflows/index.md) for building visual automations
* [Settings](/guide/settings/index.md) for account, workspace, and integration configuration
---
url: /guide/getting-started/installation.md
---
# Installation
Download The AI Platform from the official website and install it like any other desktop app.
## Download
| Platform | Download | Requirement |
| --------------------- | ----------------------------------------------------------------------------------------------------------------------- | -------------------------- |
| macOS (Apple Silicon) | [Download .dmg](https://downloads.theaiplatform.app/release-artifacts/tap/prod/macos/the-ai-platform-macos-arm64.dmg) | macOS 14 (Sonoma) or later |
| Windows (x64) | [Download .exe](https://downloads.theaiplatform.app/release-artifacts/tap/prod/windows/the-ai-platform-windows-x64.exe) | Windows 10 or later |
You can also visit [theaiplatform.app](https://theaiplatform.app/) where the download page detects your platform automatically.
## Install on macOS
1. Open the downloaded `.dmg` file
2. Drag **The AI Platform** into your **Applications** folder
3. Open the app from Applications
On first launch, macOS may ask you to confirm that you want to open an app downloaded from the internet. Click **Open** to continue.
## Install on Windows
1. Run the downloaded installer
2. Follow the setup wizard
3. Launch **The AI Platform** from the Start menu or desktop shortcut
When you open The AI Platform for the first time, you will see the login screen. Head to [Sign In & Set Up](/guide/getting-started/creating-account.md) to sign in and set up your workspace.
:::tip
The AI Platform checks for updates automatically. When a new version is available, you will see a notification in the sidebar. See [Updating](/guide/updating.md) for details.
:::
---
url: /guide/getting-started/creating-account.md
---
# Sign In & Set Up
The AI Platform uses OAuth for authentication, so there is no separate sign-up step inside the app. The first time you open it, you log in through your identity provider — that single flow handles both new accounts and returning users. After that, you create a workspace and you are ready to go.
## Sign In with OAuth
When you launch the app for the first time, you land on the login screen.
Click **Log in with OAuth** to open your identity provider in your browser. Sign in (or sign up) there and you will be redirected back to the app automatically. If your account is brand new, the OAuth provider will walk you through creating it before bringing you back.
If your organization supports it, you can also scan the QR code on the login screen with your mobile device to authenticate through the Zephyr mobile app.
:::tip
You only need to sign in once. The AI Platform keeps you logged in across sessions.
:::
## Create a Workspace
After signing in for the first time, you will see a **Create your first workspace** screen. A workspace is a shared space where your team collaborates, similar to a Slack workspace or a Discord server. All your channels, projects, specialists, and settings live inside a workspace.
Click **Create Workspace**, enter a name, and confirm. The app creates the workspace and drops you into it right away.
A fresh workspace starts empty, so your first step will be connecting an LLM provider and adding some specialists.
## Join an Existing Workspace
If a teammate has already created a workspace, they can invite you. After signing in, you will see the workspaces you have been invited to. Click one to enter it.
You can belong to multiple workspaces and switch between them at any time using the workspace menu in the app header.
## Invite Your Team
Once your workspace is set up, you can invite others from the workspace settings. Open **Settings** from the icon rail, then go to **Members**. From there you can send invitations by email.
Team members who accept the invite will see the workspace after they sign in.
## Next Steps
With your workspace ready, you need two things before you can chat:
1. **Connect an LLM provider** so specialists can respond. Head to [Connections](/guide/settings/connections.md) to add an API key, or use the Zephyr Built-in provider if you have a Zephyr plan.
2. **Create your first channel** and chat with a specialist. Head to [Your First Channel](/guide/getting-started/your-first-channel.md) — the natural flow walks you through everything, including adding a specialist on the first mention.
---
url: /guide/getting-started/your-first-channel.md
---
# Your First Channel
Channels are where you chat with specialists and teammates. This walkthrough covers everything you can do on the chat page — from creating a channel to mentioning specialists, inviting teammates, and switching between Everyone and Humans Only mode.
## Create a Channel
Click the **+** button next to **Channels** in the sidebar. A dialog appears where you set a channel name, an optional description, and whether the channel is public or private.
If you do not have a Zephyr plan, connect any of the other providers with your own API key. See [Connections](/guide/settings/connections.md) for setup instructions.
## Chat
Conversations work like modern messaging apps.
**Messages** support rich formatting, file attachments (drag and drop or paste), and emoji reactions. Hover over any message to react, reply in a thread, copy it, or translate it.
**Threads** let you branch off from a message for focused discussion without cluttering the main channel.
**Tool calls** are visible in the chat. When a specialist uses a tool (searching code, reading a file, querying a database), you see what it did and can click to expand the details.

**Search** lets you jump to any conversation or person. Press `Cmd+K` (macOS) or `Ctrl+K` (Windows/Linux) to open it.
## Projects
Projects bring together everything related to a piece of work: a GitHub repository for codebase context, channels for focused conversation, a task board for tracking work, and knowledge sources for reference material.

See the [Projects](/guide/projects/index.md) guide to learn more.
## Workflows
The workflow editor lets you build visual automations. Drag nodes onto a canvas, connect them, and define triggers. Workflows can call APIs, transform data, invoke specialists, and send notifications.

See the [Workflows](/guide/workflows/index.md) guide to learn more.
## Connections
Specialists need at least one LLM provider configured before they can respond. You can also connect external services like GitHub, Slack, Notion, Figma, and Linear to give specialists context from your existing tools.

See [Connections](/guide/settings/connections.md) for the full setup.
## What You Will Need
* A Mac (macOS 14 or later) or Windows computer
* An internet connection for sign-up and syncing
* An API key from an LLM provider, or an active Zephyr plan for the built-in provider
## Next Steps
If you have not installed the app yet, head to [Installation](/guide/getting-started/installation.md). Otherwise, dive into the section that matches what you want to do:
* [Chat](/guide/chat/index.md) for messaging, threads, and the channel layout
* [Specialists](/guide/specialists/index.md) for browsing the marketplace and building your own
* [Projects](/guide/projects/index.md) for connecting code repositories and giving specialists context
* [Workflows](/guide/workflows/index.md) for building visual automations
* [Settings](/guide/settings/index.md) for account, workspace, and integration configuration
---
url: /guide/getting-started/installation.md
---
# Installation
Download The AI Platform from the official website and install it like any other desktop app.
## Download
| Platform | Download | Requirement |
| --------------------- | ----------------------------------------------------------------------------------------------------------------------- | -------------------------- |
| macOS (Apple Silicon) | [Download .dmg](https://downloads.theaiplatform.app/release-artifacts/tap/prod/macos/the-ai-platform-macos-arm64.dmg) | macOS 14 (Sonoma) or later |
| Windows (x64) | [Download .exe](https://downloads.theaiplatform.app/release-artifacts/tap/prod/windows/the-ai-platform-windows-x64.exe) | Windows 10 or later |
You can also visit [theaiplatform.app](https://theaiplatform.app/) where the download page detects your platform automatically.
## Install on macOS
1. Open the downloaded `.dmg` file
2. Drag **The AI Platform** into your **Applications** folder
3. Open the app from Applications
On first launch, macOS may ask you to confirm that you want to open an app downloaded from the internet. Click **Open** to continue.
## Install on Windows
1. Run the downloaded installer
2. Follow the setup wizard
3. Launch **The AI Platform** from the Start menu or desktop shortcut
When you open The AI Platform for the first time, you will see the login screen. Head to [Sign In & Set Up](/guide/getting-started/creating-account.md) to sign in and set up your workspace.
:::tip
The AI Platform checks for updates automatically. When a new version is available, you will see a notification in the sidebar. See [Updating](/guide/updating.md) for details.
:::
---
url: /guide/getting-started/creating-account.md
---
# Sign In & Set Up
The AI Platform uses OAuth for authentication, so there is no separate sign-up step inside the app. The first time you open it, you log in through your identity provider — that single flow handles both new accounts and returning users. After that, you create a workspace and you are ready to go.
## Sign In with OAuth
When you launch the app for the first time, you land on the login screen.
Click **Log in with OAuth** to open your identity provider in your browser. Sign in (or sign up) there and you will be redirected back to the app automatically. If your account is brand new, the OAuth provider will walk you through creating it before bringing you back.
If your organization supports it, you can also scan the QR code on the login screen with your mobile device to authenticate through the Zephyr mobile app.
:::tip
You only need to sign in once. The AI Platform keeps you logged in across sessions.
:::
## Create a Workspace
After signing in for the first time, you will see a **Create your first workspace** screen. A workspace is a shared space where your team collaborates, similar to a Slack workspace or a Discord server. All your channels, projects, specialists, and settings live inside a workspace.
Click **Create Workspace**, enter a name, and confirm. The app creates the workspace and drops you into it right away.
A fresh workspace starts empty, so your first step will be connecting an LLM provider and adding some specialists.
## Join an Existing Workspace
If a teammate has already created a workspace, they can invite you. After signing in, you will see the workspaces you have been invited to. Click one to enter it.
You can belong to multiple workspaces and switch between them at any time using the workspace menu in the app header.
## Invite Your Team
Once your workspace is set up, you can invite others from the workspace settings. Open **Settings** from the icon rail, then go to **Members**. From there you can send invitations by email.
Team members who accept the invite will see the workspace after they sign in.
## Next Steps
With your workspace ready, you need two things before you can chat:
1. **Connect an LLM provider** so specialists can respond. Head to [Connections](/guide/settings/connections.md) to add an API key, or use the Zephyr Built-in provider if you have a Zephyr plan.
2. **Create your first channel** and chat with a specialist. Head to [Your First Channel](/guide/getting-started/your-first-channel.md) — the natural flow walks you through everything, including adding a specialist on the first mention.
---
url: /guide/getting-started/your-first-channel.md
---
# Your First Channel
Channels are where you chat with specialists and teammates. This walkthrough covers everything you can do on the chat page — from creating a channel to mentioning specialists, inviting teammates, and switching between Everyone and Humans Only mode.
## Create a Channel
Click the **+** button next to **Channels** in the sidebar. A dialog appears where you set a channel name, an optional description, and whether the channel is public or private.
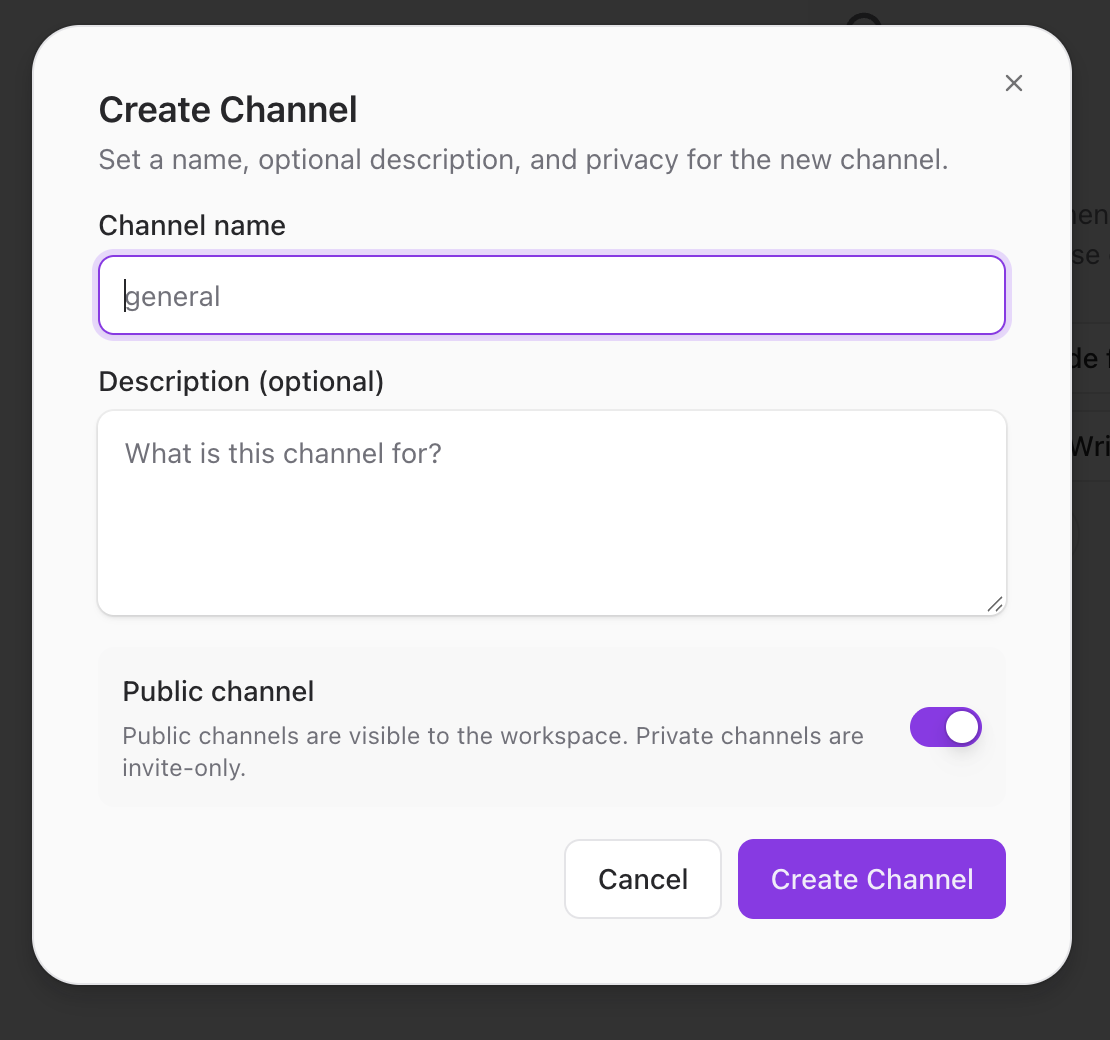 Give the channel a name that describes the topic and click **Create Channel**. Public channels are visible to everyone in the workspace. Private channels are invite-only. You can also leave the name empty — the channel defaults to "New Chat" and you can rename it later.
## Start a Conversation
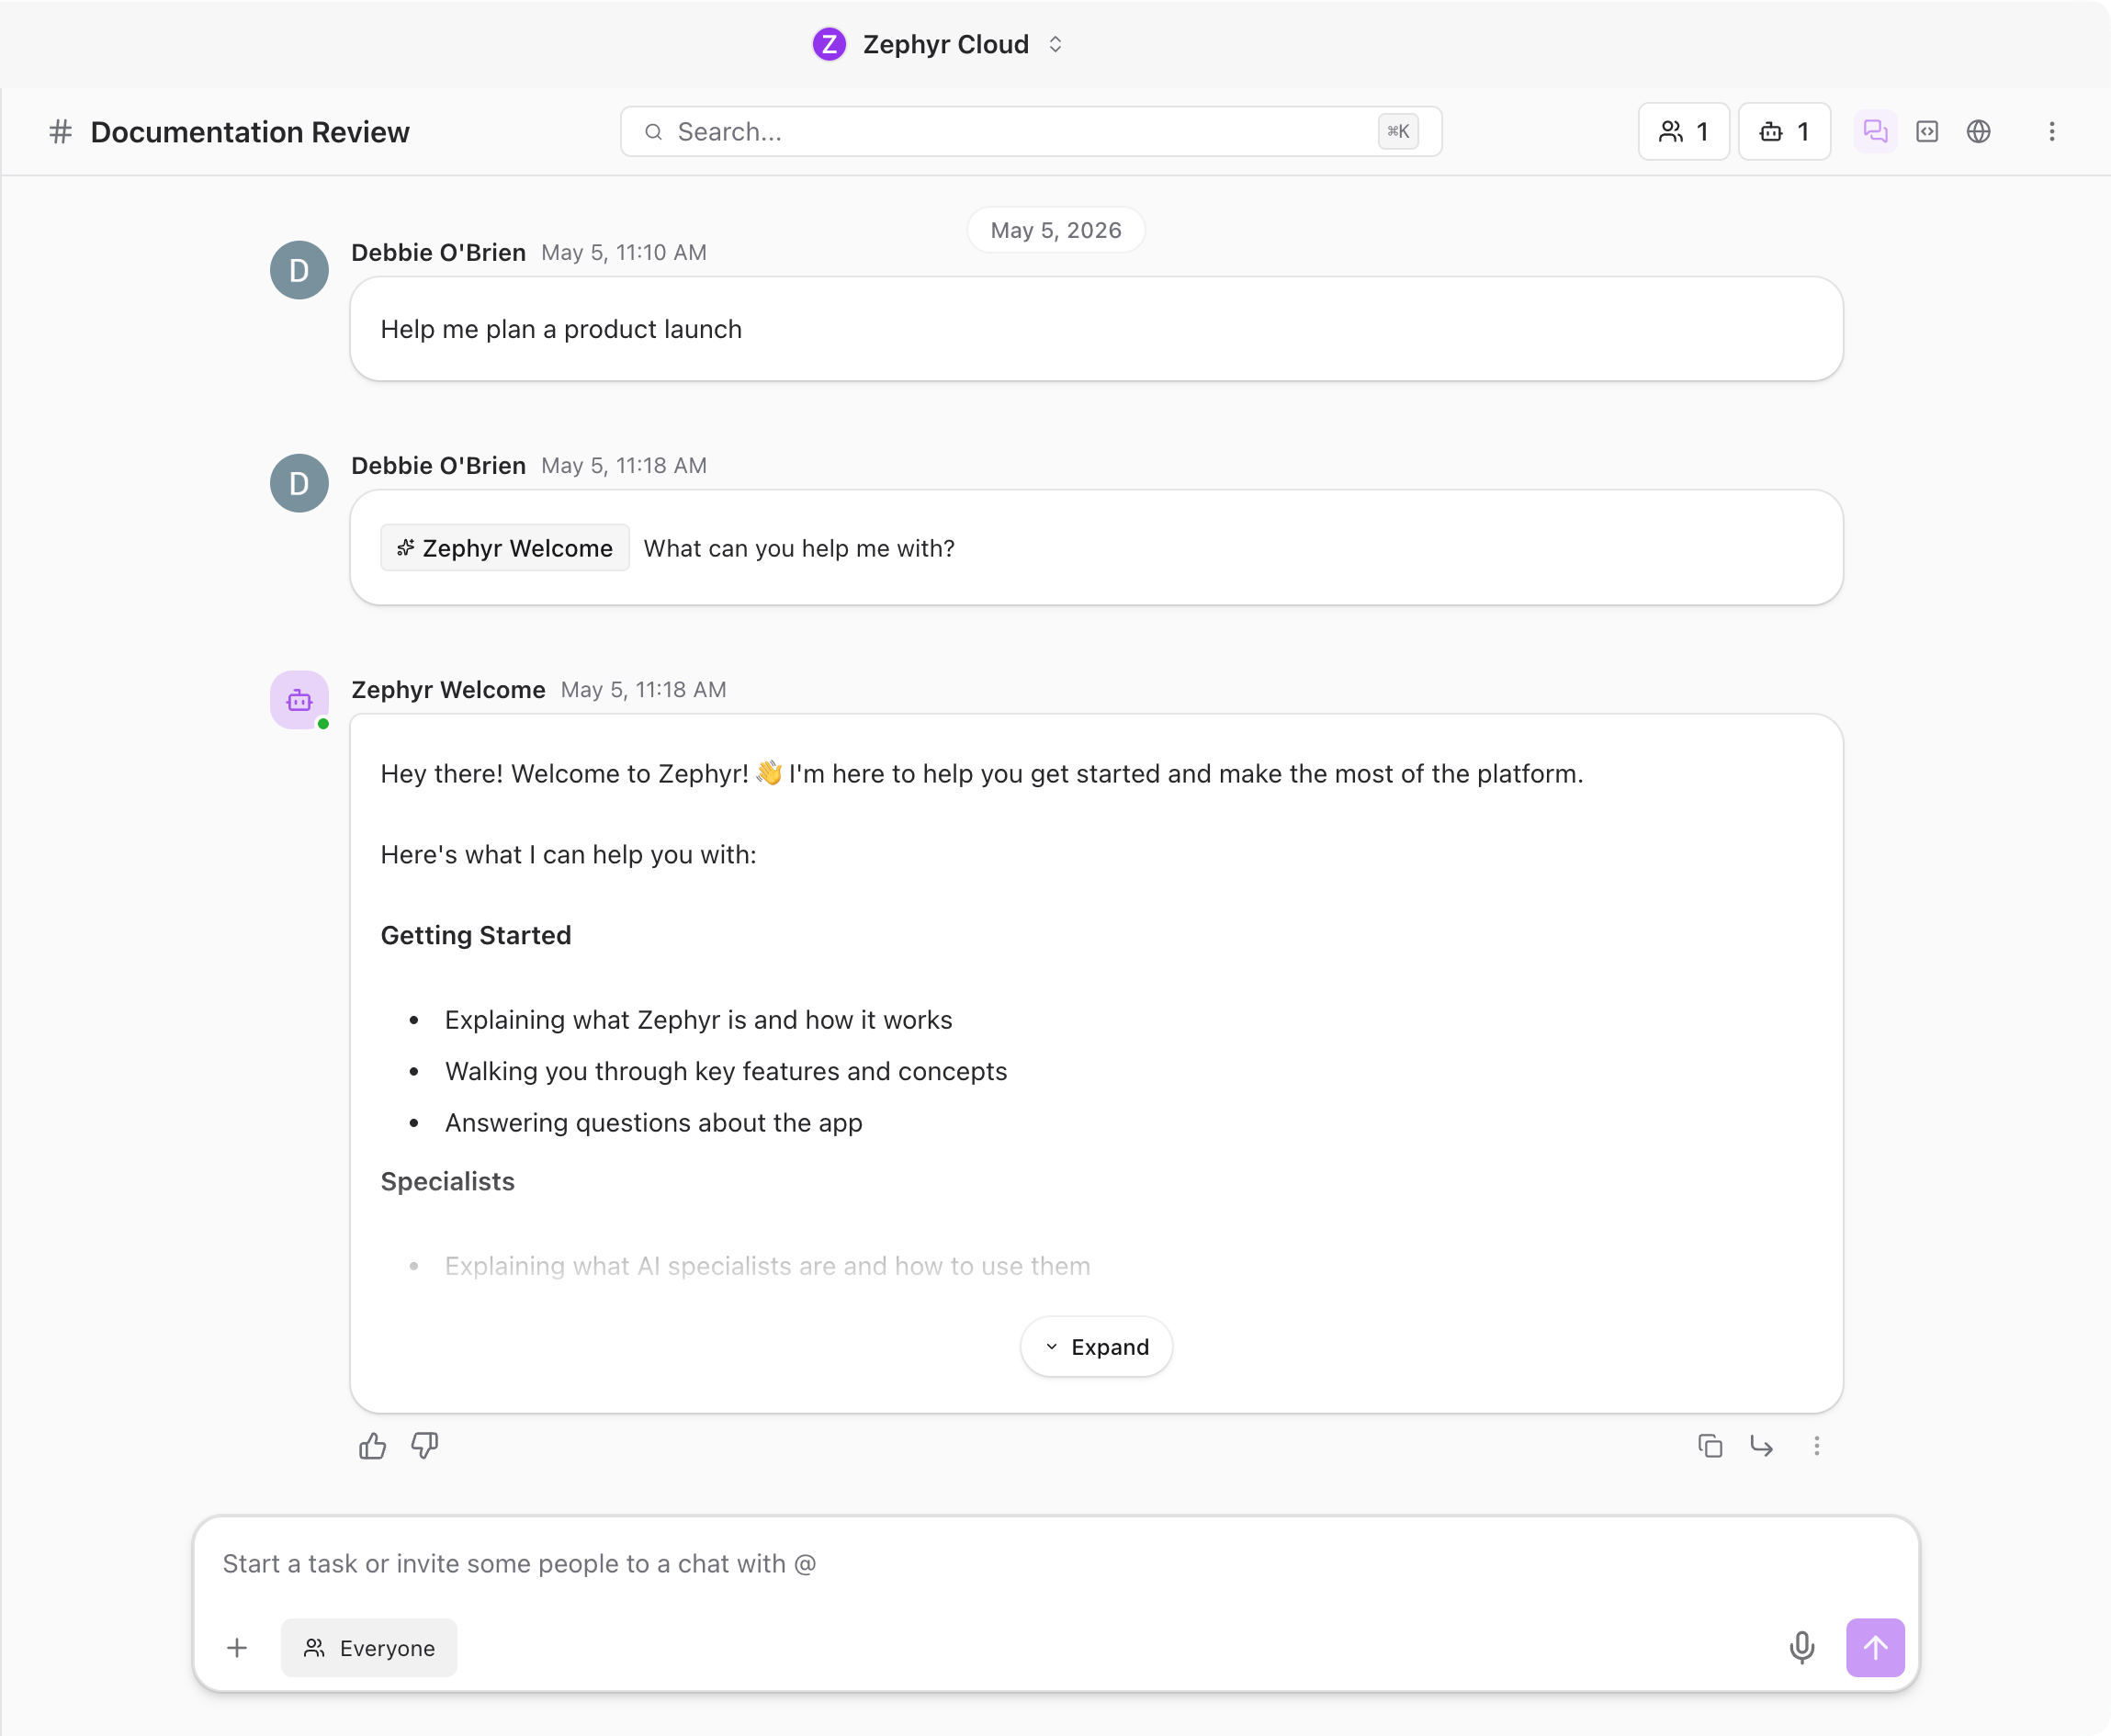
A new channel opens with a *"Start a conversation"* screen.
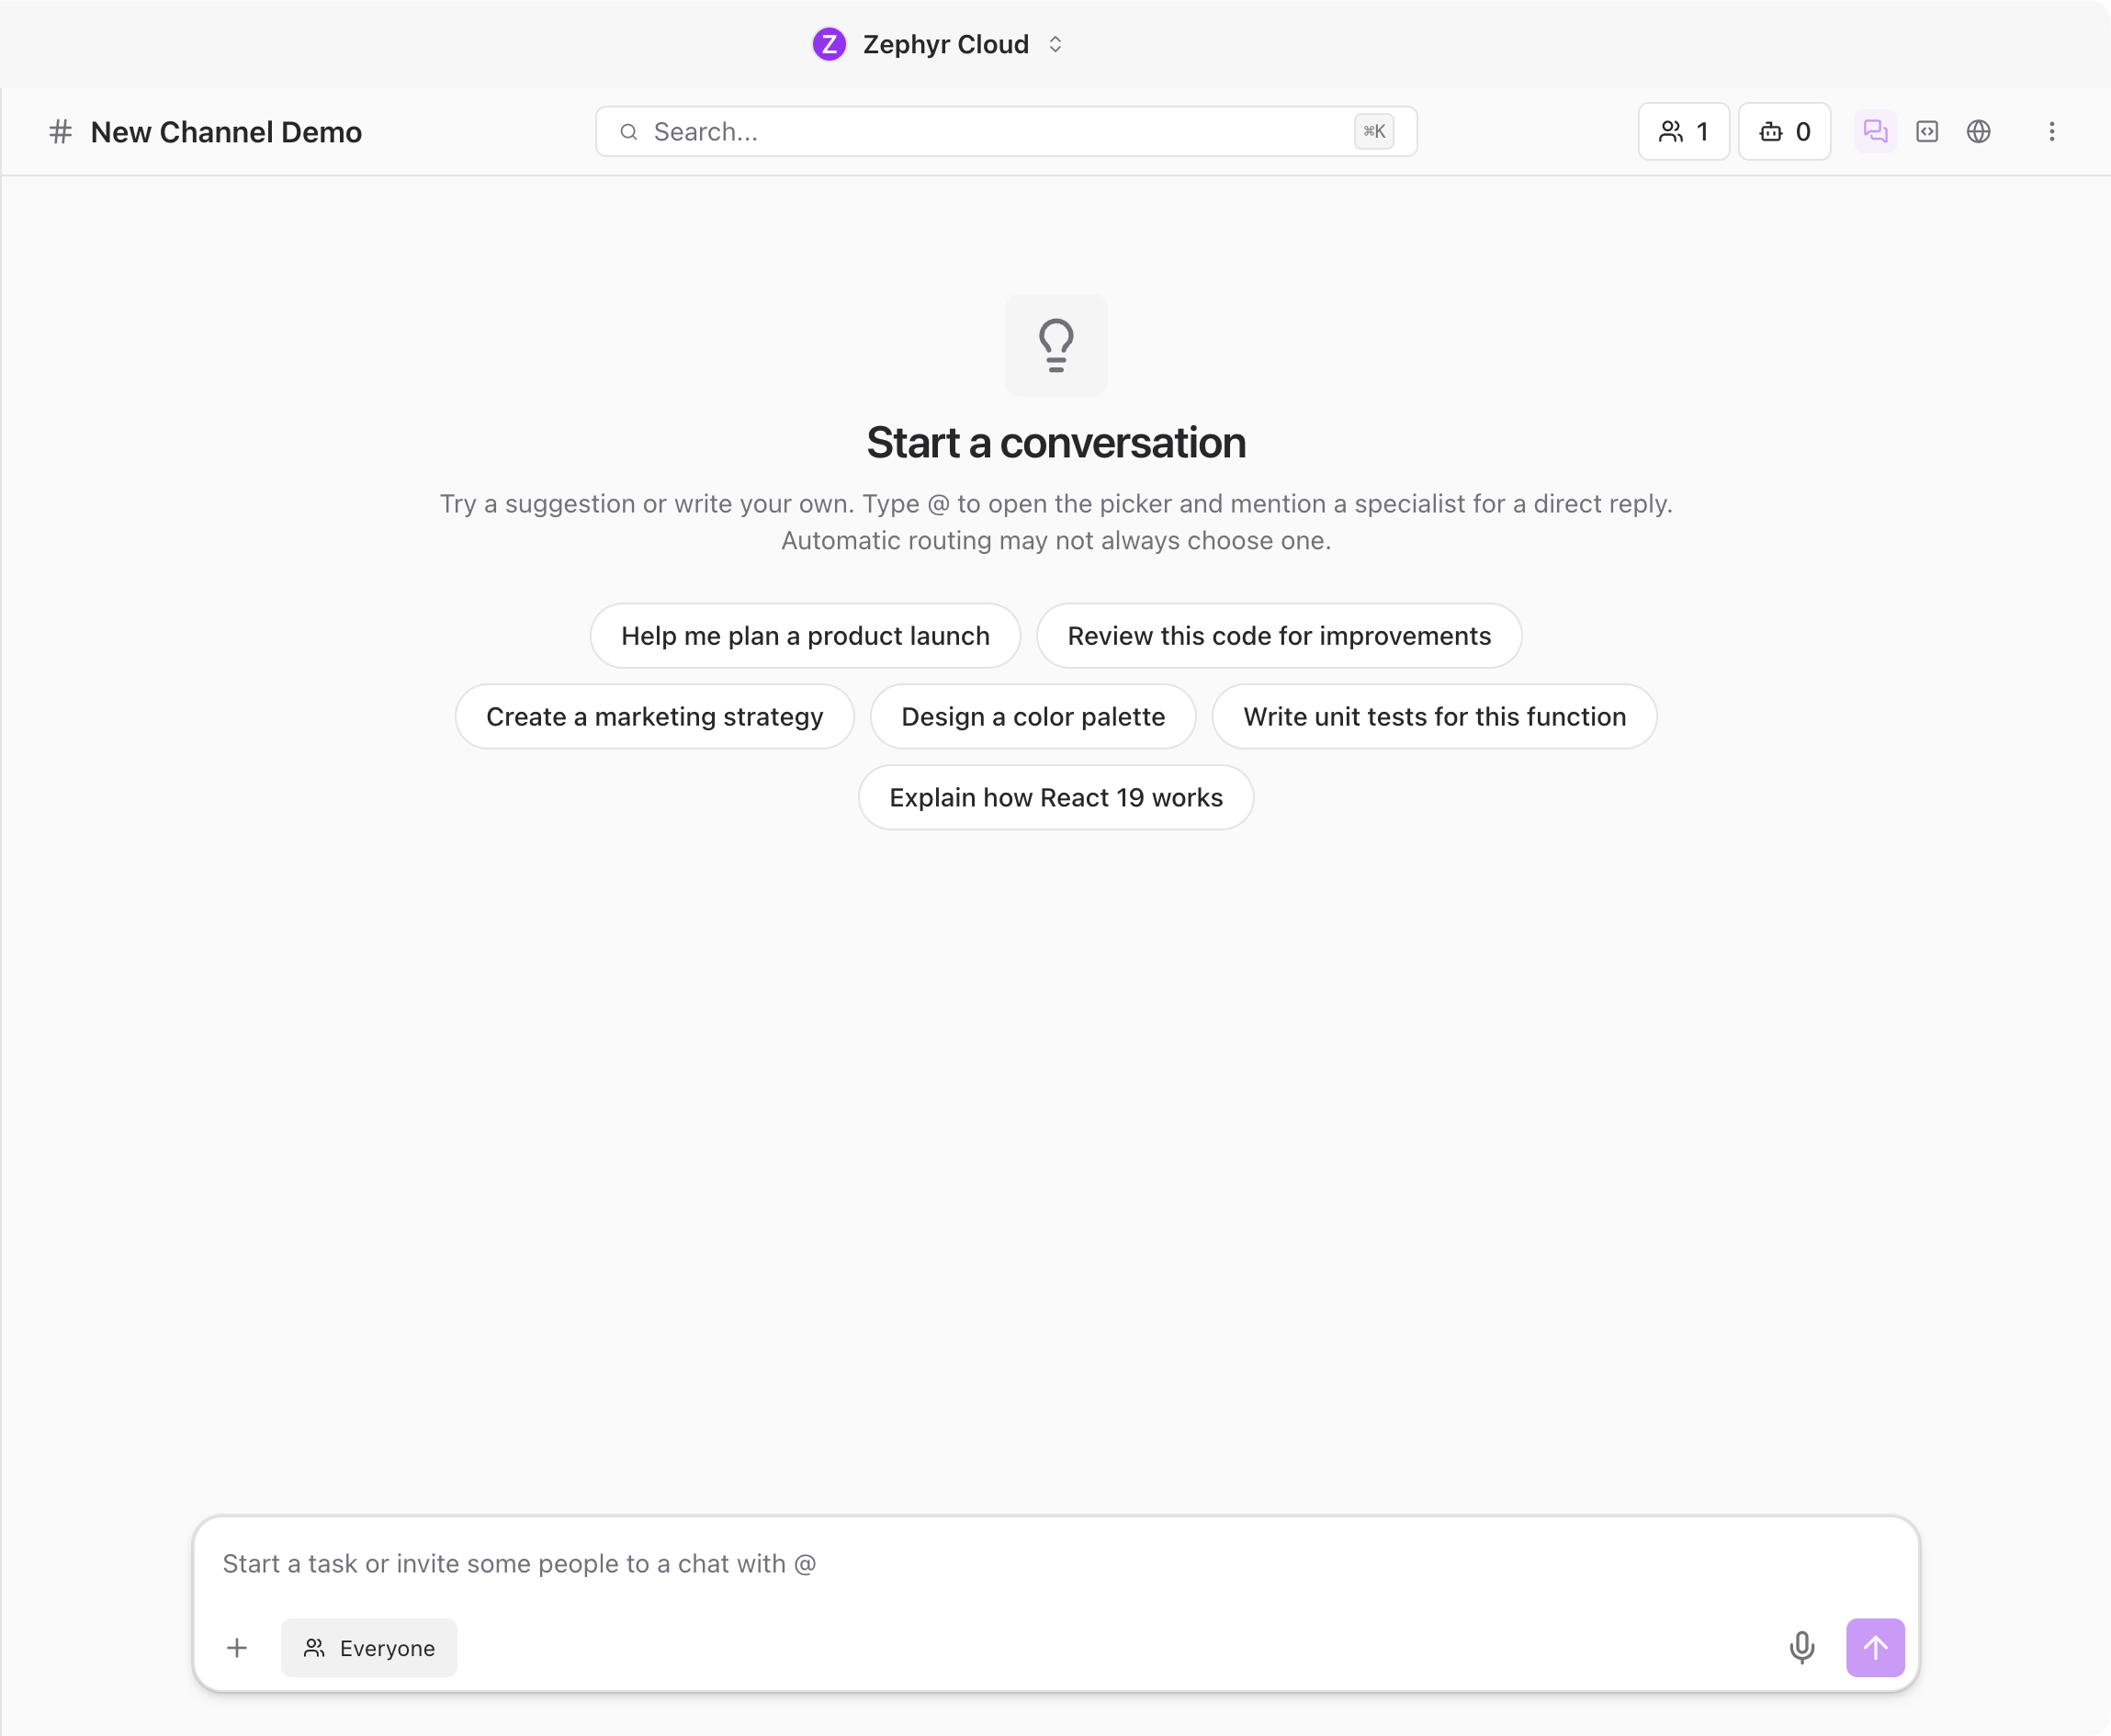
You have a few ways to get going:
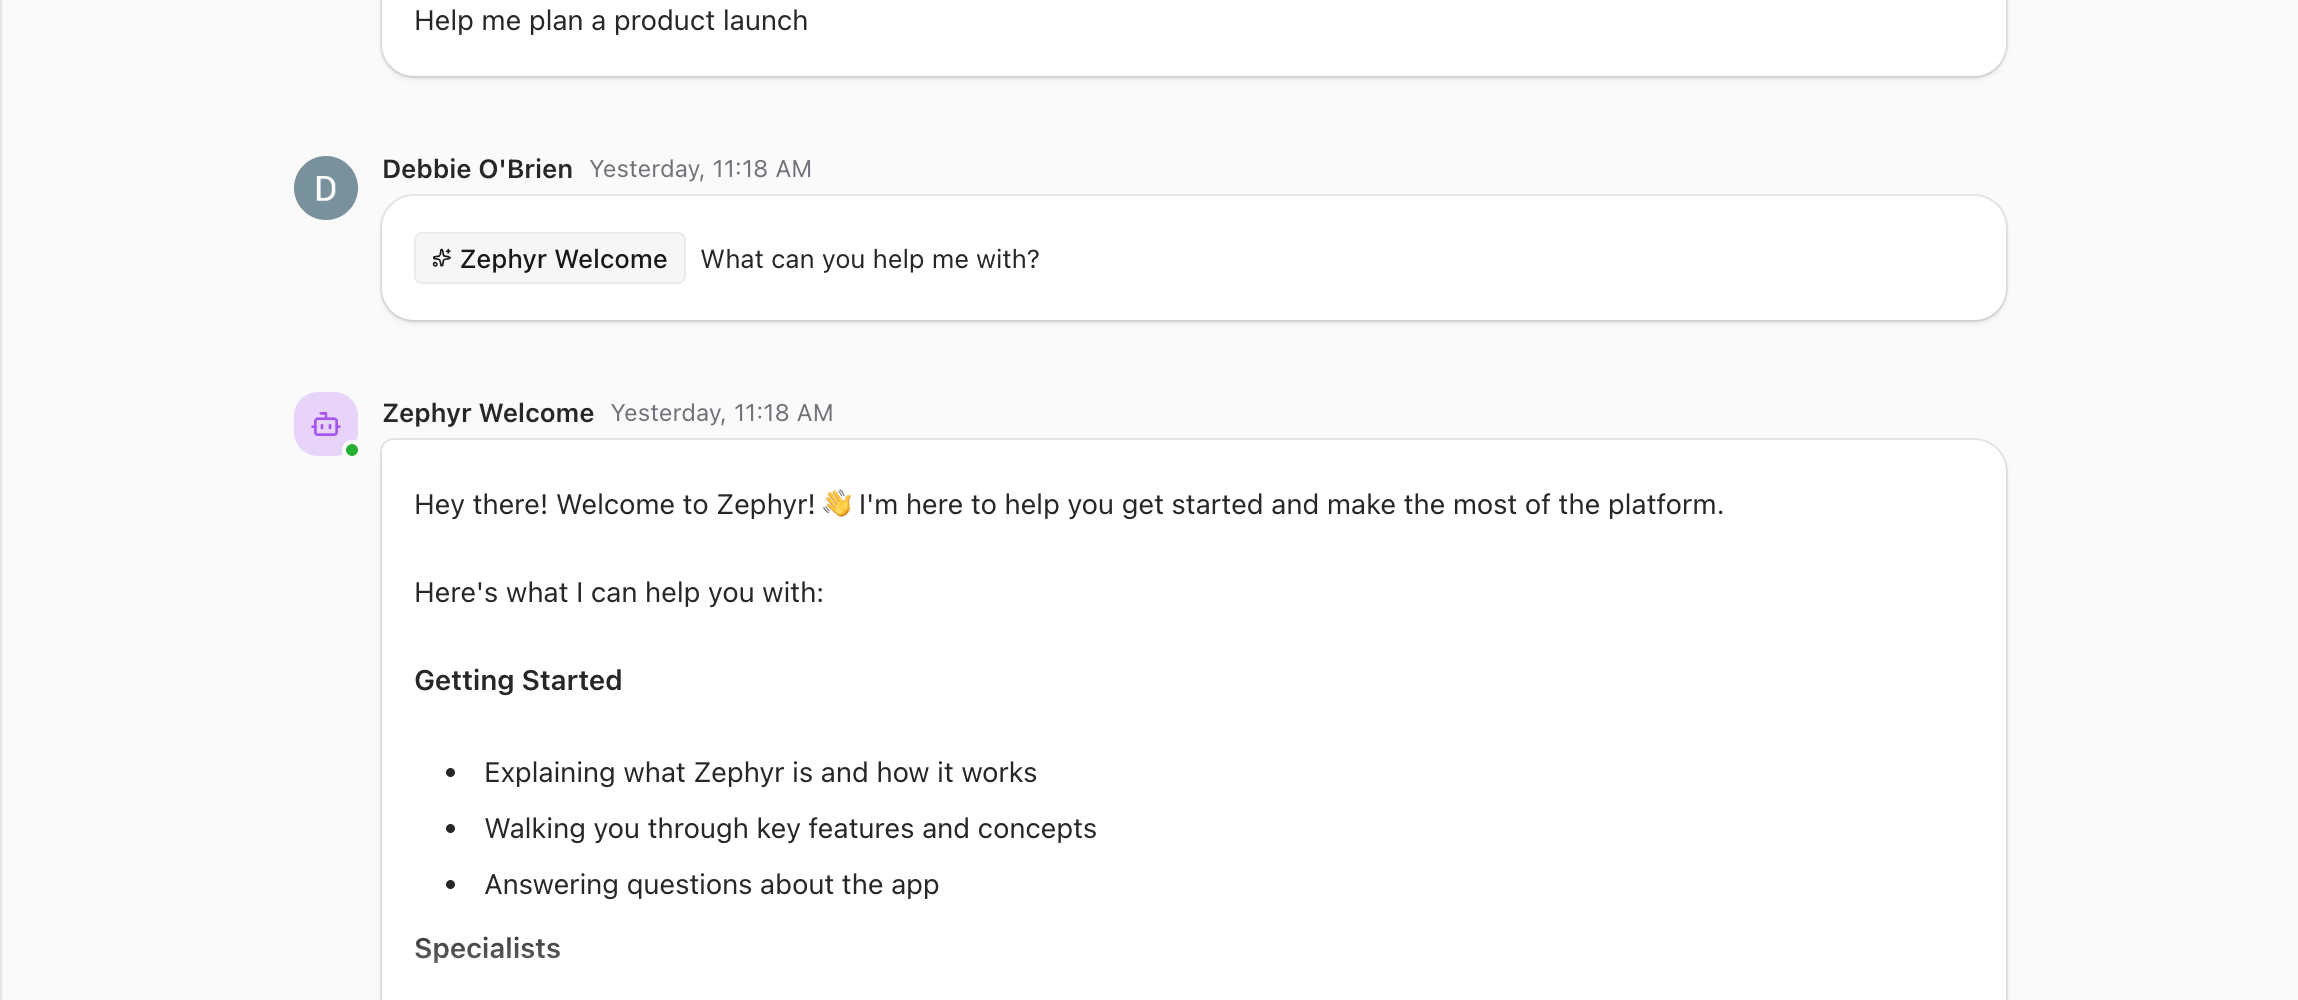
* **Click a suggestion prompt** like *"Help me plan a product launch"* or *"Explain how React 19 works."* Each prompt is linked to a specialist that handles the topic. Clicking one sends the message immediately with that specialist mentioned.
* **Mention a specialist with @** to direct the message at a specific agent.
* **Type a regular message** without mentioning anyone. The platform routes it to the most appropriate specialist based on the content, though automatic routing may not always pick the one you expect.
## Add People and Specialists with @
Type **@** in the message input to open the mention picker. It shows the people in your workspace and lets you find specialists too.
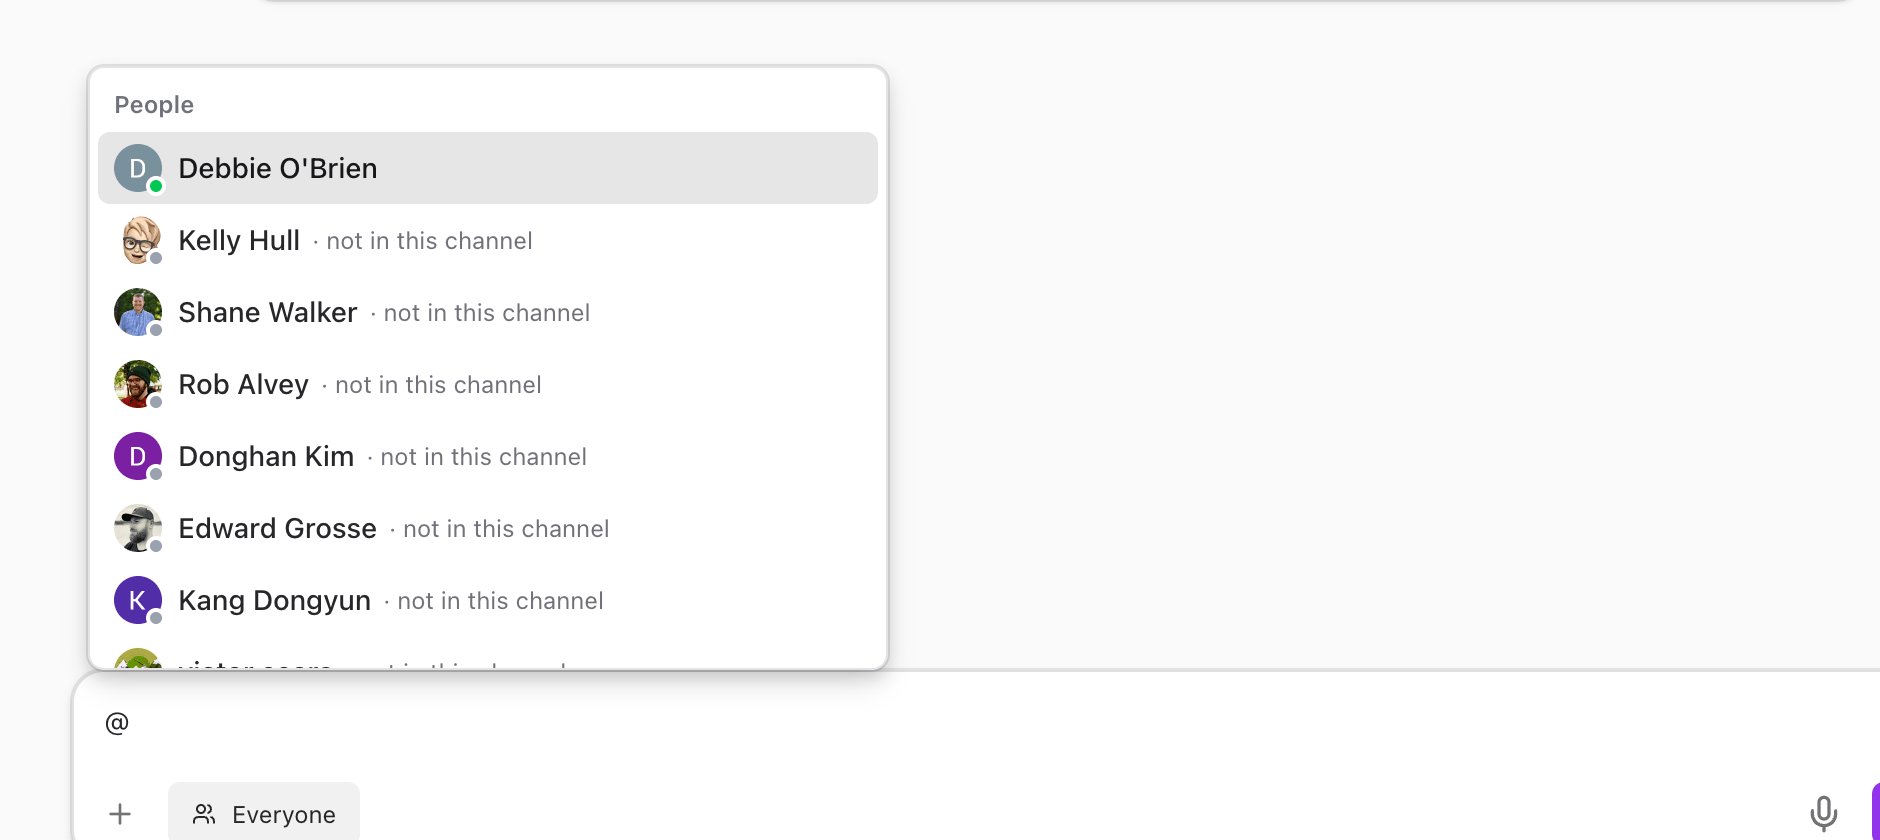
Keep typing to filter. For example, type **welcome** after the **@** to find the Zephyr Welcome specialist. The picker updates as you type and groups matches under **Specialists**, **People**, and **Channels** headings.
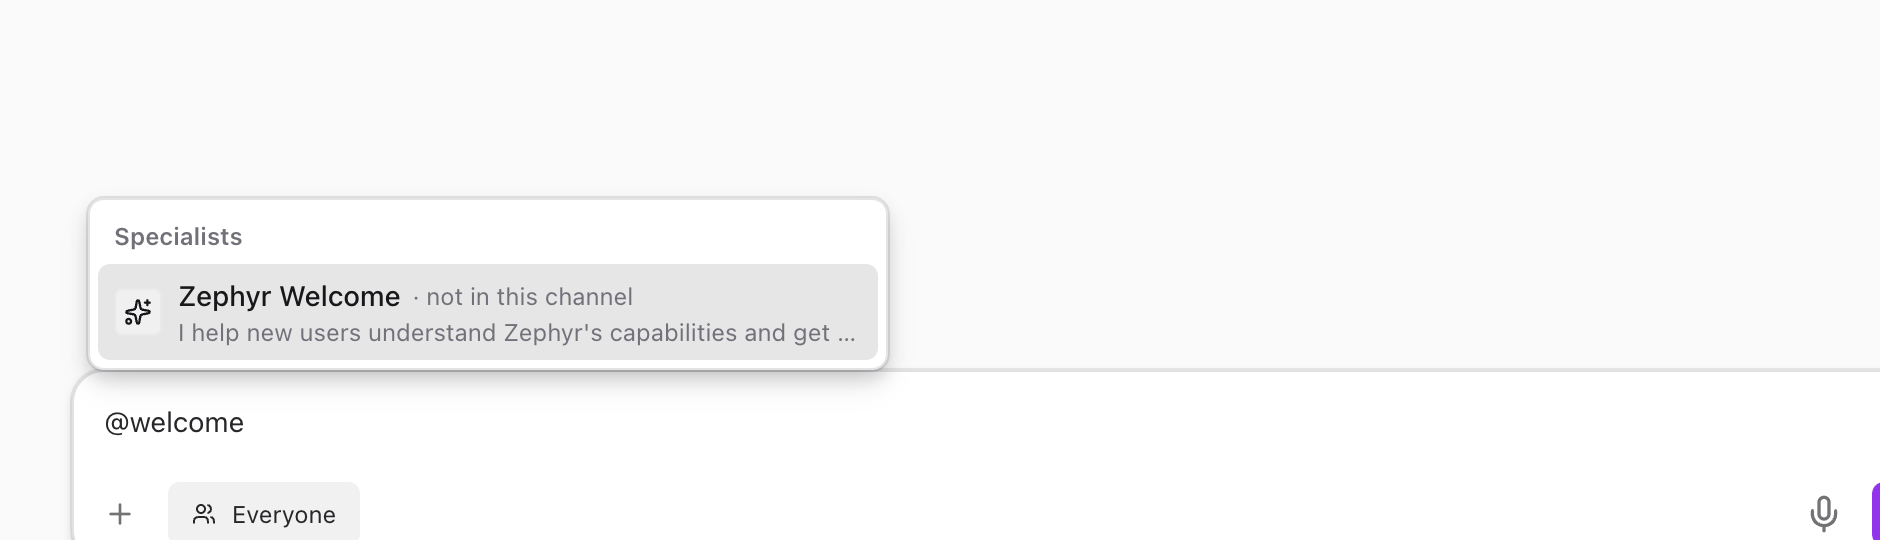
Click a result (or press **Enter**) to select it. The name appears as a mention chip in your message input, ready for you to add your question.
## Send Your First Message
Type your question after the specialist mention. For example:
> @Zephyr Welcome What can you help me with?
Press **Enter** to send.
If this is the first time you have mentioned this specialist in the channel, the app asks whether you want to add it.
Give the channel a name that describes the topic and click **Create Channel**. Public channels are visible to everyone in the workspace. Private channels are invite-only. You can also leave the name empty — the channel defaults to "New Chat" and you can rename it later.
## Start a Conversation
A new channel opens with a *"Start a conversation"* screen.

You have a few ways to get going:
* **Click a suggestion prompt** like *"Help me plan a product launch"* or *"Explain how React 19 works."* Each prompt is linked to a specialist that handles the topic. Clicking one sends the message immediately with that specialist mentioned.
* **Mention a specialist with @** to direct the message at a specific agent.
* **Type a regular message** without mentioning anyone. The platform routes it to the most appropriate specialist based on the content, though automatic routing may not always pick the one you expect.
## Add People and Specialists with @
Type **@** in the message input to open the mention picker. It shows the people in your workspace and lets you find specialists too.

Keep typing to filter. For example, type **welcome** after the **@** to find the Zephyr Welcome specialist. The picker updates as you type and groups matches under **Specialists**, **People**, and **Channels** headings.

Click a result (or press **Enter**) to select it. The name appears as a mention chip in your message input, ready for you to add your question.
## Send Your First Message
Type your question after the specialist mention. For example:
> @Zephyr Welcome What can you help me with?
Press **Enter** to send.
If this is the first time you have mentioned this specialist in the channel, the app asks whether you want to add it.
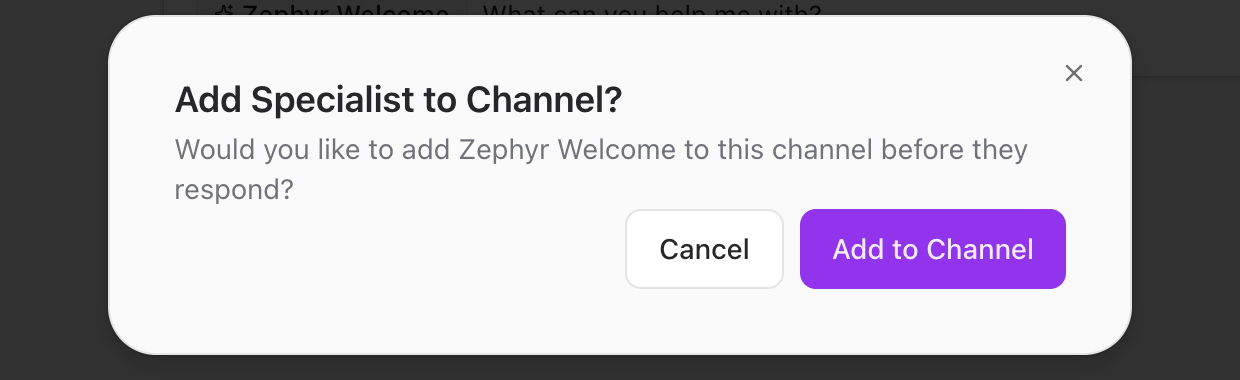 Click **Add to Channel** to confirm. The specialist joins the channel and starts responding. You only see this dialog once per specialist per channel.
## Confirm the Specialist Joined
After you add a specialist, the specialist count in the channel header updates. A small badge appears on the robot icon showing how many specialists are now in the channel.

Click the badge to open the **Members** panel, which lists everyone — people and specialists — currently in the channel. From there you can also remove members or add more.
## Read the Response
The specialist streams its response into the channel in real time, just like a normal chat.

Specialist messages have their own avatar and name so you can tell them apart from messages sent by people. Responses can include rich formatting with headings, bullet points, and code blocks.
If a response is long, it is automatically collapsed with an **Expand** button. When a specialist uses tools — like searching code, reading a file, or looking up a task — you will see a collapsible **tool call** section in the message. Click to expand and see exactly what the specialist did.
## Customize the Response
Hover over a specialist response to reveal a toolbar with two icons and a three-dot menu. These options unlock powerful, easy-to-miss features that are scoped to the single message you are looking at.
The toolbar lets you:
* **Regenerate the response.** Re-run the specialist's answer if you did not like the result. Each regeneration is saved so you can flip between versions.
* **Switch the provider on the fly.** Pick a different model provider for this single response without changing your defaults.
* **Override the model.** Force this specialist to use a different model — handy for one-off tasks that need more reasoning power or speed.
* **See model details and token usage.** Confirm exactly which model produced the response and how many tokens it used.
Other responses in the channel keep their original settings.
## Bring in Teammates
You can invite any person in your workspace into a channel by mentioning them with **@** the same way you mention specialists.

Type **@** followed by part of their name, pick them from the picker, and they get a notification when you send the message. If the person is not yet a channel member, they will be added when you @-mention them.
Multiple people and specialists can work in the same channel. A planning conversation might have a product manager, a designer, and a coding specialist all responding together.
## Talk to People Only
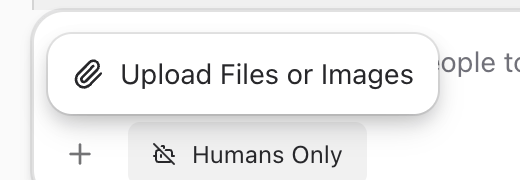
Sometimes you want to chat with your team without specialists chiming in. Click the **Everyone** pill in the composer to switch to **Humans Only** mode.

A banner appears above the input confirming that specialist responses are paused. Messages you send go to people only — specialists ignore them unless you explicitly @-mention one. Click the pill again to switch back to **Everyone**.
This is useful for quick team discussions, decisions that do not need an AI response, or moments when you want to think out loud with your colleagues first.
## Specialists Speak Your Language
Specialists automatically reply in whatever language you write in. Type your question in Spanish, French, Japanese, or any other supported language, and the specialist responds in the same language.
You do not need to configure anything or pick a language. Switch languages mid-conversation if you need to — the specialist keeps up.
## Attach Files
Click the **+** button at the bottom of the composer to attach files or images.
Click **Add to Channel** to confirm. The specialist joins the channel and starts responding. You only see this dialog once per specialist per channel.
## Confirm the Specialist Joined
After you add a specialist, the specialist count in the channel header updates. A small badge appears on the robot icon showing how many specialists are now in the channel.

Click the badge to open the **Members** panel, which lists everyone — people and specialists — currently in the channel. From there you can also remove members or add more.
## Read the Response
The specialist streams its response into the channel in real time, just like a normal chat.

Specialist messages have their own avatar and name so you can tell them apart from messages sent by people. Responses can include rich formatting with headings, bullet points, and code blocks.
If a response is long, it is automatically collapsed with an **Expand** button. When a specialist uses tools — like searching code, reading a file, or looking up a task — you will see a collapsible **tool call** section in the message. Click to expand and see exactly what the specialist did.
## Customize the Response
Hover over a specialist response to reveal a toolbar with two icons and a three-dot menu. These options unlock powerful, easy-to-miss features that are scoped to the single message you are looking at.
The toolbar lets you:
* **Regenerate the response.** Re-run the specialist's answer if you did not like the result. Each regeneration is saved so you can flip between versions.
* **Switch the provider on the fly.** Pick a different model provider for this single response without changing your defaults.
* **Override the model.** Force this specialist to use a different model — handy for one-off tasks that need more reasoning power or speed.
* **See model details and token usage.** Confirm exactly which model produced the response and how many tokens it used.
Other responses in the channel keep their original settings.
## Bring in Teammates
You can invite any person in your workspace into a channel by mentioning them with **@** the same way you mention specialists.

Type **@** followed by part of their name, pick them from the picker, and they get a notification when you send the message. If the person is not yet a channel member, they will be added when you @-mention them.
Multiple people and specialists can work in the same channel. A planning conversation might have a product manager, a designer, and a coding specialist all responding together.
## Talk to People Only
Sometimes you want to chat with your team without specialists chiming in. Click the **Everyone** pill in the composer to switch to **Humans Only** mode.

A banner appears above the input confirming that specialist responses are paused. Messages you send go to people only — specialists ignore them unless you explicitly @-mention one. Click the pill again to switch back to **Everyone**.
This is useful for quick team discussions, decisions that do not need an AI response, or moments when you want to think out loud with your colleagues first.
## Specialists Speak Your Language
Specialists automatically reply in whatever language you write in. Type your question in Spanish, French, Japanese, or any other supported language, and the specialist responds in the same language.
You do not need to configure anything or pick a language. Switch languages mid-conversation if you need to — the specialist keeps up.
## Attach Files
Click the **+** button at the bottom of the composer to attach files or images.
 You can also paste images from your clipboard or drag files directly into the chat. Specialists can read and respond to attached files when they are part of the conversation.
## Message Actions
Hover over any message and a small action bar appears in the top-right corner with quick options like reacting with an emoji and replying in a thread. Click the **three-dot menu** in the action bar to open the full actions menu.
The menu includes:
* **Edit message** to fix typos or update what you wrote.
* **Copy link** to share a direct link to the message with anyone in the workspace.
* **Reply in thread** to start a focused side conversation. See [Threads](/guide/chat/threads.md) for more.
* **Delete message** to remove it from the channel.
* **Translate** to translate a message into another language.
## Open Links Without Leaving the App
When a specialist sends a link, or you click a URL in any message, the app shows a small *"Open external link?"* confirmation dialog before navigating. Confirm and the link opens in the [embedded browser](/guide/chat/embedded-browser.md) panel right next to your chat — no app switching, no losing your place in the conversation.
## What to Explore Next
* [Browse Specialists](/guide/getting-started/browse-specialists.md) to discover more specialists from the marketplace.
* [Threads](/guide/chat/threads.md) for branching off a specialist response into a focused side conversation.
* [Projects](/guide/projects/index.md) to connect a code repository and give specialists your codebase as context.
:::tip
You can have multiple channels open in tabs across your workspace, each with different specialists and topics. Use the sidebar to switch between them.
:::
---
url: /guide/getting-started/browse-specialists.md
---
# Browse Specialists
The Specialists marketplace is where you find pre-built AI agents to add to your workspace. Once added, a specialist becomes available to mention with **@** in any channel.
You do not need to visit the marketplace to start chatting — see [Your First Channel](/guide/getting-started/your-first-channel.md) for the natural flow that adds a specialist on first mention. This page is for when you want to discover and install more specialists in advance.
## Open the Marketplace
Click the **Specialists** icon in the icon rail on the left side of the app.

You will see specialists grouped into sections like **Custom Specialists** and **Added**. Each card shows the specialist's name, publisher, and a short description of what it does.
Use the search bar at the top to filter by name or keyword. Click any card to read its full detail page before deciding to add it.
## Add a Specialist
Pick any specialist that looks useful and click the **Add** button on its card. The button changes to a green **Added** badge and the specialist becomes available to mention in every channel in your workspace.
:::tip
Try **Zephyr Welcome** first. It is built to introduce you to the platform and will walk you through what specialists can do.
:::
You can add as many specialists as you want. Browse by category, search by keyword, or click any card to explore.
## Build Your Own
If you cannot find a specialist that fits your needs, you can build one from scratch. The specialist builder lets you define a persona, attach knowledge sources, wire up tools, and even chat with an AI assistant that helps refine the configuration as you go.
Click the **+** button on the Specialists page to open the builder, or read the [Specialist Builder](/guide/specialists/building-specialists.md) guide for a walkthrough.
## What to Explore Next
* [Your First Channel](/guide/getting-started/your-first-channel.md) to start a conversation
* [Specialists guide](/guide/specialists/index.md) for more on building, configuring, and using specialists
---
url: /guide/chat/index.md
---
# Channels Overview
Channels are where conversations happen. Each channel is a dedicated space for a topic, project, or team — and any number of people and specialists can join in. This page covers the layout you see when you're chatting in a channel.
## Channel List
The sidebar on the left shows your conversations, grouped into three sections.
### Channels
**Channels** are group conversations. Each channel has a name and can be public (visible to everyone in the workspace) or private (invite-only). Click the **+** button next to the heading to create a new channel.
### DMs
**DMs** are direct messages with individual people. Each entry shows the person's name and a presence indicator. A green dot means they are currently online. Click the **+** button next to the heading to start a new direct message.
### Archived
The **Archived** section is collapsed by default. Click it to expand and see channels and DMs that have been archived. From here you can restore an item back to its original section or permanently delete it.
## Message Area
The center column is where conversations happen. When you select a channel or DM from the sidebar, its messages appear here.
Messages stream in as they arrive. You do not need to refresh to see new content. Specialist messages have their own avatar and name so you can tell them apart from messages sent by people. For more on working with messages, see the [Messaging guide](/guide/chat/messaging.md).
When you open a channel that has no messages yet, you will see a *"Start a conversation"* screen with suggestion prompts to help you kick things off. See [Your First Channel](/guide/getting-started/your-first-channel.md) for a walkthrough.
## Channel Header
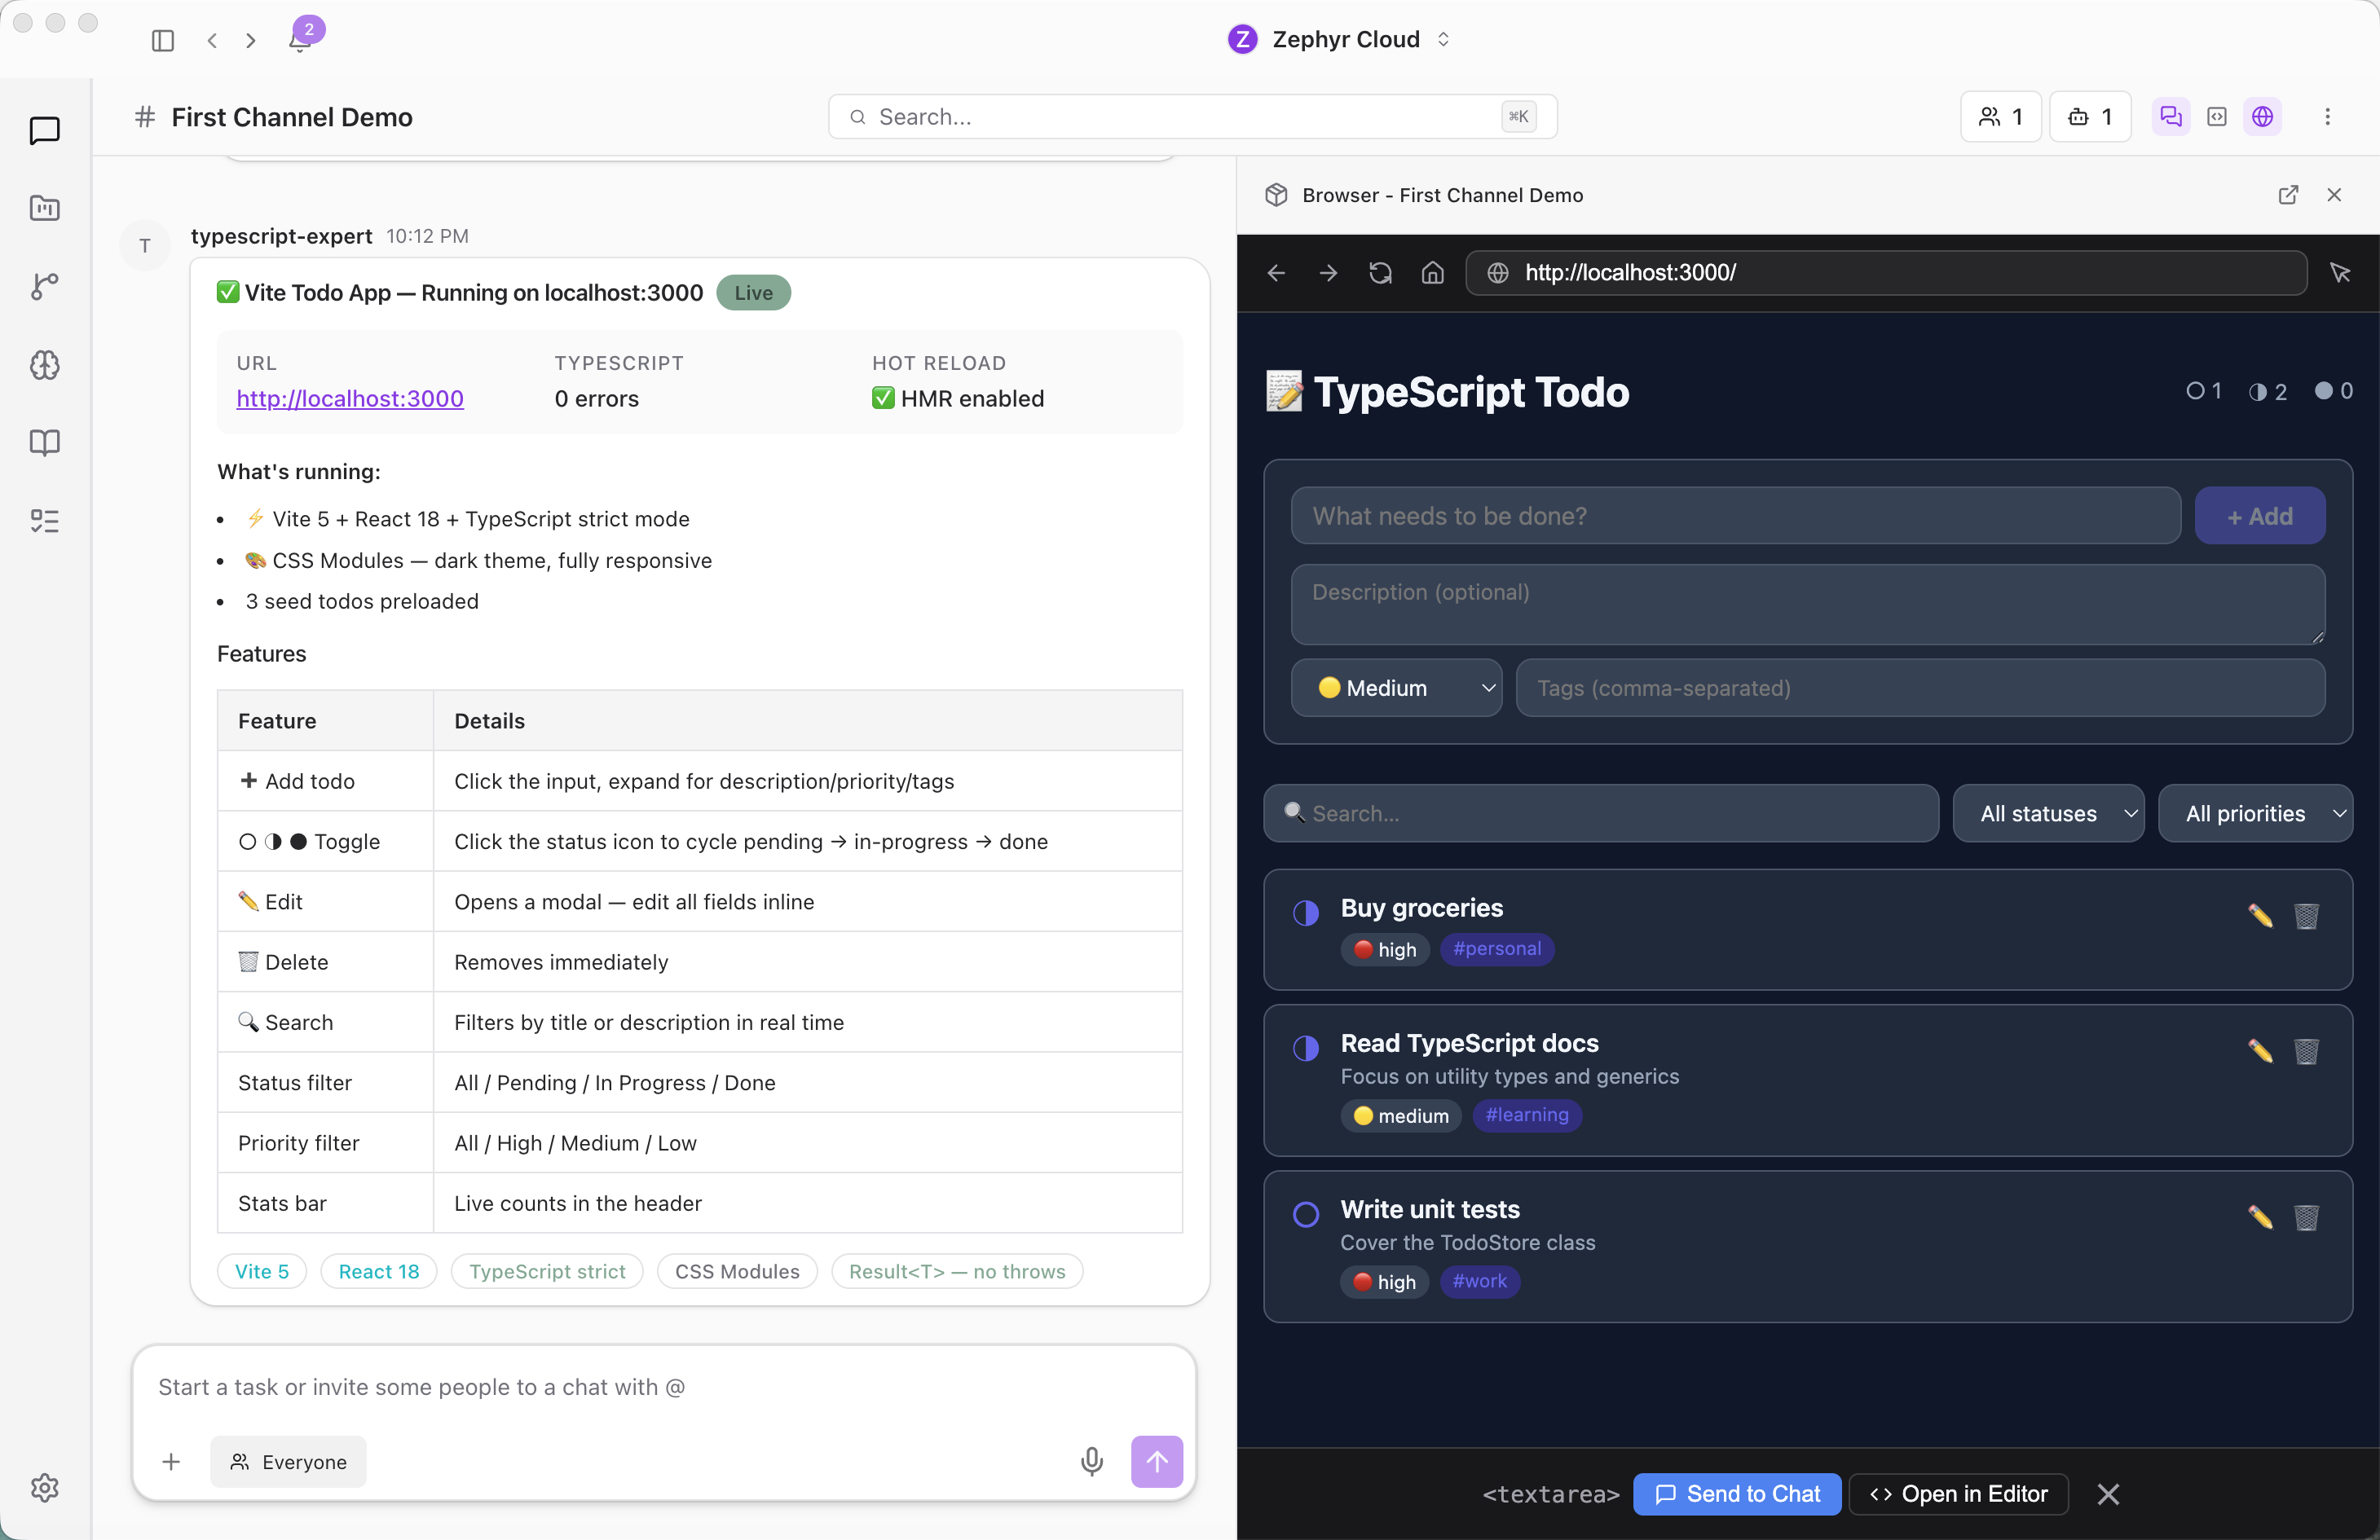
The bar at the top of the message area shows the channel name on the left and a row of icons on the right.
The icons in the header include:
* **People count** showing how many human members are in the channel.
* **Specialist count** with a numbered badge showing how many specialists have been added. Click it to open the channel's [Members](/guide/chat/channel-details.md) panel.
* **Channel details** opens a slide-in panel with channel settings, members, tasks, and history. See [Channel Details](/guide/chat/channel-details.md).
* **Layout toggles** for opening additional side panels:
* **Browser** opens the [embedded browser](/guide/chat/embedded-browser.md) panel alongside the chat. Preview a localhost dev server, click **Select Element** to send any DOM element straight into the chat as context, or open links from messages here without leaving the app.
* **Code** opens the [Code Editor](/guide/chat/code-editor.md) panel alongside the chat. When a project has linked repositories, files the specialist edits appear here in real time, and you can jump straight from any element in the Browser to its source line.
You can have multiple side panels open at the same time. The layout splits the available space between them.
## Side Panels
Click the channel name or the info icon to open the **Channel Details panel** on the right. It slides in alongside the message area with five tabs scoped to the current channel:
* **Members** lists every person and specialist in the channel. Admins can add or remove participants from here.
* **Tasks** shows tasks linked to this channel. You can create tasks, change their status, and assign them to people or specialists without leaving the conversation.
* **Knowledge** shows knowledge plots attached to the channel. Link a [knowledge garden](/guide/knowledge/index.md) plot so specialists have access to reference material when responding.
* **Workflows** shows [workflows](/guide/workflows/index.md) tied to this channel. Attached workflows can be triggered by messages or run on demand.
* **History** logs channel events like member joins, specialist invocations, and configuration changes.
For a deep dive into each tab, see the [Channel Details](/guide/chat/channel-details.md) page.
## Quick Search and Navigation
Click any channel or DM in the sidebar to open it in the message area. Sidebar sections are collapsible, so you can tuck away sections you do not need right now.
For faster navigation, press **`Cmd+K`** on macOS or **`Ctrl+K`** on Windows and Linux to open the command palette. Type a channel name, person, or keyword to jump straight there. The palette also lets you trigger actions like creating a new channel or opening settings without leaving the keyboard.
## Notifications
When a specialist or teammate replies to you, sends a message in a channel you're in, or @-mentions you, a notification appears in the top-right of the app. Click the notification to jump straight to the message.
## What to Explore Next
* [Channel Details](/guide/chat/channel-details.md). Deep dive into the channel settings and side panels.
* [Messaging](/guide/chat/messaging.md). Sending messages, formatting, attachments, and mentions.
* [Threads](/guide/chat/threads.md). Side conversations within a channel.
* [Specialists](/guide/specialists/index.md). Adding AI specialists to your channels.
* [Projects](/guide/projects/index.md). Organizing channels into project folders.
---
url: /guide/chat/messaging.md
---
# Sending Messages
The message input bar at the bottom of every conversation handles text, file attachments, voice notes, and mentions.
## Text Input
The input area is a multi-line text field with placeholder text that reads *"Send a message or invite people to a chat with @ to mention a specialist"*. Just start typing and the field expands as needed.

Drafts are saved automatically for each conversation. If you switch channels and come back, your unsent text is still there. Use the up and down arrow keys to scroll through your recent command history.
## Attachments
Click the **+** button to the left of the input field to open the attachment menu, or drag and drop files directly into the conversation.
Accepted file types include images, PDFs, plain text, and Word documents (`.doc` and `.docx`). You can attach up to 10 files at a time, with a maximum size of 50 MB per file. Thumbnails appear inline before you send so you can confirm the right files are attached.
## Voice Input
Click the microphone button to record a voice note. The app transcribes your speech into text using the language configured in your settings. This is useful for quick messages when typing is not convenient.
## @Mentions
Type `@` in the input field to open the mention picker. From here you can mention:
* **People**. Tag a person in the workspace to get their attention.
* **Specialists**. Mention an AI specialist to have it respond in the conversation. See [Working with Specialists](/guide/specialists/using-specialists.md) for details.
* **Files and folders**. Reference items from the virtual file system so the conversation has context about specific resources.
## Reactions
Hover over any message to see the reaction bar. Six quick reactions are available: thumbs up, heart, fire, clap, laughing face, and surprised face.
Click a reaction to add it. Click the same reaction again to remove it. Reactions are visible to everyone in the conversation and each reaction shows a count of how many people have used it.
## Translation
When a message is written in a language other than your own, a translate button appears. Click it to see the message in your language. Over 15 languages are supported. Translations are cached so repeated requests load instantly. A *"Show Original"* link lets you switch back to the original text.
## Read Receipts
Every message shows delivery status in the lower right corner. The four states are:
1. **Sending**. The message is on its way to the server.
2. **Sent**. The server received it.
3. **Delivered**. The recipient's device received it.
4. **Read**. The recipient opened the conversation and saw the message.
When multiple people have read a message, up to three reader avatars appear. If more than three people have read it, a count badge shows the overflow.
## Message Actions
Hover over a message to see the action toolbar. Available actions include:
* **Copy**. Copy the message text to your clipboard.
* **Reply**. Start a [thread](/guide/chat/threads.md) in response to the message.
* **Delete**. Remove the message. You can only delete messages you sent yourself.
## AI Feedback
When a specialist sends a response, thumbs up and thumbs down buttons appear on the message. Use these to give feedback on the quality of the response.
## Composer Mode
The input bar has an audience selector that controls whether your message triggers a specialist response.
* **Everyone** (default). Your message goes to the channel and specialists respond if mentioned or matched by keyword.
* **Humans Only**. Your message reaches human participants only. Specialists do not respond unless you explicitly mention one with **@**. A ribbon appears above the input to remind you that you are in human-only mode.
Toggle between modes by clicking the audience pill next to the input, or press `Cmd+.` (macOS) or `Ctrl+.` (Windows/Linux) while focused in the text field.
## What to Explore Next
* [Threads](/guide/chat/threads.md). Learn how to use side conversations for focused discussions.
* [Working with Specialists](/guide/specialists/using-specialists.md). Understand how specialist responses appear and how to interact with them.
---
url: /guide/chat/threads.md
---
# Thread Conversations
Threads let you branch off from a message in the main chat for a focused side conversation. They keep the main channel clean while letting you dig deeper into a specific topic. Any message in a channel can become the starting point for a thread.
## Start a Thread
Hover over any message in the main chat. A small action bar appears in the top-right of the message with quick options. Click the **Reply in thread** icon (a curved arrow) to open the thread panel on the right side of the screen, with the parent message preview at the top.
You do not need to create a thread explicitly. The first reply you send creates the thread automatically. Type your reply in the input field at the bottom and press Enter or click the send button.
## Reply to a Thread
The reply input supports the same features as the main message input: text, @-mentions, file attachments, and drag and drop. Replies appear in the thread panel and stay out of the main channel.
## Choose Who Sees Your Reply
Threads have the same audience toggle as the main composer. Click the **Everyone** pill below the reply input to switch to **Humans Only** mode for that thread.
In **Everyone** mode, both people and specialists can see and respond to your replies. In **Humans Only** mode, specialists are paused — handy for a quick side conversation with teammates without an AI chiming in.
The toggle is per-thread, so you can run quiet threads alongside specialist-led ones in the same channel.
## See Replies Back in the Channel
Once a thread has at least one reply, an indicator appears under the original message in the main chat showing how many replies the thread has and who has participated. Click the indicator to open the thread panel and see all replies.
The indicator shows:
* **Participant avatars.** Up to three stacked profile pictures of people who have replied.
* **Reply count.** The total number of replies, like *"2 replies"*.
* **Last reply time.** When the most recent reply was posted.
* **Status dot.** A colored dot showing the execution state of any specialist activity in the thread. Green means done, yellow means in progress, red means an error, gray means idle.
* **Unread badge.** A count of new replies you have not read yet.
## Resize the Thread Panel
The thread panel opens as a resizable side panel alongside the main chat. Drag the divider between the main chat and the thread panel to adjust the width of each side. Each side has a minimum width of about a quarter of the screen.
## Specialist Reasoning and Tool Calls
When a specialist replies in a thread, you may see two extra sections inside its message:
* **Reasoning.** A collapsible block showing the specialist's chain of thought. Click to expand and read how the specialist worked through the problem.
* **Tool calls.** A collapsible block listing every tool the specialist used while preparing the response — searching code, reading files, running commands, looking up tasks. Each tool call shows its inputs and outputs so you can verify the work.
These sections appear automatically when a specialist's response involves reasoning or tool use. They are collapsed by default to keep the reply readable.
## Empty Threads
When you open a thread that has no replies yet, you will see an empty state with a message icon and the text *"No replies yet. Be the first to reply to this message."* along with the reply input field at the bottom.
## Read-Only Threads
If you are not a member of the channel, you can still view threads but cannot reply. The input area is replaced with a notice that reads *"Read-only thread. Join this channel to reply."*
## What to Explore Next
* [Channels Overview](/guide/chat/index.md). Return to the main chat layout guide.
* [Messaging](/guide/chat/messaging.md). Learn about all the features available when sending messages.
* [Working with Specialists](/guide/specialists/using-specialists.md). See how specialists respond in threads.
---
url: /guide/chat/channel-details.md
---
# Channel Details
Every channel has a slide-out panel with all the settings, members, and resources tied to that channel. Open it by clicking the channel name in the header, or by clicking the people-count icon to jump straight to the Members tab.
The panel splits into five tabs along the top: **Members**, **Tasks**, **Knowledge**, **Workflows**, and **History**.
## Members
The Members tab lists every person and specialist in the channel.
For each person you see their name, avatar, role, and online status. For each specialist you see its avatar, name, and a short description.
If you have admin permissions, you can add or remove members from this tab. Click the **+ Add member** button to bring up the workspace member picker. Type a name to filter the list and click to add.
## Specialists
The same panel includes a Specialists section under Members. Click **+ Add specialist** to open the specialist picker and add an agent to the channel. Once added, the specialist will respond to @-mentions and any messages routed to it.
You can also remove a specialist from a channel without deleting it from your workspace. Hover the specialist row and click the remove icon.
## Tasks
The Tasks tab shows every task linked to this channel. You can:
* **Create a task** with the **+ New task** button.
* **Change task status** between Backlog, To Do, In Progress, Blocked, and Done.
* **Assign tasks** to people or specialists.
* **Open a task** to see acceptance criteria, comments, and history.
For more detail see [Tasks](/guide/tasks/index.md).
## Knowledge
The Knowledge tab lists knowledge plots attached to the channel. Linking a plot gives every specialist in the channel access to that reference material when they respond.
Click **+ Link plot** to open the plot picker and attach an existing plot. To learn how to create plots, see [Knowledge Sources](/guide/projects/knowledge.md).
## Workflows
The Workflows tab lists workflows tied to the channel. Attached workflows can be triggered automatically by messages or run on demand.
Click **+ Add workflow** to attach an existing workflow. For workflow basics see [Workflows](/guide/workflows/index.md).
## History
The History tab is a chronological log of channel events:
* Member joined or left.
* Specialist added or removed.
* Channel renamed or settings changed.
* Knowledge plot or workflow attached.
History entries are read-only. They are useful for understanding how a channel evolved over time, especially when working with teammates who joined the channel after it was set up.
## What to Explore Next
* [Channels Overview](/guide/chat/index.md). The main chat layout guide.
* [Messaging](/guide/chat/messaging.md). Sending messages, formatting, and mentions.
* [Threads](/guide/chat/threads.md). Side conversations within a channel.
---
url: /guide/chat/embedded-browser.md
---
# Embedded Browser
The embedded browser is a full Chromium browser that runs inside the app, right next to your chat. It lets you preview live web pages, share what you're seeing with a [specialist](/guide/specialists/index.md), and jump straight from a UI element on the page to the source file that produced it. It pairs with the [Code Editor](/guide/chat/code-editor.md) panel to make the build-test-fix loop happen without ever leaving the conversation.
## When to Use It
* Browse a localhost preview of an app a specialist is helping you build, then hand it elements to fix or improve.
* Open a documentation page, blog post, or design reference alongside the chat without leaving the app.
* Use [Browser Extensions](/guide/settings/browser-extensions.md) like password managers or accessibility tools inside the app's browser.
* Send the URL or selected element straight into the chat as context the specialist can reason about.
## Open the Browser

Every channel has a row of panel toggle buttons in the workspace heading at the top of the chat. Click the **Browser** (globe icon) to open it as a panel next to the chat. Click again to hide it.
You can also open the Browser by clicking a link inside any chat message. After confirming the [link-safety modal](#link-safety), the Browser panel opens and navigates to the URL automatically.
## The Browser Toolbar
Across the top of the panel you'll find:
* **Back, Forward, Reload, Home.** Standard browser navigation. Home resets to the default landing page (Google by default).
* **URL bar.** Type a URL or search query and press Enter. The placeholder reads *"Enter URL or search…"*.
* **Select Element** *(pointer icon, right side)*. Activates element-picking mode. See below.
You can see the full toolbar in context above and in the [build-test-fix loop screenshot](#the-build-test-fix-loop) below.
## Select Element
This is what makes the embedded browser more than just a browser. Click the **Select Element** button, then click any element on the page. An action bar appears with three buttons:
* **Send to Chat.** Pastes the element's HTML snippet straight into the active chat input. You can then add your own question and send.
* **Open in Editor.** Jumps to the source file that produced this element and opens it in the [Code Editor](/guide/chat/code-editor.md) panel at the right line. Requires a source map — usually available for development builds. The button is disabled when no source map is found.
* **Dismiss.** Cancels the selection and hides the action bar.
### Send to Chat in Action
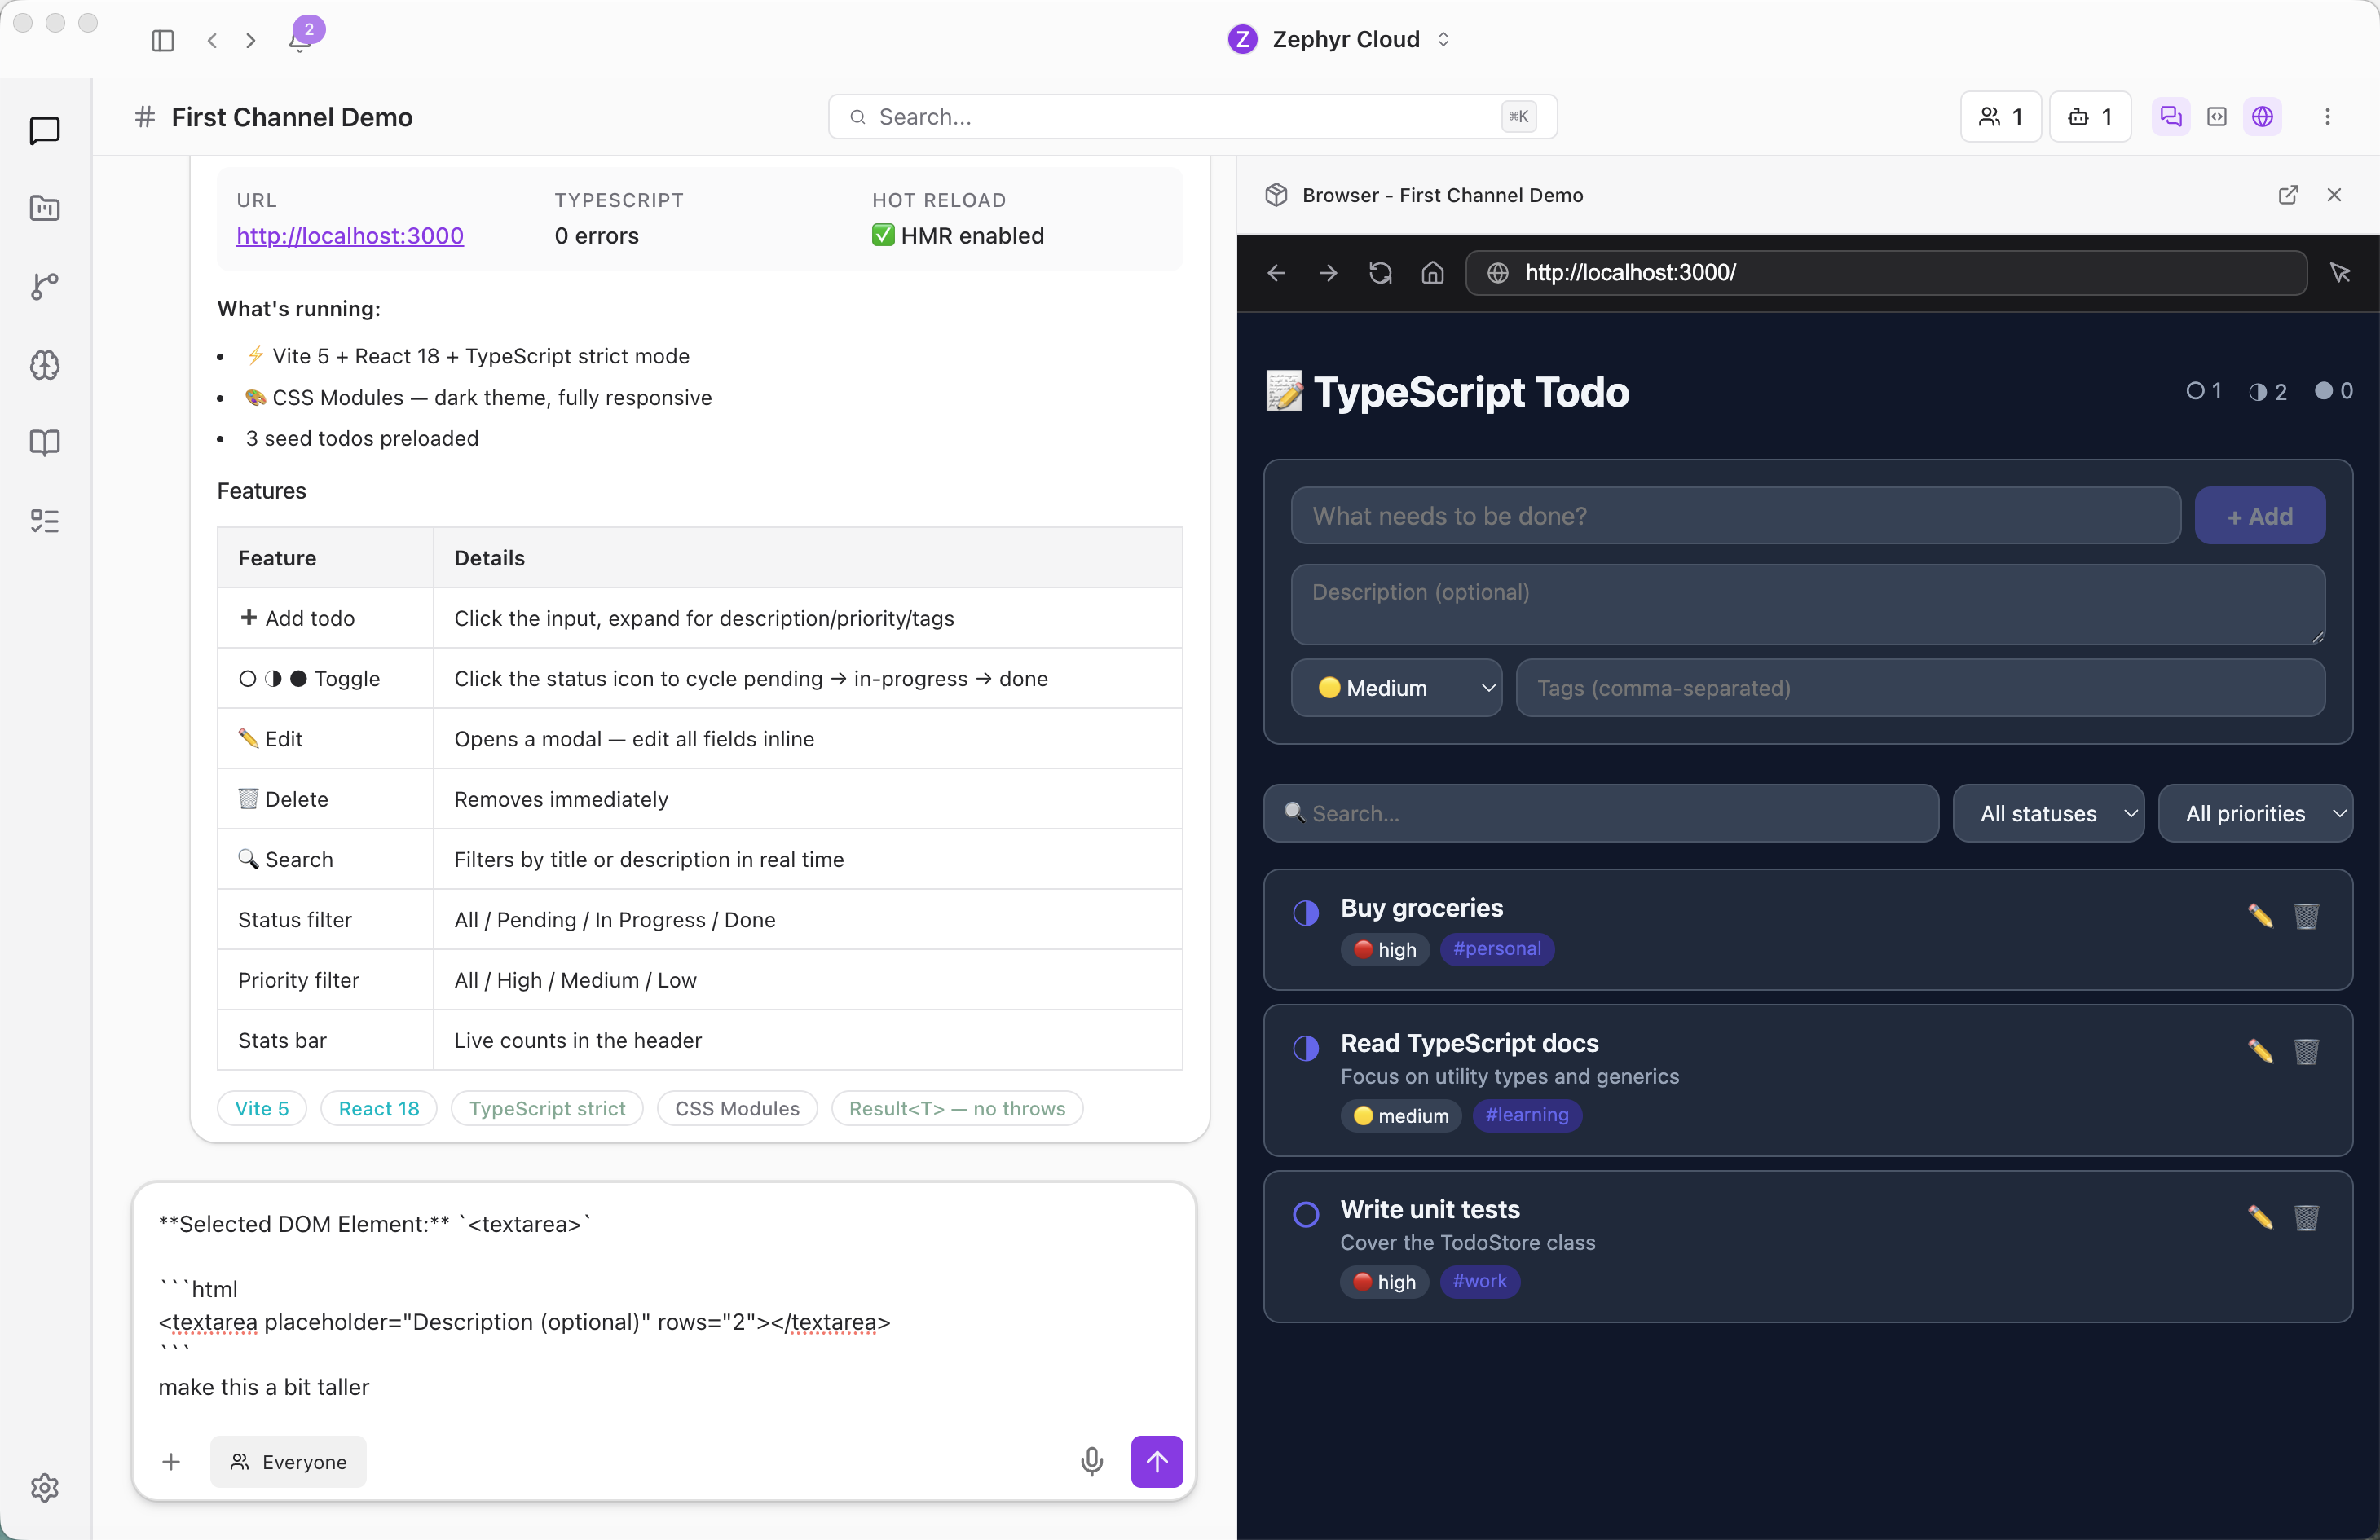
After you click **Send to Chat**, the element's HTML snippet appears as the first line of your chat input. Type your follow-up directly underneath — *"make this a bit taller"*, *"why is this off-center?"*, *"add a label"* — and send. The specialist sees the exact DOM node alongside your request and knows precisely which element you're talking about, without you having to describe it.
You can also keep selecting more elements: each click on **Send to Chat** appends a new HTML snippet to the input, so you can stack multiple elements in a single message and ask the specialist to handle them together.
## The Build-Test-Fix Loop
The browser, the [Code Editor](/guide/chat/code-editor.md), and the chat are designed to work together. A typical session looks like this:
1. Ask a specialist to build a feature in a [project](/guide/projects/index.md) chat.
2. The specialist edits files. You see them appear in the **Code** panel.
3. Your dev server (or the specialist's `npm run dev`) serves the app on localhost.
4. Open the **Browser** panel to that localhost URL. The page renders alongside the chat.
5. Spot something that's not right. Click **Select Element**, click the offending element, click **Send to Chat**.
6. Ask the specialist to fix it. The specialist edits the source file, the dev server reloads, the browser reloads, you check again.
7. Repeat until done — without ever switching apps, copying URLs, or pasting screenshots.
## Link Safety
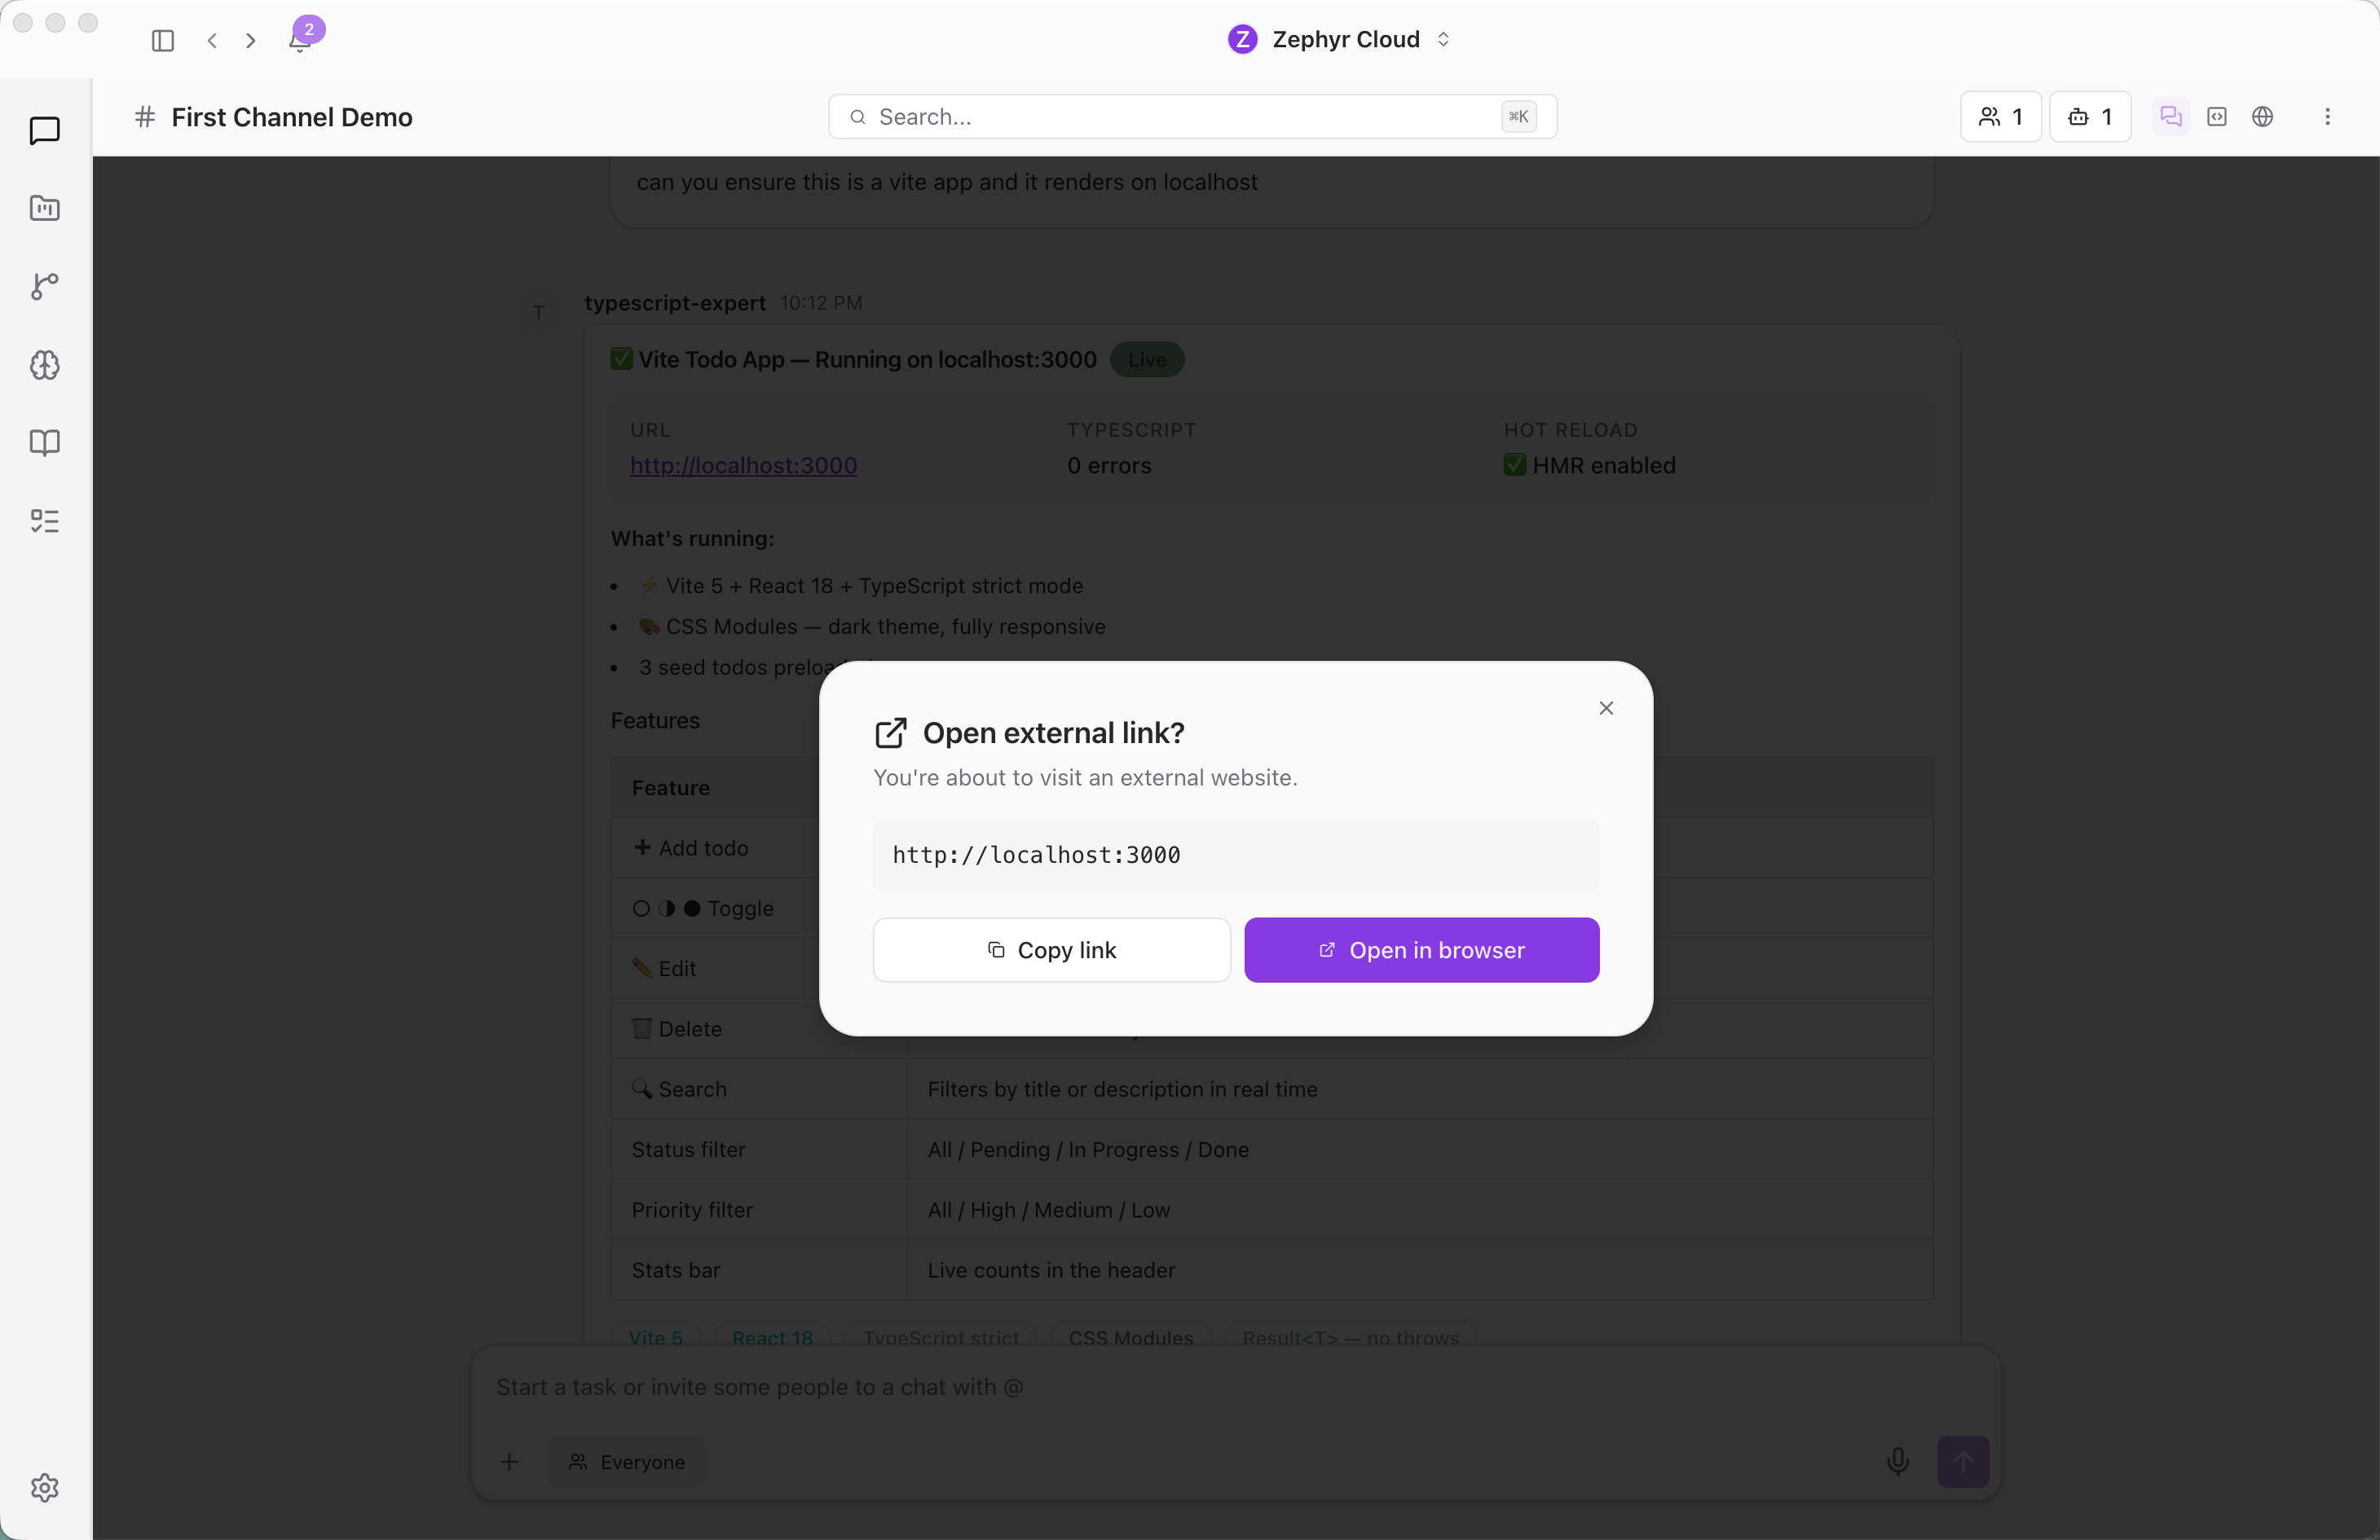
When you click an http or https link inside any chat message, the app shows an *"Open external link?"* confirmation modal before navigating. The modal displays the full URL with these actions:
* **Open in browser** sends the URL to the embedded browser panel and switches focus to it.
* **Copy link** copies the URL to your clipboard so you can paste it elsewhere.
* Click outside the modal or press Escape to cancel.
This stops links from auto-opening browser windows in your face and gives you a chance to read the URL before navigating. Links that aren't http or https (like `javascript:` or `file:` URLs) render as plain text and can't be clicked.
## Standalone Mode
The browser panel is embedded next to the chat by default. On larger displays you can detach it into its own window if you want more horizontal space for the page and the chat side-by-side. The mode is sticky — if you close and reopen the panel, it remembers whether you wanted embedded or standalone last time.
## Browser Extensions
You can install Chrome extensions that run inside the embedded browser — useful for password managers, accessibility tools, ad blockers, or any other extension your workflow depends on. See the [Browser Extensions](/guide/settings/browser-extensions.md) settings page for how to install and manage them.
## Related
* [Code Editor](/guide/chat/code-editor.md) — the editor panel that pairs with the browser for the Open-in-Editor handoff.
* [Browser Extensions](/guide/settings/browser-extensions.md) — install Chrome extensions inside the embedded browser.
* [Specialists](/guide/specialists/index.md) — how specialists read your selected element and respond with code changes.
* [Channels Overview](/guide/chat/index.md) — the broader chat layout, including all panel toggles.
---
url: /guide/chat/code-editor.md
---
# Code Editor
The Code Editor is a VS Code-style editor that runs inside the app, attached to the active chat. It's where files appear when a [specialist](/guide/specialists/index.md) writes or edits code, where you read the diff yourself, and where the [embedded browser](/guide/chat/embedded-browser.md) hands off when you click *"Open in Editor"* on a page element.
## When to Use It
* Watch a specialist's code edits arrive in real time as they answer your message.
* Read or tweak a file the specialist just wrote without opening a separate IDE.
* Jump from a rendered element in the [embedded browser](/guide/chat/embedded-browser.md) straight to the source line that produced it.
* Pair it with the browser for a real build-test-fix loop inside the chat.
## Open the Code Editor

Every channel has a row of panel toggle buttons in the workspace heading. Click the **Code** (square code icon) to open the editor as a panel next to the chat. Click again to hide it.
The editor scope is per-conversation. Each chat gets its own editor state — open files, cursor positions, undo history. Switching channels switches editor context.
## Editor Panel

The editor is scoped to a single channel — its open files, cursor positions, and undo history all belong to that conversation. When the channel is part of a [project](/guide/projects/index.md) with linked repositories or local folders, the editor reads from that project's source tree, and any edits a specialist makes during the conversation appear in the panel automatically.
## Open a File from the Browser
The [embedded browser](/guide/chat/embedded-browser.md)'s **Open in Editor** action is the most direct way to navigate from a rendered UI back to the source. Pick an element on the page, click **Open in Editor**, and the Code panel opens (or focuses if it's already open) with the source file loaded and the cursor on the line that produced that element.
This handoff requires a source map. For most dev servers (Vite, Next.js, Webpack with source maps enabled) it works out of the box. The button is disabled when no source map is found for the selected element.
## Edit Files Yourself
You can edit files directly in the panel — type, save, and the change is committed to the chat's working tree. This is a quick way to make a manual fix or tweak a specialist's edit without going back to chat to ask.
When [worktrees](/guide/projects/development.md) are enabled, your edits live on the chat's branch alongside whatever the specialist has been doing. The chat's turn counter and snapshot history track every change, so you can see what the specialist did, what you did, and roll back if needed.
## Standalone Mode
The Code panel is embedded next to the chat by default. If your window is narrower than 900px, the editor opens in a standalone window instead so you have enough room to read code. On wider windows you can also detach the editor manually if you want more horizontal space. The mode is sticky per conversation — if you detach it, it stays detached the next time you open that chat.
## Language Servers
For code intelligence — autocompletion, go-to-definition, diagnostics, find-references — install Language Server Protocol providers from the [Language Servers settings page](/guide/settings/language-servers.md). Servers run locally and give specialists deeper understanding of your codebase too.
Language Servers require the desktop app with LSP support enabled.
## The Build-Test-Fix Loop
The editor and the [embedded browser](/guide/chat/embedded-browser.md) are designed to work together for the iterative loop most coding sessions involve:
1. Ask a specialist to build a feature in a [project](/guide/projects/index.md) chat.
2. The specialist writes files. You see them appear in the **Code** panel.
3. Your dev server (or the specialist's `npm run dev`) serves the app on localhost.
4. Open the **Browser** panel to the dev server URL.
5. Click **Select Element** on something that's wrong, **Open in Editor** to jump to the source.
6. Ask the specialist to fix it, the dev server reloads, the browser reloads, you check again.
7. Repeat until done.
The whole loop happens inside the chat. No app switching, no copying URLs or screenshots.
## Related
* [Embedded Browser](/guide/chat/embedded-browser.md) — the browser panel that pairs with the editor and hands off via Select Element.
* [Projects](/guide/projects/index.md) — link repositories and folders so the editor has files to show.
* [Git Worktrees](/guide/projects/development.md) — give every chat its own isolated branch.
* [Language Servers](/guide/settings/language-servers.md) — install LSP providers for code intelligence.
* [Specialists](/guide/specialists/index.md) — how specialists read and write code in this panel.
---
url: /guide/specialists/index.md
---
# What are Specialists
Specialists are AI agents with specific expertise. They live in your workspace, join channels, and respond when you mention them. Each one is tuned for a particular job, whether that is writing code, reviewing designs, planning projects, or analyzing data.
## The Specialists Marketplace
Click the **Specialists** icon in the workspace rail on the left side of the app. This takes you to the marketplace, where you browse, search, and add specialists to your workspace.

## The Specialists Sidebar
The secondary sidebar on the left of the Specialists area gives you quick navigation back to the marketplace and shortcuts to your work in progress.
* **Find a specialist** at the top takes you back to the main marketplace view.
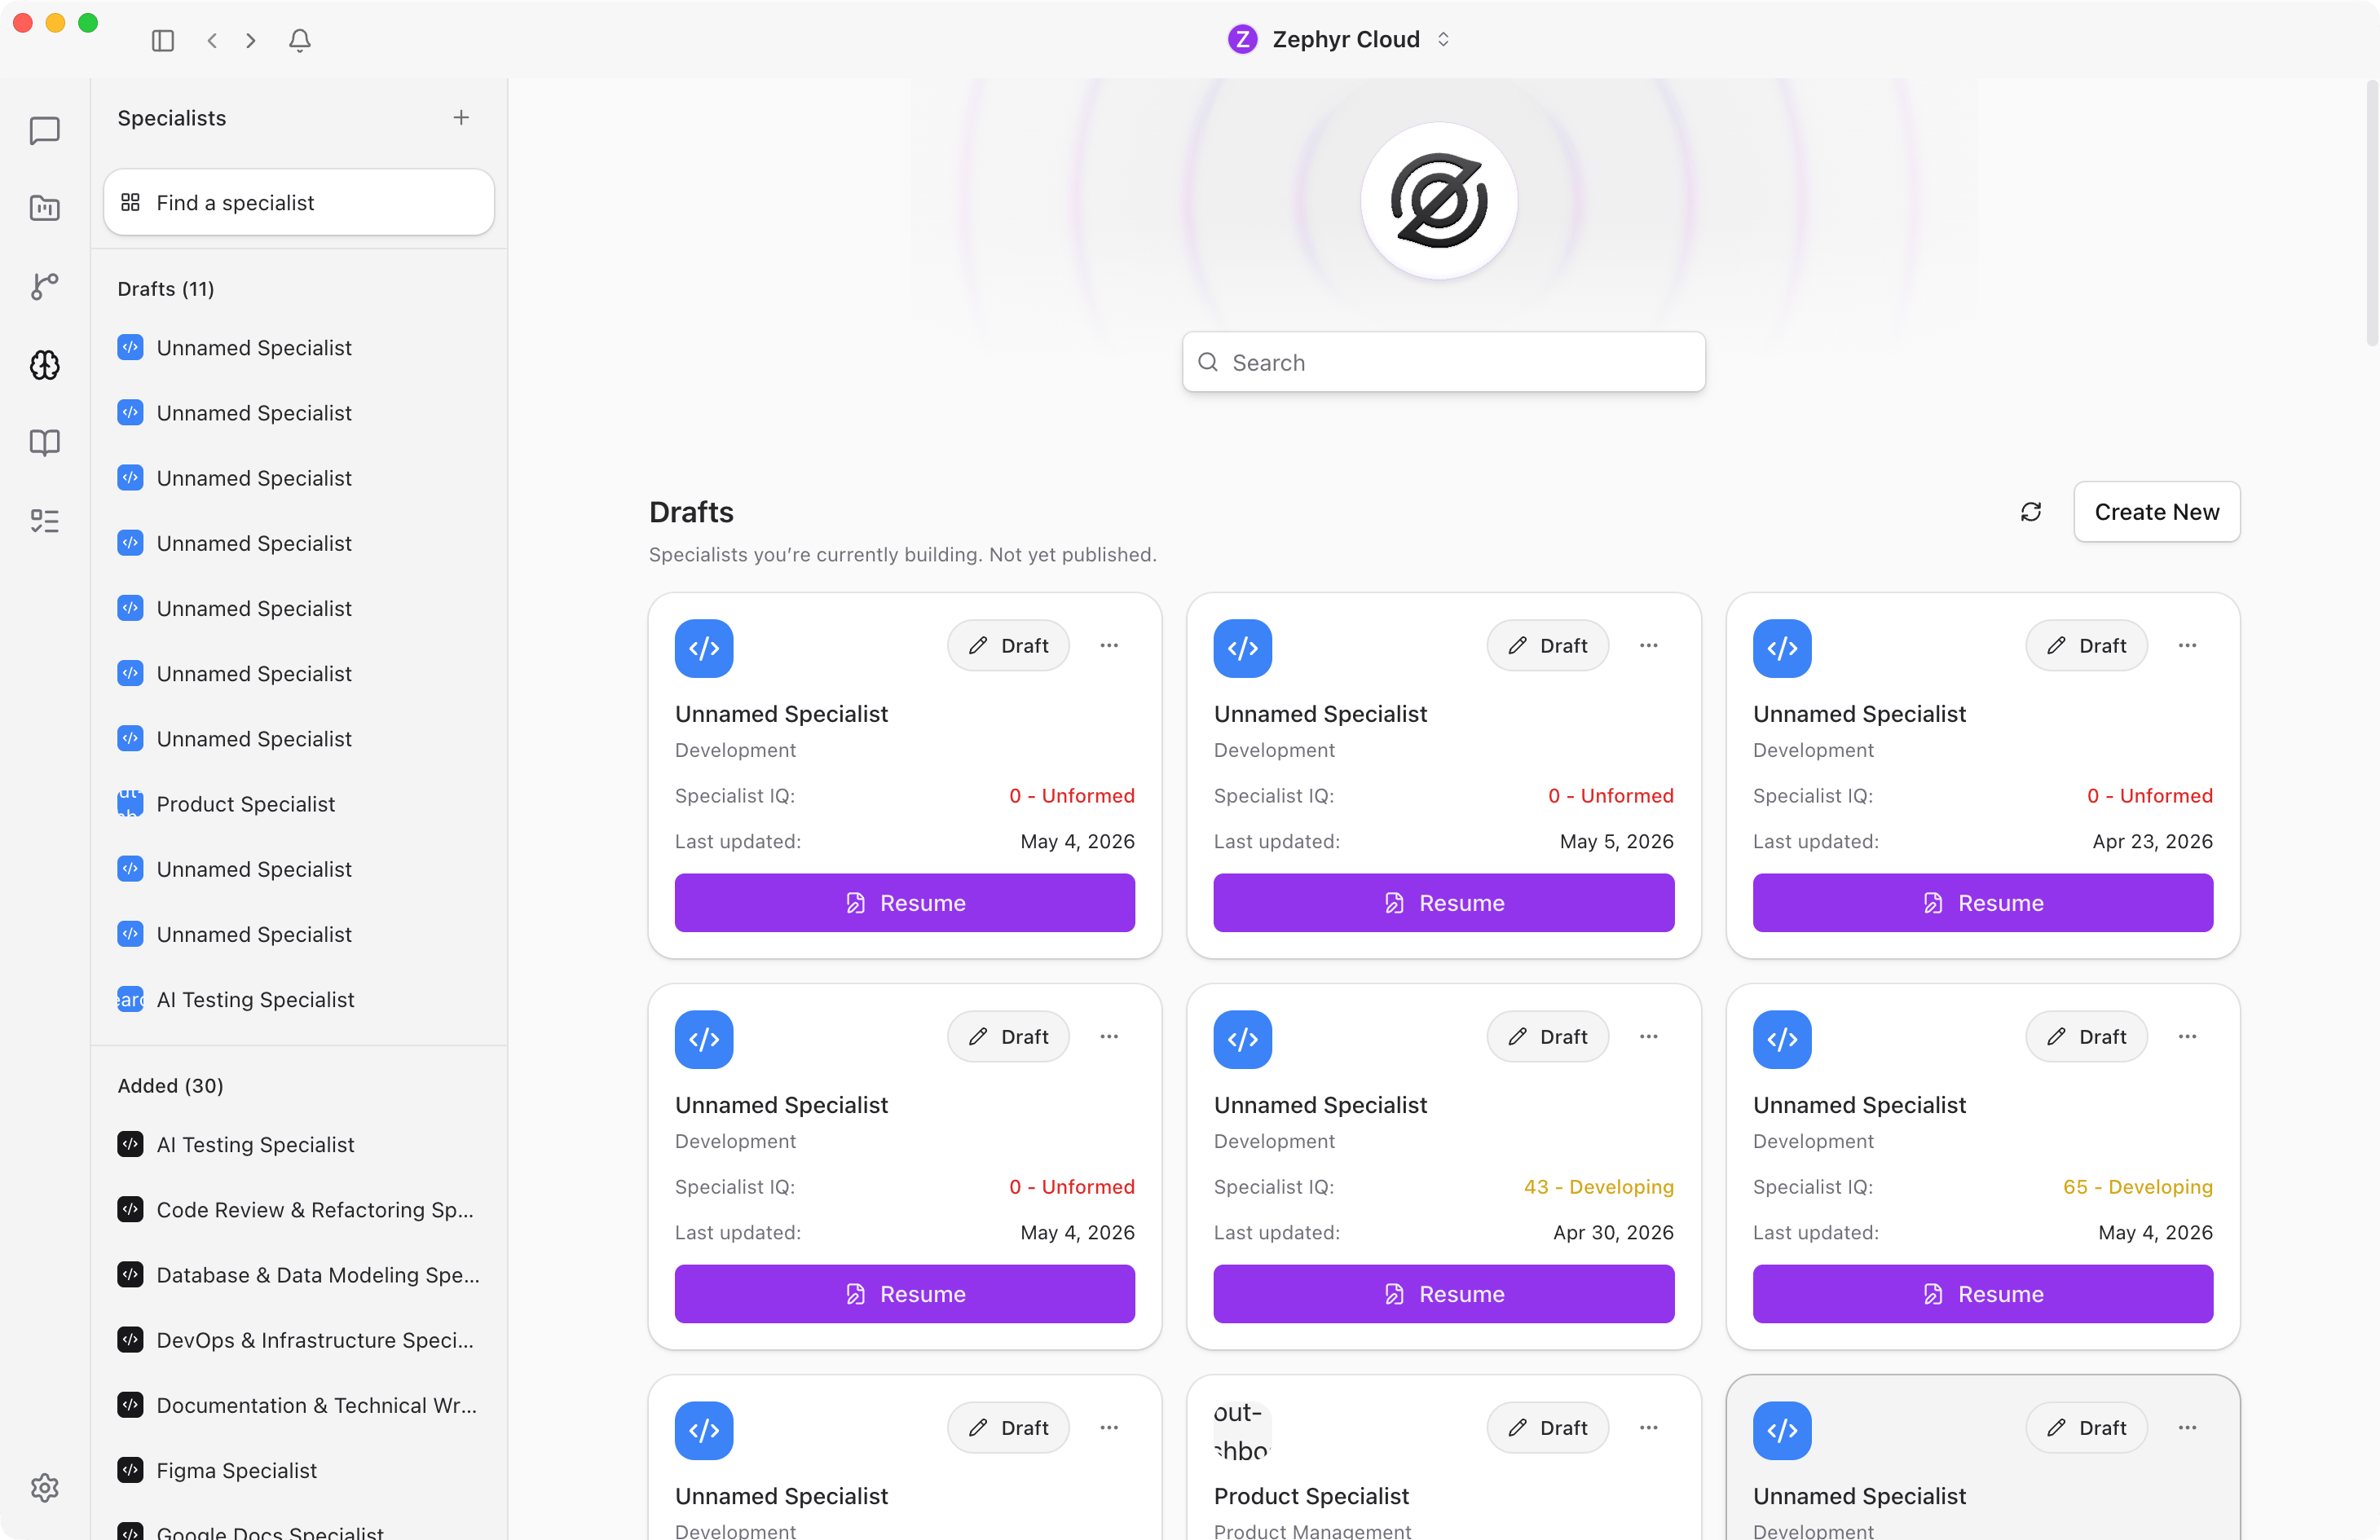
* **Drafts** lists every specialist you are currently building. Hover any draft to reveal a context menu with **Rename** and **Delete** actions.
* **Added** lists every specialist that has been added to the workspace. Hover any entry for a **Remove** action.
* The **+** button in the sidebar header creates a new specialist draft and opens the [builder](/guide/specialists/building-specialists.md).
## Search and Browse
The search bar at the top of the marketplace filters specialists by name or description. Clear the search to return to the full browse view.
When no search is active, the marketplace organizes specialists into three top sections, in this order:
* **Bundled Specialists.** Built-in specialists that ship with the app. The header has a small refresh button if you ever need to re-fetch the list.
* **Featured.** Highlighted specialists worth a closer look.
* **Categories.** Every available specialist grouped by category. See [Categories](#categories) below.
## Categories
Specialists are grouped into eight categories. Each category has a short description so you know what to expect.
| Category | Examples |
| -------------------------- | ------------------------------------------------------ |
| **Frontend & Design** | React, TypeScript, Tailwind, Figma, and UI specialists |
| **Backend & Data** | Rust, databases, Python, and server-side specialists |
| **Quality & Security** | Testing, code review, and security specialists |
| **DevOps & Deployment** | Deployment, infrastructure, and pipeline specialists |
| **Productivity & Process** | Documentation, workflow, and process specialists |
| **Google Workspace** | Google Docs, Sheets, and Workspace specialists |
| **Platform & Onboarding** | Tauri, onboarding, and specialist-creation specialists |
| **Other** | Custom and workspace-published specialists |
## Specialist Cards
Every specialist appears as a card. Cards give you a quick summary so you can decide whether to add a specialist without opening its full detail page.
Each card shows:
* **Icon.** A visual identifier for the specialist.
* **Name.** The display name.
* **Publisher.** Who created the specialist, with a verified badge for officially maintained ones.
* **Description.** A short summary of what the specialist does.
* **"Can run locally" indicator.** Shown when the specialist works without external network services.
* **Add / Added button.** One click to add or remove the specialist from your workspace.
## Adding and Removing a Specialist
Adding a specialist takes one click. Click the **Add** button on any card. The button changes to a green **Added** badge, and the specialist becomes available in every channel in your workspace.
To remove a specialist, click the **Added** badge or use the three-dot menu (see below). The specialist is removed from every channel and stops responding to mentions.
## Specialist Detail Page
Click any card to open its detail page. The page contains everything about the specialist:
* **Header.** Specialist icon, name, publisher, version, and an **Add / Remove / three-dot menu** action area.
* **Metadata.** Created by, version, last updated date, network requirements (online or local), and external links.
* **Capabilities and Tech Stack.** Badges showing what the specialist can do and which technologies it understands.
* **Preferred Models.** The AI models the specialist works best with.
* **Model Overrides.** Workspace-level and personal overrides for the specialist's model. See [Model Overrides](/guide/specialists/model-overrides.md).
* **Knowledge sources.** Documentation and context the specialist uses for grounded responses.
* **Overview.** A longer markdown description.
* **Workflows.** Any automated workflows tied to the specialist.
### The Three-Dot Menu
The three-dot button (⋯) next to the Add / Remove button opens a menu of additional actions. The options depend on whether the specialist is custom or built-in, and whether it is currently added.
* **Rename** *(custom only)* — Change the display name without opening the builder.
* **Edit** *(custom only)* — Jump straight into the [builder](/guide/specialists/building-specialists.md) for that specialist.
* **Duplicate** — Create a copy of the specialist as a new draft. Works for built-in specialists too, which is the easiest way to start a custom specialist from a known-good template.
* **Delete** *(custom only)* — Permanently remove the custom specialist from the workspace.
* **Remove** *(built-in, when added)* — Remove the specialist from the workspace without deleting it. You can re-add it from the marketplace any time.
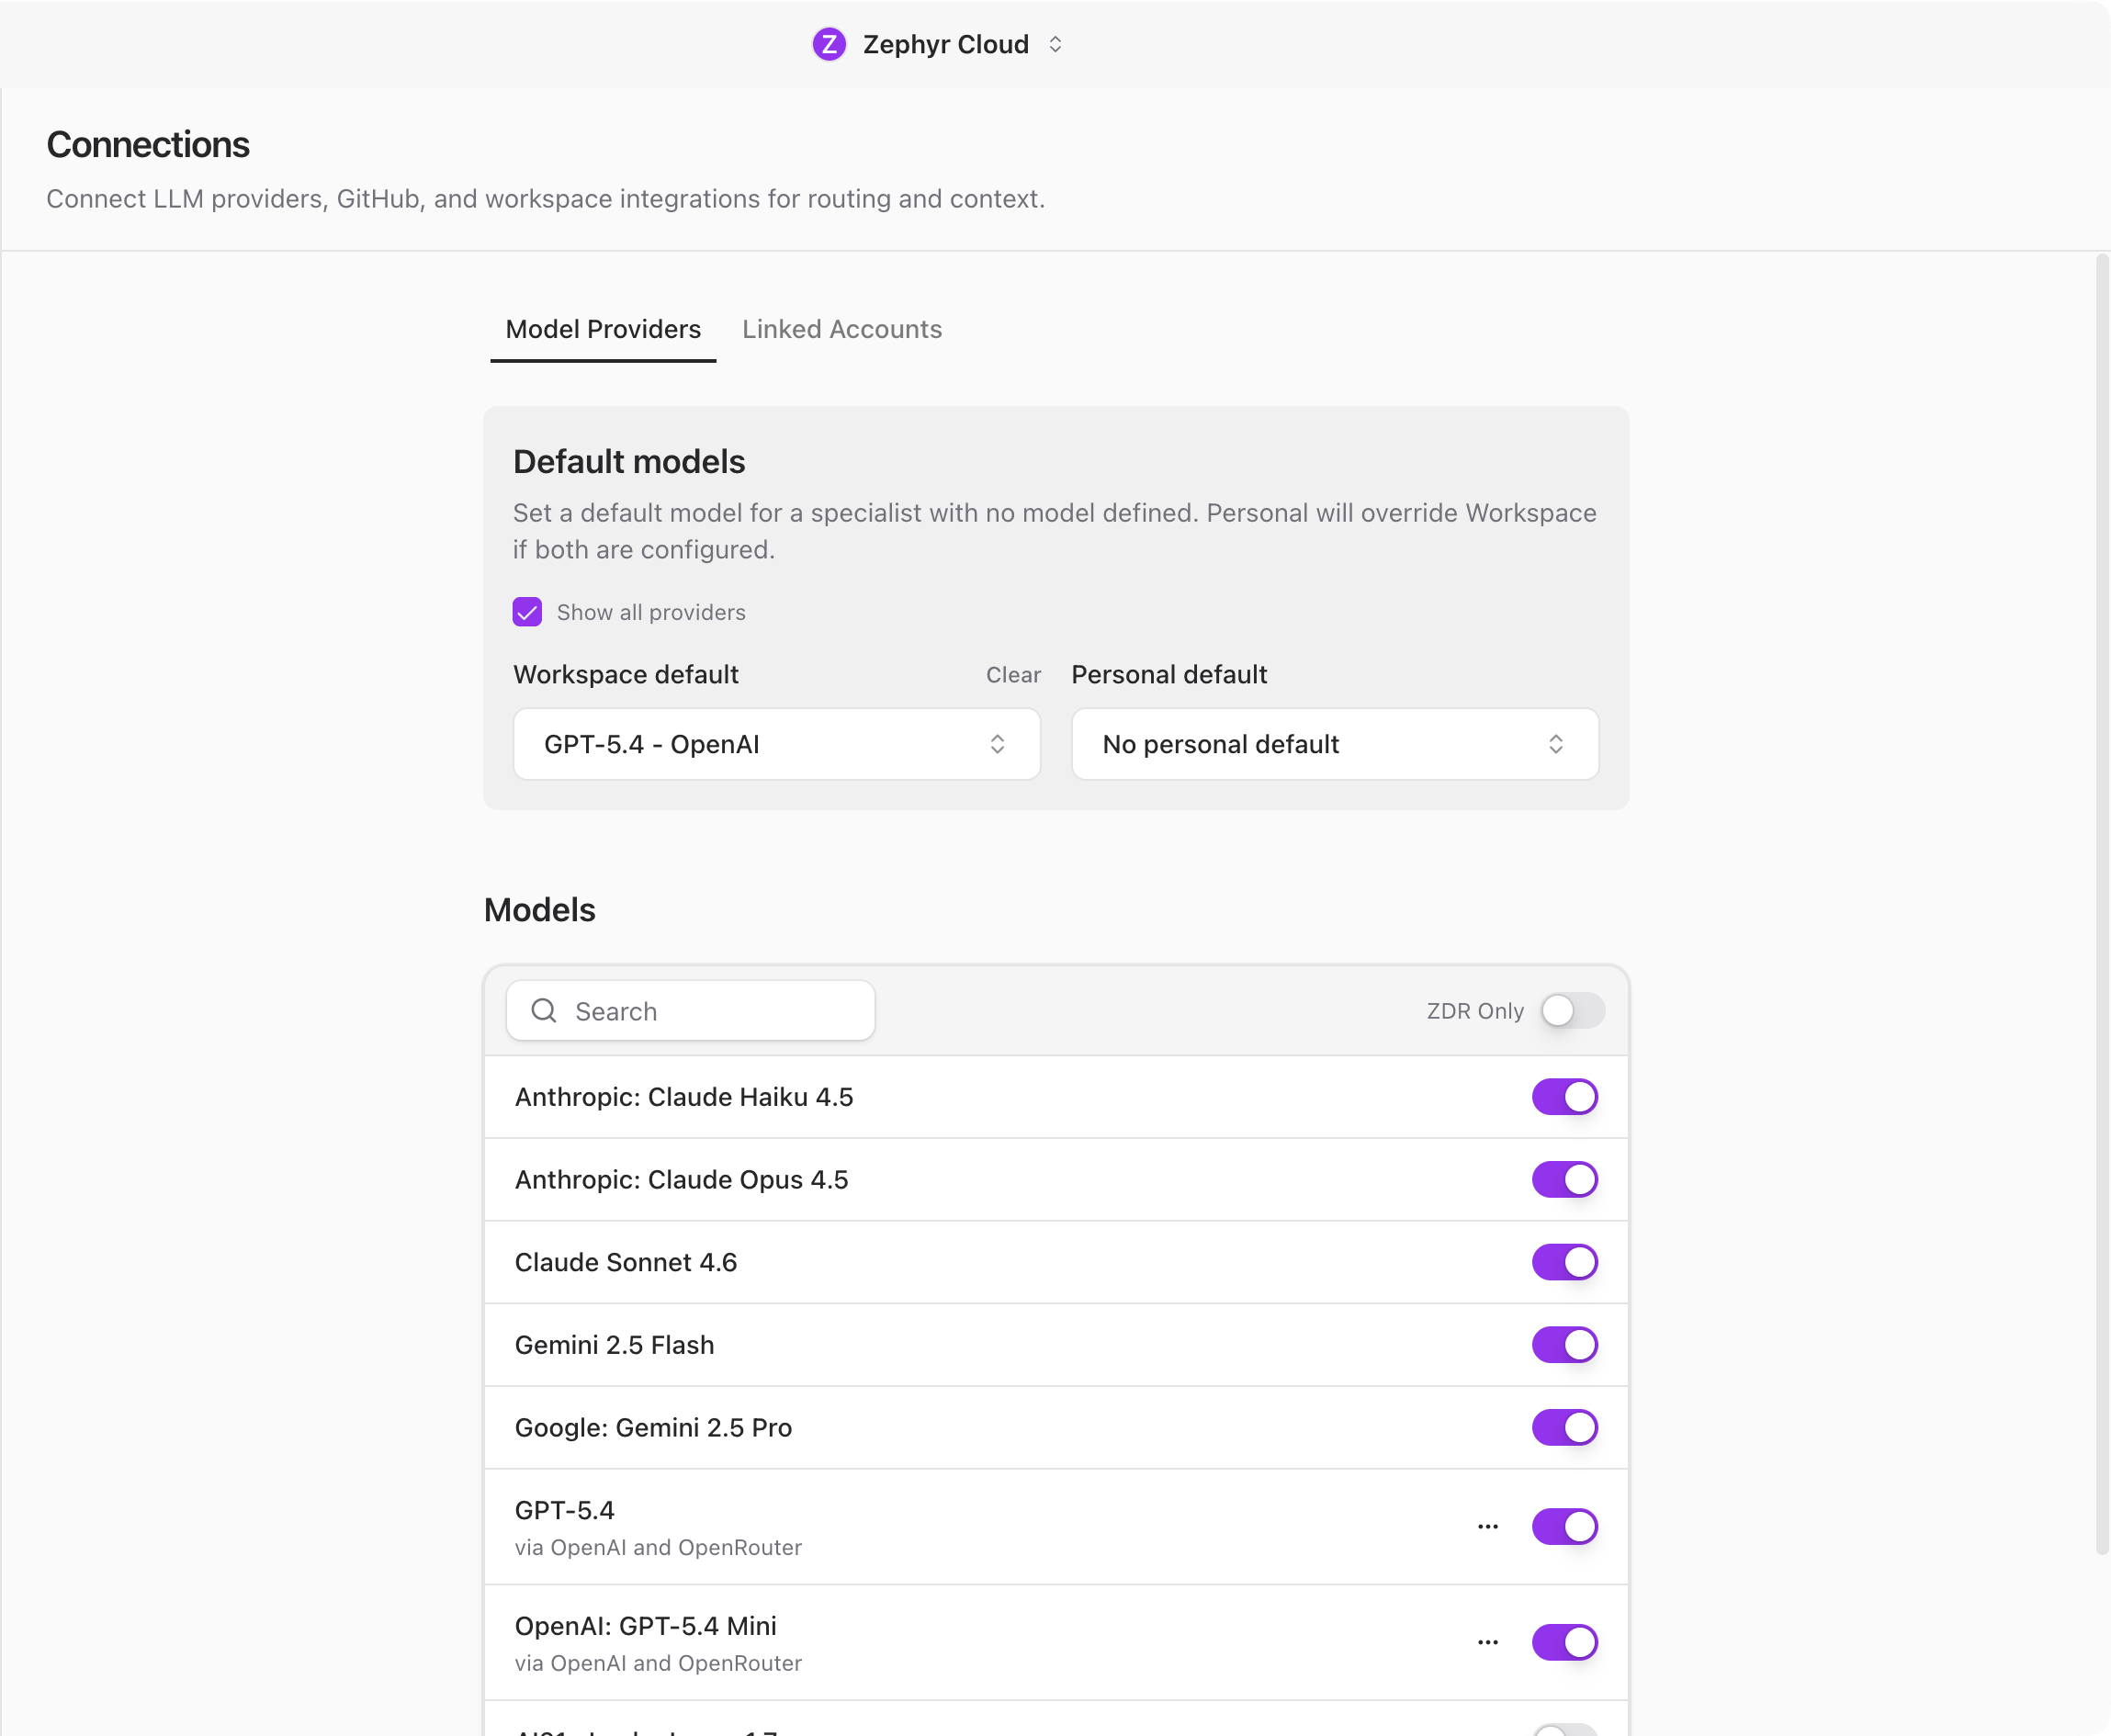
### Provider and ZDR Filters
In the Model Overrides section, two checkboxes control which models appear in the override pickers:
* **Show all providers.** When unchecked, the picker only shows providers you have already connected. Check it to see every provider, including ones you have not configured yet.
* **ZDR only.** Filters to providers that offer Zero Data Retention. ZDR filtering is available on the Basic plan and higher.
ZDR only controls which model/provider rows The AI Platform can use for a turn. It does not enable raw text retention in analytics or observability: requests to retain prompt text, completion text, token text, or raw streaming deltas are refused regardless of role or workspace setting. Token-retention analytics keep only ids, counts, hashes, coarse identifiers, and non-content counters.
## Built-in vs Custom Specialists
There are two kinds of specialists.
**Built-in specialists** ship with the app and are maintained by The AI Platform team. They cover common tasks like code review, documentation writing, and project planning. Built-in specialists show a verified badge.
**Custom specialists** are created by people in your workspace using the [specialist builder](/guide/specialists/building-specialists.md). They can be tailored to your team's specific domain, tools, and workflows.
Both types appear side by side in the marketplace.
## Running Locally
Some specialists are designed to run entirely on your machine without sending data to external services. These show a *"Can run locally"* indicator on their card. Use them when data privacy is a priority.
## Guides
* [Working with Specialists](/guide/specialists/using-specialists.md). Mention, interact with, and get the most out of specialists in your channels.
* [Building Specialists](/guide/specialists/building-specialists.md). Create your own custom specialists with the builder.
* [Builder Details](/guide/specialists/builder-details.md). Walk through every tab in the builder.
* [Model Overrides](/guide/specialists/model-overrides.md). Change which AI model a specialist uses at the workspace or personal level.
---
url: /guide/specialists/using-specialists.md
---
# Working with Specialists
Once a specialist is added to your workspace, you can bring it into any channel and have it respond to your questions. Specialists work alongside people in the same conversation, so the whole team sees the answers and can build on them.
## Mention a Specialist
To bring a specialist into a conversation, type `@` in the message input and select the specialist from the picker. A mention chip appears in your message. When you send the message, the specialist receives it and begins working on a response.
You can mention multiple specialists in the same message. Each one responds independently.
## Add a Specialist to a Channel
The first time you mention a specialist in a channel where it is not yet a member, a dialog asks whether you want to add it. Click **Add to Channel** to confirm. After that, the specialist is a permanent member of the channel and responds to future mentions without the prompt.
You can also add specialists to a channel through the **Members** tab in the [channel details](/guide/chat/channel-details.md) panel.
## How Specialist Responses Look
Specialist messages have a distinct visual style so you can tell them apart from human messages at a glance.
* **Avatar shape.** Specialists use a rounded-square avatar. Humans use a circular avatar.
* **Status dot.** A small dot next to the avatar shows the specialist's current state: working, online, typing, or idle.
* **Streaming indicator.** While the specialist is generating a response, a *"Generating..."* shimmer appears with a cancel button. Click cancel to stop the response mid-stream.
## Reasoning and Tool Calls
Some specialist responses include a collapsible **reasoning** section. Click to expand it and see the specialist's chain of thought. This helps you understand why the specialist gave a particular answer.
When a specialist uses tools (searches the web, reads files, runs code), a **tool calls** section appears. Expand it to see each tool that was invoked, the input it received, and the output it produced.
One especially useful tool: when the [embedded browser](/guide/chat/embedded-browser.md) is open and you've used **Select Element** to pick something on the page, specialists can call a tool to read the selected element directly. So you can pick a misaligned button, type *"why is this off?"*, and the specialist will know exactly which DOM node you mean — the HTML, attributes, and computed styles all show up in the tool call.
## Artifacts
Specialists often produce code, configuration files, or structured output. These appear as **artifacts** with syntax highlighting, a copy button, and a download button. The language is detected automatically and shown in the artifact header.
## Error Handling
When a specialist runs into an error, the response shows a clear error state:
* **Failed model badge.** Indicates which model failed.
* **Model picker.** Lets you switch to a different model and retry.
* **Provider suggestions.** The app may suggest enabling a built-in provider if the current one is unavailable.
* **Retry button.** Sends the same request again with the current or updated model.
## Give Feedback
Every specialist response has thumbs up and thumbs down buttons in the message footer. Use these to rate the quality of the response. Your feedback helps improve the specialist over time and contributes to its quality benchmarks.
## Inspect a Response
Each specialist response has a metadata menu next to the feedback buttons. Open it to see technical details about the response and to control how it was generated:
* **Model.** Which AI model produced the response. Click to override the model and regenerate.
* **Provider.** The actual provider that served the request (which may be different from the requested provider once provider routing kicks in).
* **Token usage.** Input and output tokens used.
* **Latency.** Time to first token and total time.
* **Regenerate.** Send the same prompt again to get a fresh response.
You can also toggle **Show all providers** here, which expands the model picker to include providers you have not connected yet.
## Expand and Collapse
Specialist responses can be long. Use the expand and collapse controls to manage how much of a response is visible. Reasoning sections, tool calls, and artifacts all support independent expand and collapse.
## Tips for Better Results
* **Be specific.** Tell the specialist exactly what you need rather than asking open-ended questions.
* **Provide context.** Mention relevant files, paste error messages, or describe the current state of your work.
* **Use the right specialist.** Each specialist is tuned for a specific domain. Check its [detail page](/guide/specialists/index.md#specialist-detail-page) to understand its strengths.
* **Iterate.** If the first response is not quite right, follow up with clarifications. Specialists keep context within a conversation.
## Next Steps
* [Specialist Builder](/guide/specialists/building-specialists.md). Create a custom specialist tailored to your workflow.
* [Builder Details](/guide/specialists/builder-details.md). Walk through every tab in the builder.
* [Model Overrides](/guide/specialists/model-overrides.md). Change which AI model a specialist uses.
* [Threads](/guide/chat/threads.md). Use threads to have focused follow-up conversations with specialists.
---
url: /guide/specialists/building-specialists.md
---
# Specialist Builder Overview
The specialist builder lets you create custom AI agents tailored to your team's needs. You define a persona, give it knowledge, wire up tools, and publish it to your workspace. The builder also includes an AI chat assistant that helps you refine the specialist as you go.
## Getting Started
From the Specialists page, click the **+** button to create a new specialist. The builder opens with a blank slate ready for configuration.
## Builder Layout
The builder is split into two panels.
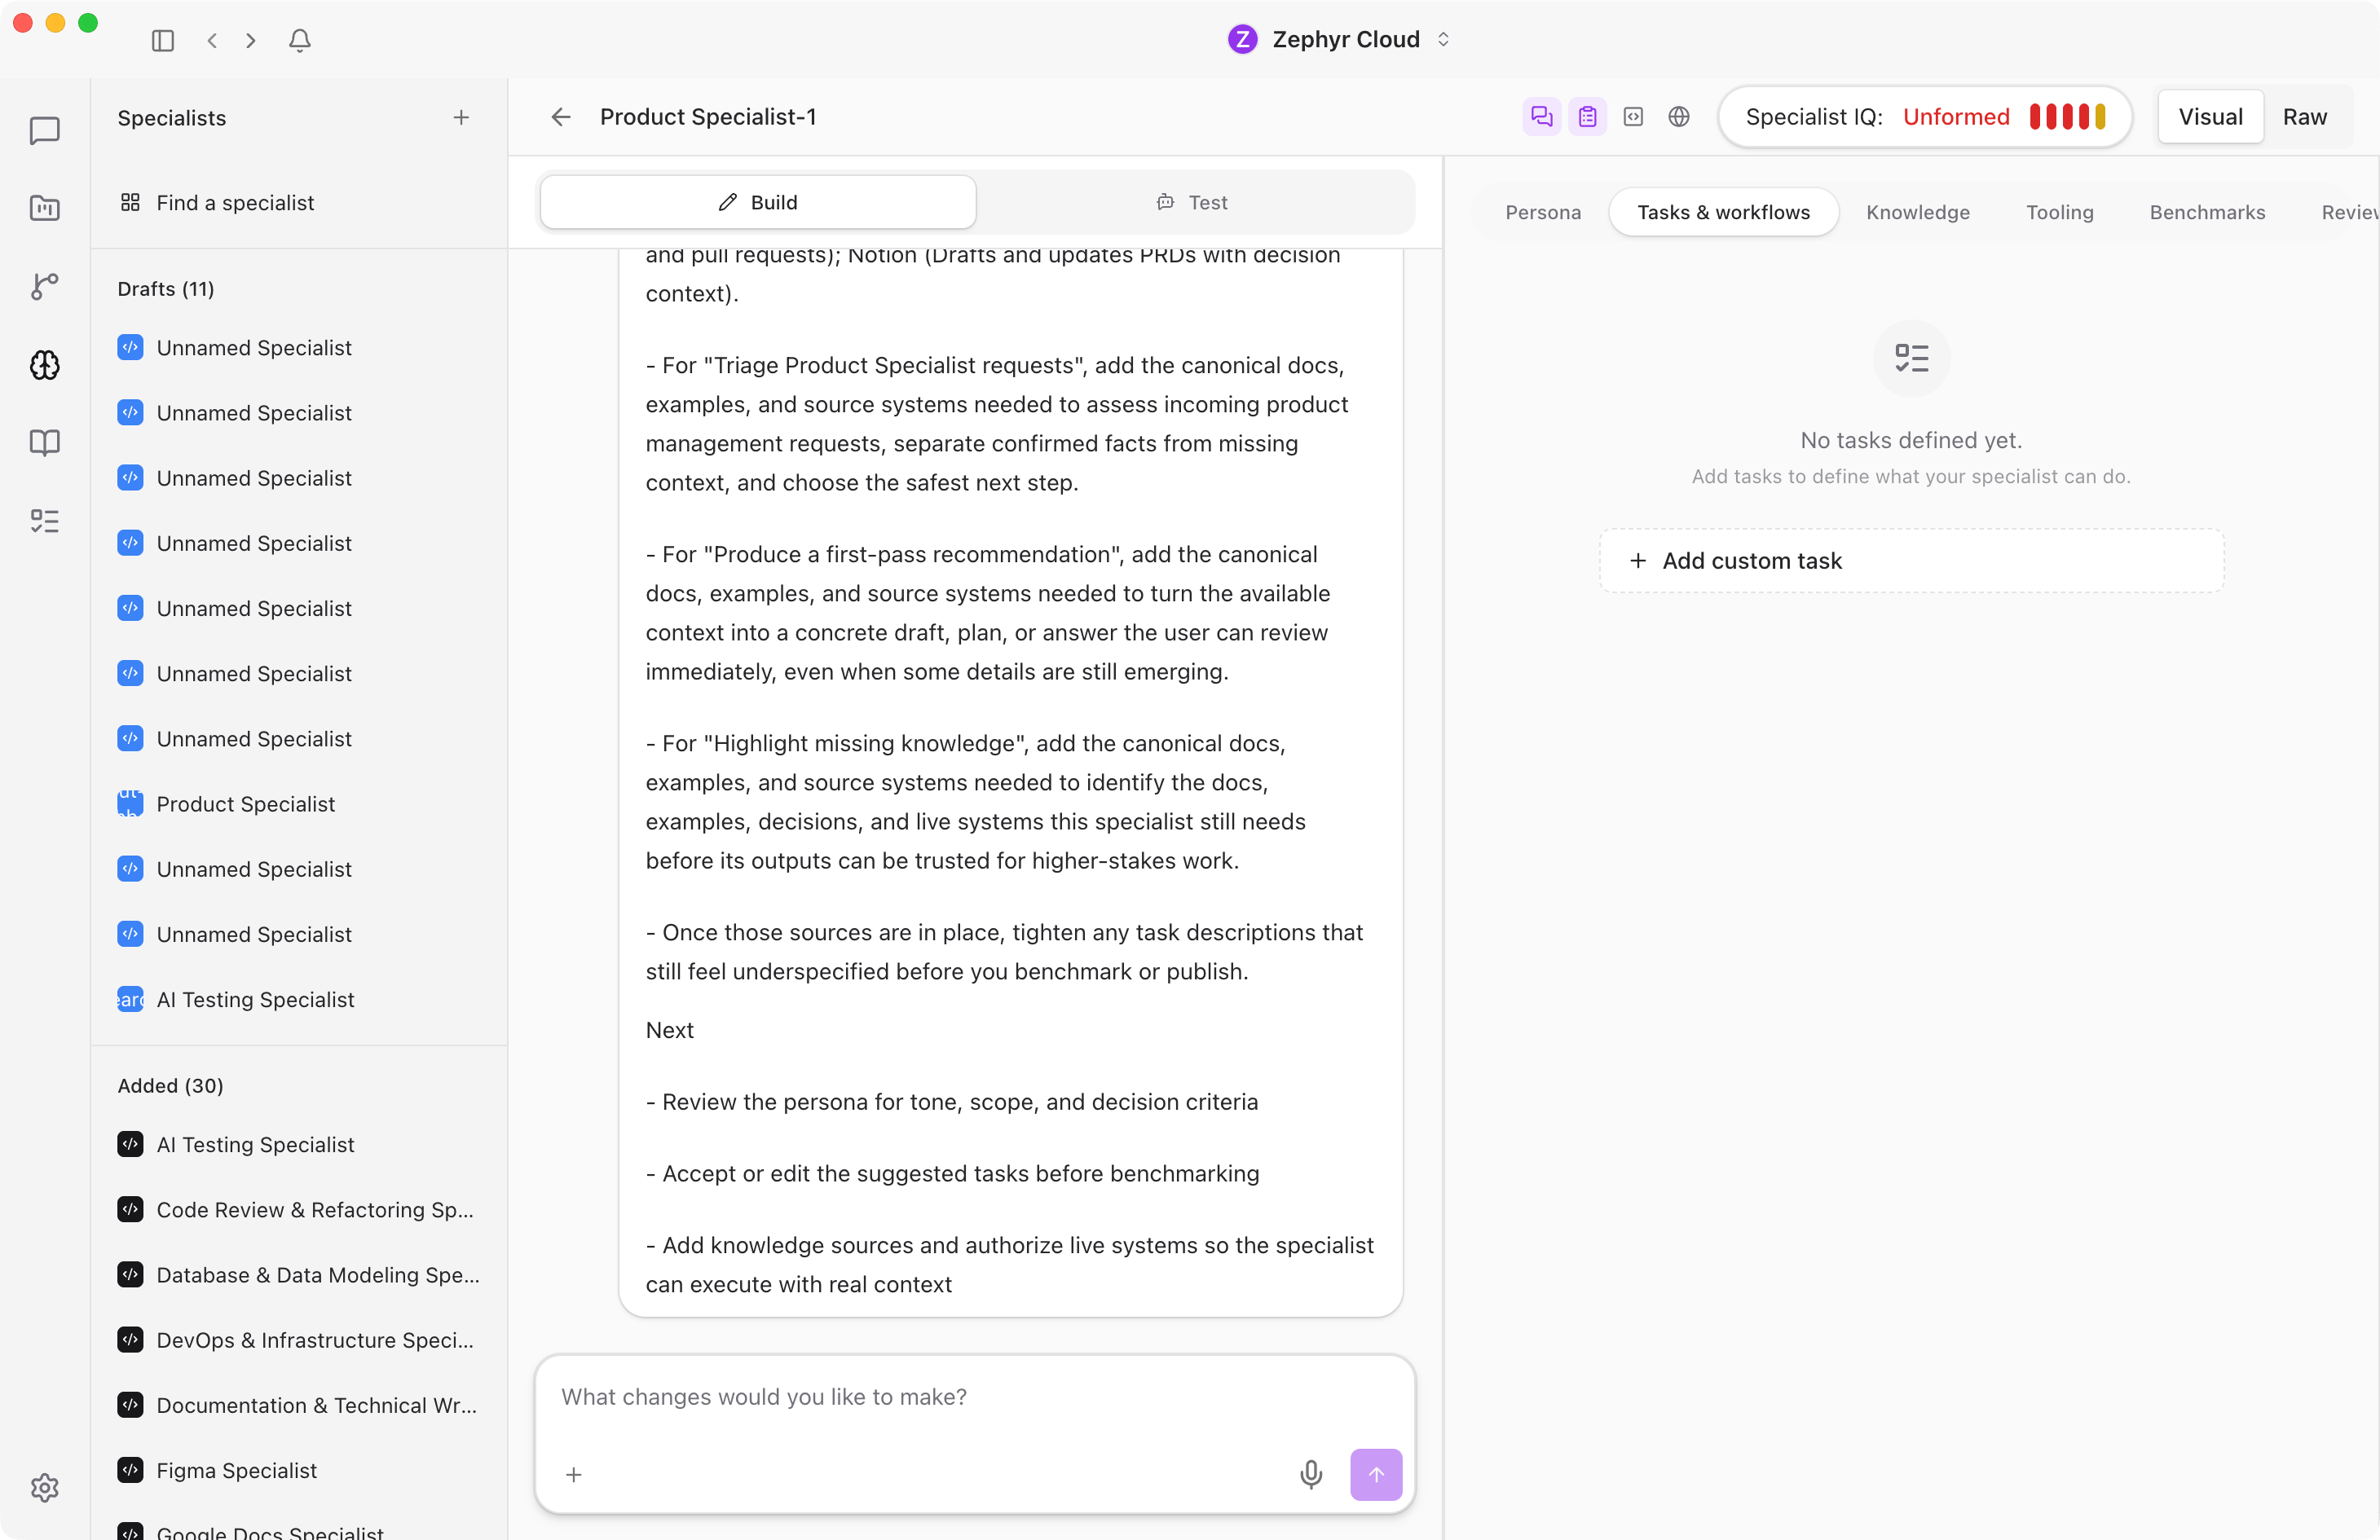
The **chat panel** on the left is an AI assistant that helps you build and test the specialist. It has two modes:
* **Build**. The assistant suggests improvements, asks clarifying questions, and helps fill in configuration fields.
* **Test**. The assistant simulates conversations so you can verify how the specialist behaves before publishing.
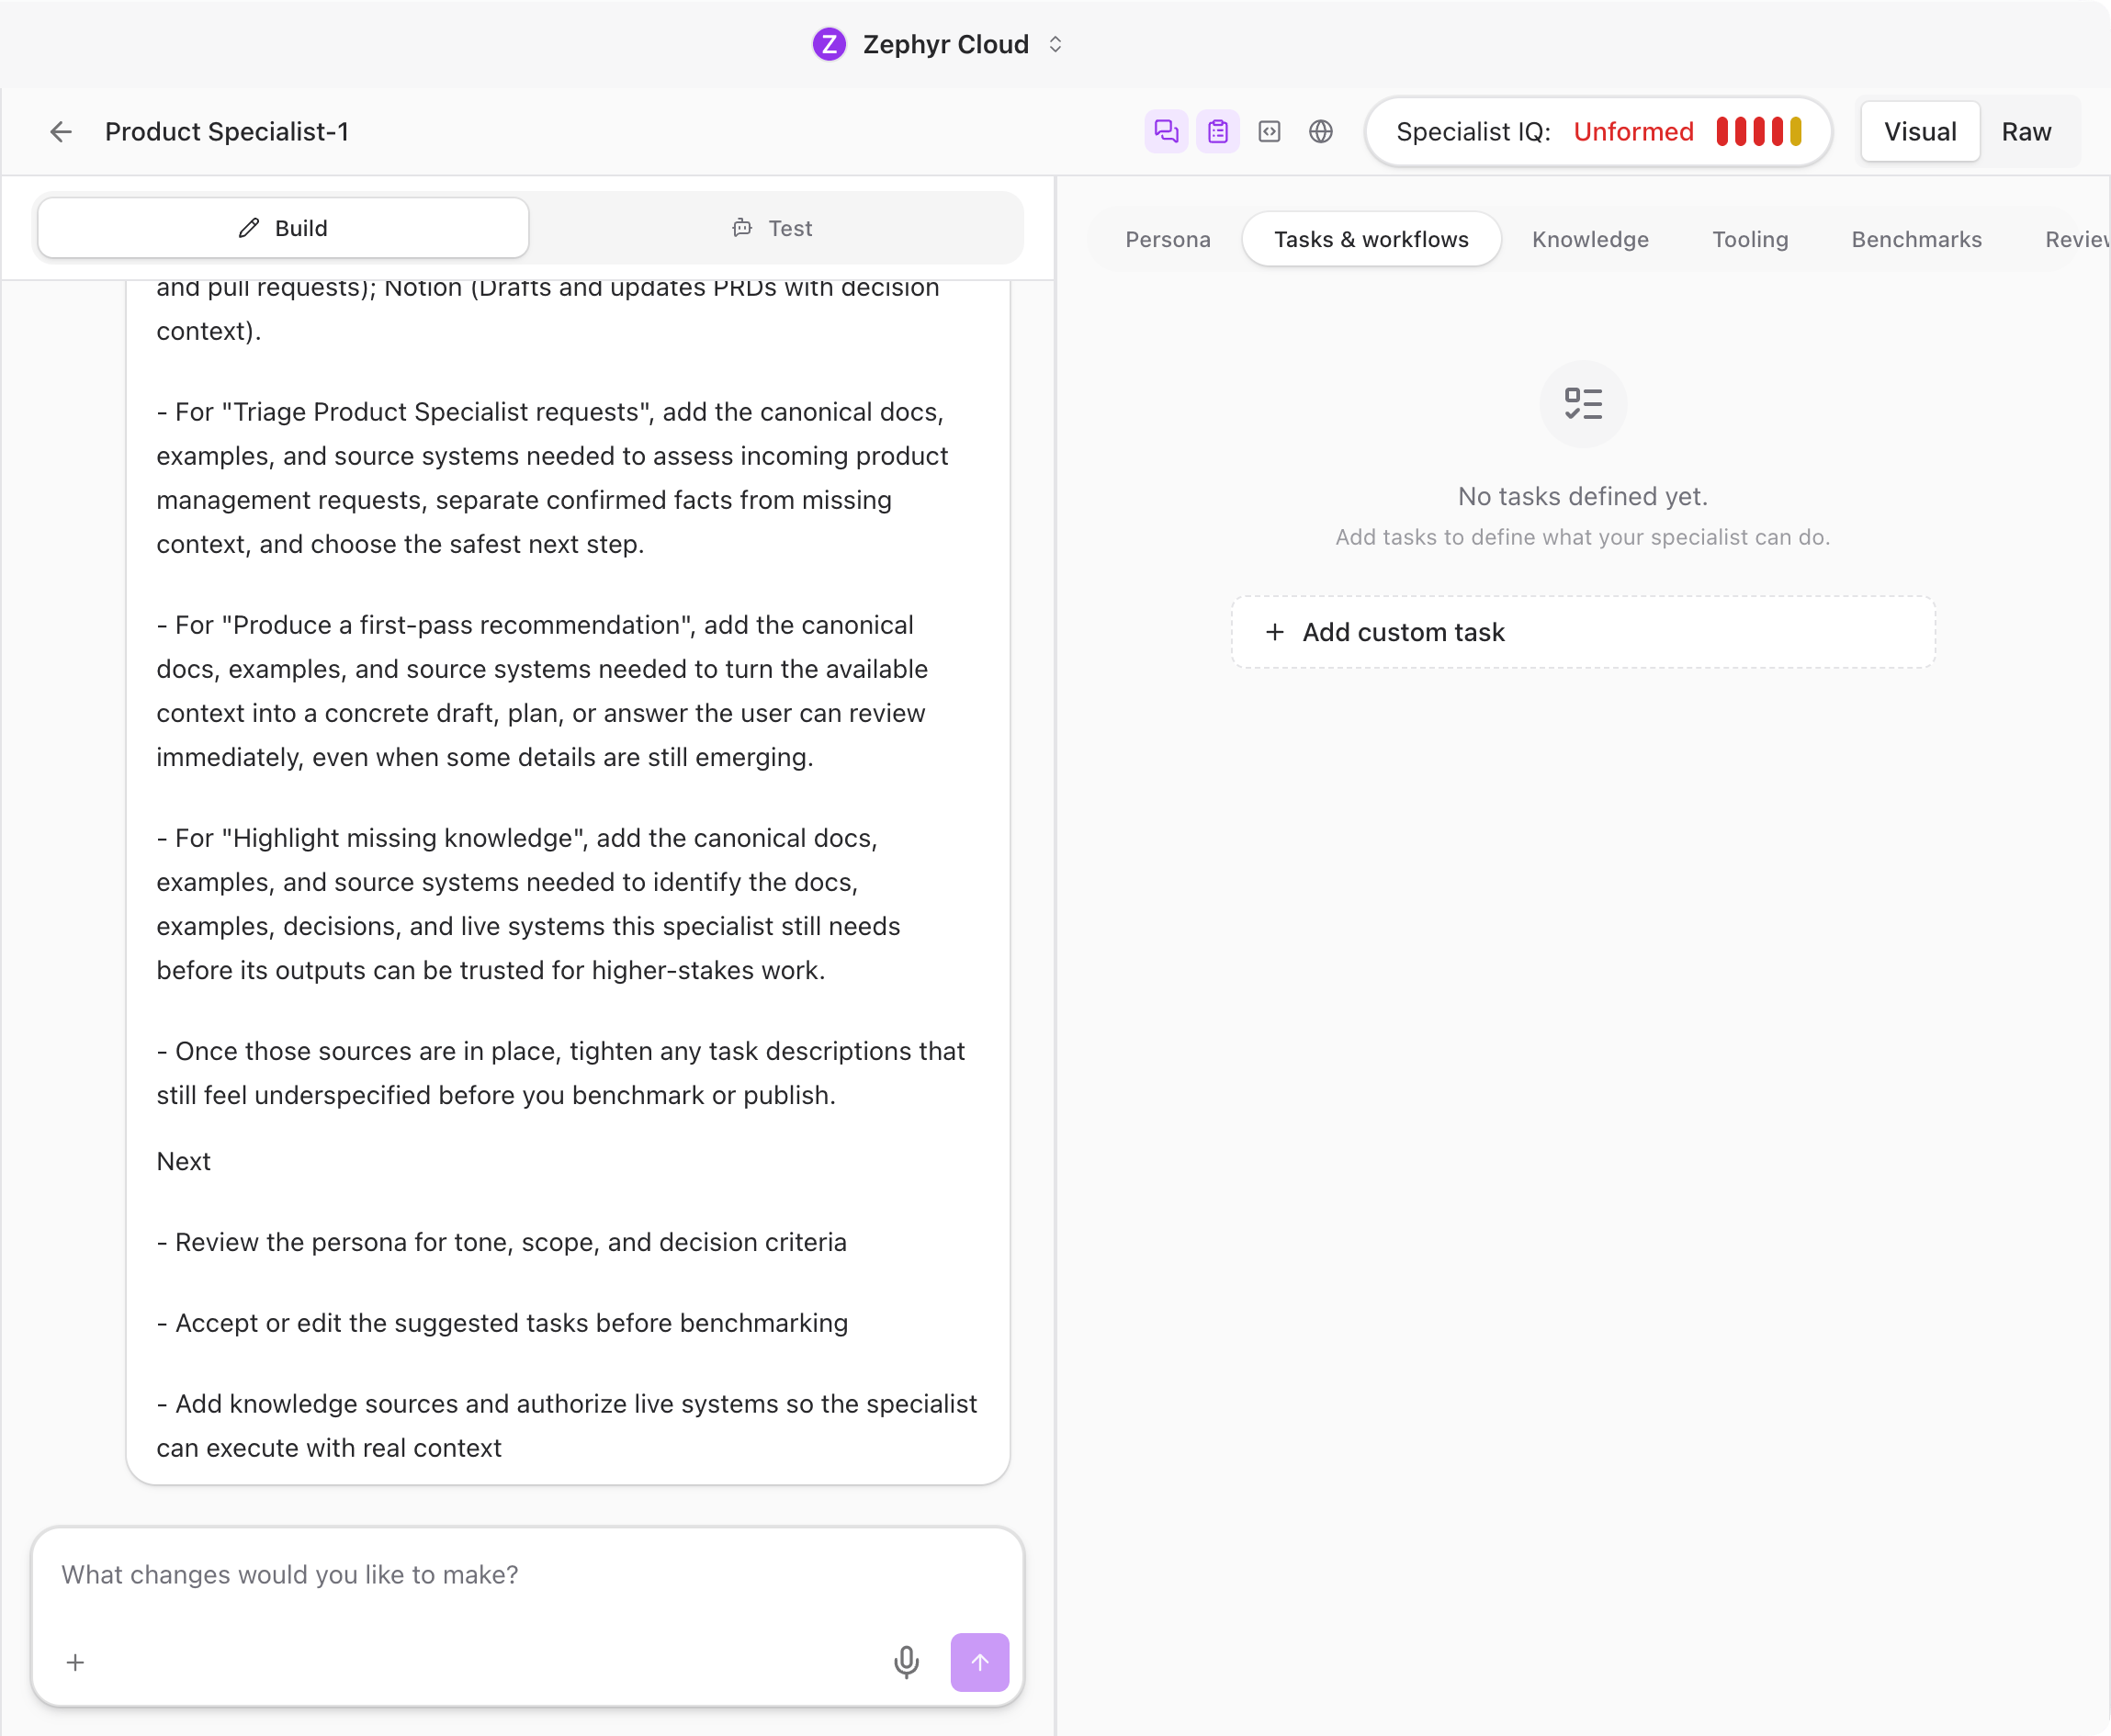
The **tabbed editor** on the right is where the actual configuration lives. Six tabs organize every aspect of the specialist:
1. **Persona**. Name, role, purpose, audience, values, attributes, tech stack, and writing style.
2. **Tasks & Workflows**. What the specialist can do and how it handles common requests.
3. **Knowledge**. Documentation, URLs, and files the specialist draws on for grounded responses.
4. **Tooling**. Built-in tools, MCP servers, and tool patterns the specialist can use.
5. **Benchmarks**. Automated quality tests that validate the specialist's behavior.
6. **Review & Publish**. Final review, scope selection, model configuration, and publishing.
For details on tabs 2 through 5, see [Builder Tab Details](/guide/specialists/builder-details.md).
## The Persona Tab
The Persona tab is where you define who the specialist is. It has seven sections:
* **Role**. A short title like "Senior Frontend Engineer" or "Technical Writer."
* **Purpose**. A sentence or two describing the specialist's primary goal.
* **Audience**. Who the specialist is built for. You can set a primary audience, secondary audience, and assumptions about what users already know.
* **Values**. Core principles that guide the specialist's behavior. You can use simple free-text values or structured entries with descriptions.
* **Attributes**. Personality traits and behavioral characteristics.
* **Tech Stack**. Languages, frameworks, and tools the specialist knows about.
* **Writing Style**. Controls for tone, verbosity, formality, reading level, jargon level, secondary tone, and style modifiers.
All fields save in real time as you type.
## The Review & Publish Tab
When you are ready to share your specialist, open the Review & Publish tab. It includes:
* **AI-generated overview**. A description, a "what it does" bullet list, and example prompts. The builder generates these automatically based on your configuration.
* **Publish scope**. Choose between **Workspace** (everyone in the workspace can use it) or **Personal** (only you).
* **Preferred model**. Select the default AI model the specialist should use.
* **Prompt authoring**. Write the default system prompt, add model-specific overrides, and configure per-task prompts with model variants and knowledge targeting.
Publishing is gated by the Specialist IQ score. Your specialist must reach a score of at least 40% before you can publish.
## Specialist IQ
Specialist IQ is a quality score from 0 to 100 that measures how complete and well-configured your specialist is. The score is broken down across five dimensions:
* **Knowledge**. Has the specialist been given relevant documentation and context?
* **Tasks**. Are tasks defined with clear descriptions and examples?
* **Tone**. Is the writing style configured?
* **Purpose**. Is the role and purpose clearly stated?
* **Benchmarks**. Have quality tests been created and passed?
As you fill in the builder, the IQ score updates in real time. The status labels are:
| Score | Status |
| --------- | ---------- |
| 0 to 19 | Unformed |
| 20 to 49 | Developing |
| 50 to 79 | Good |
| 80 to 100 | Excellent |
## The Middle Tabs
The four tabs between Persona and Review & Publish contain the bulk of the specialist's configuration. See [Builder Tab Details](/guide/specialists/builder-details.md) for a walkthrough of Tasks & Workflows, Knowledge, Tooling, and Benchmarks.
## Next Steps
* [Builder Tab Details](/guide/specialists/builder-details.md). Deep dive into the Tasks, Knowledge, Tooling, and Benchmarks tabs.
* [Model Overrides](/guide/specialists/model-overrides.md). Configure which AI model the specialist uses at the workspace or personal level.
* [Working with Specialists](/guide/specialists/using-specialists.md). See how the finished specialist behaves in a real conversation.
---
url: /guide/specialists/builder-details.md
---
# Builder Tab Details
Beyond the Persona tab, the specialist builder has four configuration tabs: **Tasks & Workflows**, **Knowledge**, **Tooling**, and **Benchmarks**. For the overall builder layout and flow, see [Building Specialists](/guide/specialists/building-specialists.md).
## Tasks & Workflows

Tasks define what the specialist can do. The builder suggests tasks automatically based on the persona you configured, and you can accept, edit, or remove them. You can also add your own custom tasks.
Each task has:
* **Title**. A short label like "Code Review" or "Write Unit Tests."
* **Key**. A machine-readable identifier used internally.
* **Description**. A detailed explanation of what the task involves.
* **Examples**. Sample prompts that show how a user would trigger this task.
* **Benchmark status**. A badge showing whether the task has passing quality tests.
Tasks also connect to workflows. When a user's message matches a task, the specialist can automatically trigger an associated workflow.
## Knowledge
The Knowledge tab is where you give the specialist access to documentation and reference material. Three source types are supported:
* **URLs**. Paste a web address and set a crawl depth from 1 to 5. The builder fetches the page and follows links up to the specified depth.
* **Files and folders**. Upload local files or select folders from the virtual file system.
* **Google Drive**. Connect a Google Drive account and select documents or folders.
After adding a source, the builder enriches it automatically. Enrichment includes generating summaries, evaluating tech stack relevance, and scoring how useful the source is for each task. Sources move through four statuses: Pending, Indexing, Indexed, and Error.
## Tooling
The Tooling tab controls which tools the specialist can access when generating responses. There are five categories:
### Built-in Agency Tools
A searchable catalog of tools provided by the platform. Browse the list and toggle individual tools on or off.
### Tool Patterns
Define prefix-based patterns to enable groups of tools at once. For example, `vfs_*` enables all virtual file system tools. A live preview shows which tools match the current pattern.
### MCP Servers
Attach existing Model Context Protocol servers or create new ones. MCP servers let the specialist call external APIs and services as part of its workflow.
### MCP Tools
Enable specific tools from attached MCP servers. You can select individual tools by their namespaced identifier or use patterns to match groups.
### Portable MCP Templates
Author reusable MCP server templates that can be installed into other specialists. Templates include server configuration, tool definitions, and connection details. You can create, install, and delete templates from this section.
A validation banner at the top of the Tooling tab shows real-time status. If there are configuration issues (missing servers, invalid patterns, unreachable endpoints), the banner highlights them.
## Benchmarks
Benchmarks are automated quality tests that validate the specialist's behavior. The Benchmarks tab has four sub-sections:
### Run
Execute benchmark suites against the specialist. Choose a suite, select a prompt level (L0 through Lx, where higher levels are harder), and pick a run mode:
* **Specialist default**. Uses the specialist's configured model and prompt.
* **Model override**. Uses a specific model you select.
* **Raw prompt**. Tests with a plain prompt, bypassing the specialist's system prompt.
A live progress indicator shows each scenario as it runs.
### Optimize
Automatically improve the specialist using AI-driven research. The optimizer evaluates the specialist across 12 quality dimensions, generates candidate configurations within a budget you set, and presents results on a leaderboard. You can preview the diff between the current configuration and each candidate, then apply the best one with a single click.
### Create
Build custom benchmark suites from scratch. Each suite contains scenarios, and each scenario includes:
* **Multi-level prompts**. Different phrasings at increasing difficulty.
* **Assertions**. Five assertion types to validate the response content.
* **Validation commands**. Optional shell commands that check response properties programmatically.
* **Oracle answers**. Reference answers the specialist's output is compared against.
### Report Card
View the results of past benchmark runs. The report card shows an overall score, pass/fail counts, token usage, estimated cost, and tool call counts. You can compare two runs side by side and drill into per-scenario traces to see exactly where the specialist succeeded or failed.
## Next Steps
* [Building Specialists](/guide/specialists/building-specialists.md). Return to the builder overview for persona and publishing details.
* [Working with Specialists](/guide/specialists/using-specialists.md). See how the finished specialist behaves in a real conversation.
* [Model Overrides](/guide/specialists/model-overrides.md). Fine-tune which AI model powers the specialist.
---
url: /guide/specialists/model-overrides.md
---
# Model Overrides
Each specialist has a preferred model, but you can override it at the organization or personal level.
## Overview
By default, each specialist uses its preferred models as defined in its manifest. However, you can override these preferences at two levels:
* **Organization Override**: Applies to all users in your workspace
* **Personal Override**: Applies only to you (takes precedence over organization override)
## Model Selection Precedence
When a specialist is invoked, the model is selected using this priority order:
```
1. Personal Override (highest priority)
↓
2. Organization Override
↓
3. Specialist's Preferred Model
↓
4. System Default (lowest priority)
```
## Setting Model Overrides
### Viewing Specialist Preferences
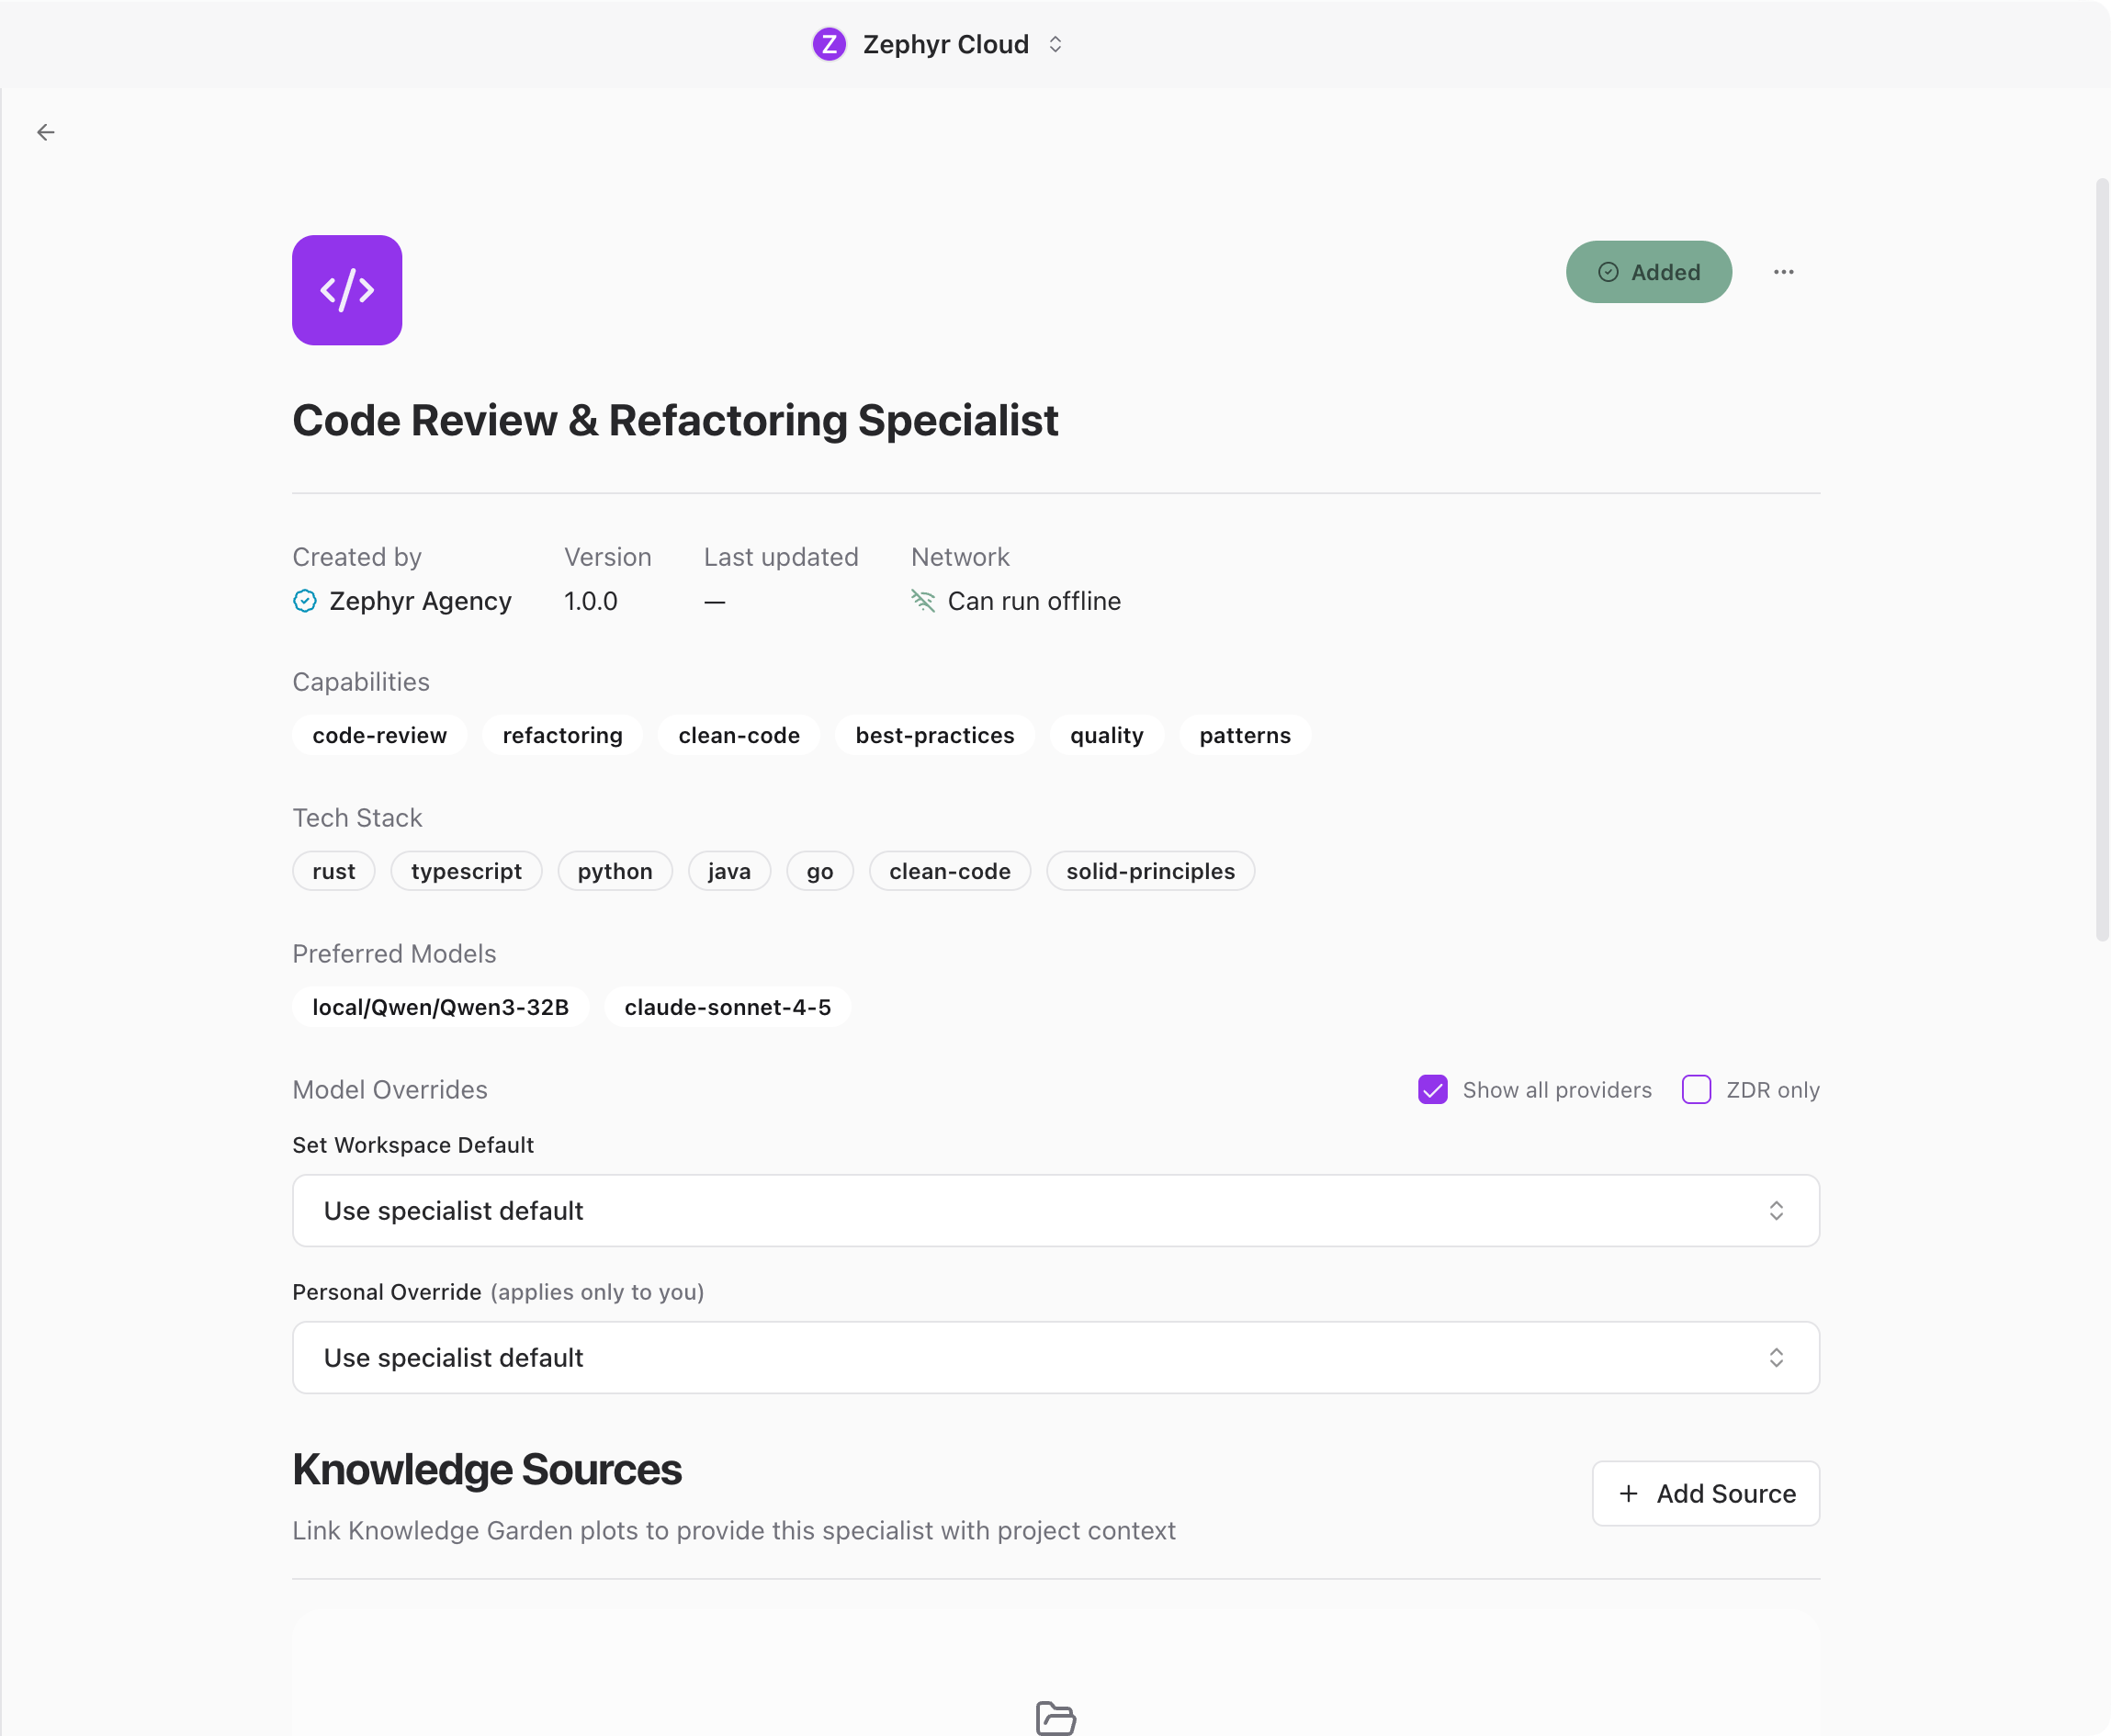
1. Navigate to the **Specialists** page
2. Click on any specialist to open its detail page
3. Scroll to the **Preferred Models** section to see which models the specialist prefers by default
Example:
```
Preferred Models
anthropic/claude-sonnet-4.5
```
### Setting an Organization Override
1. In the specialist detail page, find the **Model Overrides** section
2. Under **Organization Default**, click the dropdown
3. Search for and select a model (e.g., "GPT-4o Mini")
4. The override is saved automatically
**Note**: Organization overrides apply to all users in your workspace. This is useful for:
* Standardizing on specific models across your team
* Managing costs by using cheaper models
* Ensuring compliance with specific providers
### Setting a Personal Override
1. In the same **Model Overrides** section
2. Under **Personal Override**, click the dropdown
3. Select your preferred model
4. Your selection takes precedence over the organization default
**Use cases**:
* Testing different models for specific tasks
* Personal preference for certain model characteristics
* Using more powerful models when needed
### Clearing Overrides
Click the **X** button next to any override to remove it and restore the default behavior.
## Available Models
Models are fetched dynamically from OpenRouter when you open the specialist detail page. The list includes:
* **Anthropic Claude models** (claude-sonnet-4.5, claude-3.5-sonnet, etc.)
* **OpenAI GPT models** (gpt-4o, gpt-4-turbo, gpt-3.5-turbo, etc.)
* **Google Gemini models** (gemini-pro-1.5, gemini-flash-1.5, etc.)
* **Meta Llama models** (llama-3.3-70b-instruct, etc.)
* And any other models available on OpenRouter
The model list is always up-to-date with OpenRouter's current offerings.
## Persistence
Overrides persist across sessions. You do not need to set them again each time you open the app. Different workspaces can have different overrides, and personal overrides are always separate from organization overrides.
## Example Workflows
### Use a cost-effective model by default
Your team wants to use GPT-4o Mini by default to reduce costs, but you occasionally need the more capable Claude Sonnet 4.5 for complex tasks.
1. An admin sets **Organization Default** to "GPT-4o Mini"
2. You set **Personal Override** to "Claude Sonnet 4.5"
Your teammates use GPT-4o Mini. You use Claude Sonnet 4.5. Clear your personal override anytime to fall back to the team default.
### Compare models for a specialist
You want to evaluate which model works best for a specific specialist.
1. Leave the organization override empty
2. Set **Personal Override** to "GPT-4 Turbo"
3. Test the specialist
4. Change the override to "Claude 3.5 Sonnet"
5. Compare results
You can switch between models without affecting other users.
## Next Steps
* [Specialists Overview](/guide/specialists/index.md)
* [Working with Specialists](/guide/specialists/using-specialists.md)
* [Connections](/guide/settings/connections.md) for adding model providers
---
url: /guide/projects/index.md
---
# Projects
Projects bring together code repositories, knowledge sources, and chat conversations around a shared goal. They give specialists the context they need to understand your codebase and provide targeted help.
## Create a Project
Click the **+** button next to **Projects** to open the **Create Project** dialog.
Give your project a name. You can optionally pick an icon and toggle discoverability on or off. Discoverability is on by default, which lets anyone in your workspace find the project.
Below the name field you will see four cards for adding codebases:
* **Repository from URL**. Paste a Git URL to clone a remote repo into the project.
* **Add folder**. Opens your OS folder picker so you can link a local directory.
* **Quick start**. A guided setup flow (coming soon).
* **Knowledge garden**. Link an existing knowledge plot to the project.
Further down, the **Git Worktrees** toggle lets you create isolated branches per chat. This requires at least one cloned repository first.
The **Sandbox Profile** section lets you configure the project environment. You can set a network mode, define setup commands, and control other sandbox behavior. See [Sandbox settings](/guide/settings/sandbox.md) for a full breakdown of available options.
Click **Create Project** in the footer to finish. A project chat is automatically created and the project appears in the sidebar, ready to use.
Once a project chat is open, the [Code Editor](/guide/chat/code-editor.md) panel reads from that project's repositories or linked folders, so specialist edits show up next to the conversation in real time.
## Project Cards
When you have more than one project, each appears as a card on the Projects landing page. Hover any card and click the three-dot button in the top-right corner to open a context menu with these actions:
* **Edit Project.** Open the project's [configuration](/guide/projects/configuration.md) page.
* **Archive** or **Restore.** Move an active project into the archive, or bring an archived project back to active.
* **Delete Project.** Permanently remove the project. Disabled until the project is archived first — this is a deliberate two-step gate so projects cannot be deleted by accident.
Archived projects display an *"Archived"* badge on the card so you can tell them apart from active ones.
## The Project Toolbar
When you open a project, a toolbar appears at the top of the page. The left side shows the project name — click it for a dropdown with quick actions. On the right, the **New Chat** button creates a new conversation inside the project, followed by six icon buttons that each open a different view.
From left to right:
| Icon | Page | Purpose |
| ---- | ------------------------------------------------------------ | --------------------------------------------------------------------- |
| ⚙️ | [Configuration](/guide/projects/configuration.md) | Repository sources, local folders, worktrees, and sandbox environment |
| 🧠 | [Code Knowledge Graph](/guide/projects/code-knowledge-graph.md) | Indexed symbols, call graphs, JSX components, and git history |
| 🔀 | [Git Worktrees](/guide/projects/development.md) | Active branch list with remote sync controls |
| 🔗 | [Linked Workflows](/guide/projects/linked-workflows.md) | Workflows attached to automate actions in this project |
| 📊 | [Activity](/guide/projects/activity.md) | Analytics, recent chats, and task activity |
| ☑️ | [Pending Tasks](/guide/projects/pending-tasks.md) | Open tasks linked to this project |
The active page is highlighted so you always know which view you are on.
### Project Name Dropdown
Click the project name to open a dropdown with these actions:
* **Rename project**. Change the project name.
* **Archive project** or **Restore**. Move the project out of your active list or bring it back.
* **Copy project link**. Get a shareable link to the project.
* **Knowledge**. Open the project's [knowledge sources](/guide/projects/knowledge.md).
* **Discoverable**. Toggle whether workspace members can find this project.
:::tip
Archive a project when you are done with it. Archived projects stay searchable but move out of your active list to keep things clean.
:::
---
url: /guide/projects/knowledge.md
---
# Knowledge Sources

Each project has its own Knowledge page where you link context that [specialists](/guide/specialists/index.md) can draw from during conversations.
To open it, click the **project name** in the header to open the dropdown, then select **Knowledge**.

The page shows three categories at a glance:
* **Knowledge Garden plots**. Linked plots from the workspace [Knowledge Garden](/guide/knowledge/index.md). Each name links to its detail page.
* **Repository sources**. Git repos added in [Configuration](/guide/projects/configuration.md) with their clone status.
* **Local folder sources**. Filesystem paths added in Configuration.
Repository sources and local folders appear automatically once you add them in Configuration. Plots need to be linked manually.
## Link Knowledge to a Project

Click the **Add** dropdown at the top right of the page. Three options are available:
* **Knowledge garden**. Opens a picker of workspace plots. Search by name, check the file count, and link one or more plots. Only workspace plots appear — personal plots cannot be linked to projects.
* **Upload file**. Select images, PDFs, or text files up to 10 MB. If the project has no linked plot yet, one is created automatically and named *"\[Project Name] knowledge"*.
* **Text**. Type a title and content directly — useful for quick notes, API references, or coding guidelines.
For more on creating and managing plots, see the [Knowledge Garden](/guide/knowledge/index.md) guide.
## Unlink a Source
Click the trash icon next to a linked plot to remove it from the project. Unlinking does not delete the plot — it stays in your Knowledge Garden for use elsewhere.
---
url: /guide/projects/configuration.md
---
# Configuration
When you open a project, the **Configuration** page is the default view. It is split into four sections that control how the project connects to your code and tools.
## Repository Sources
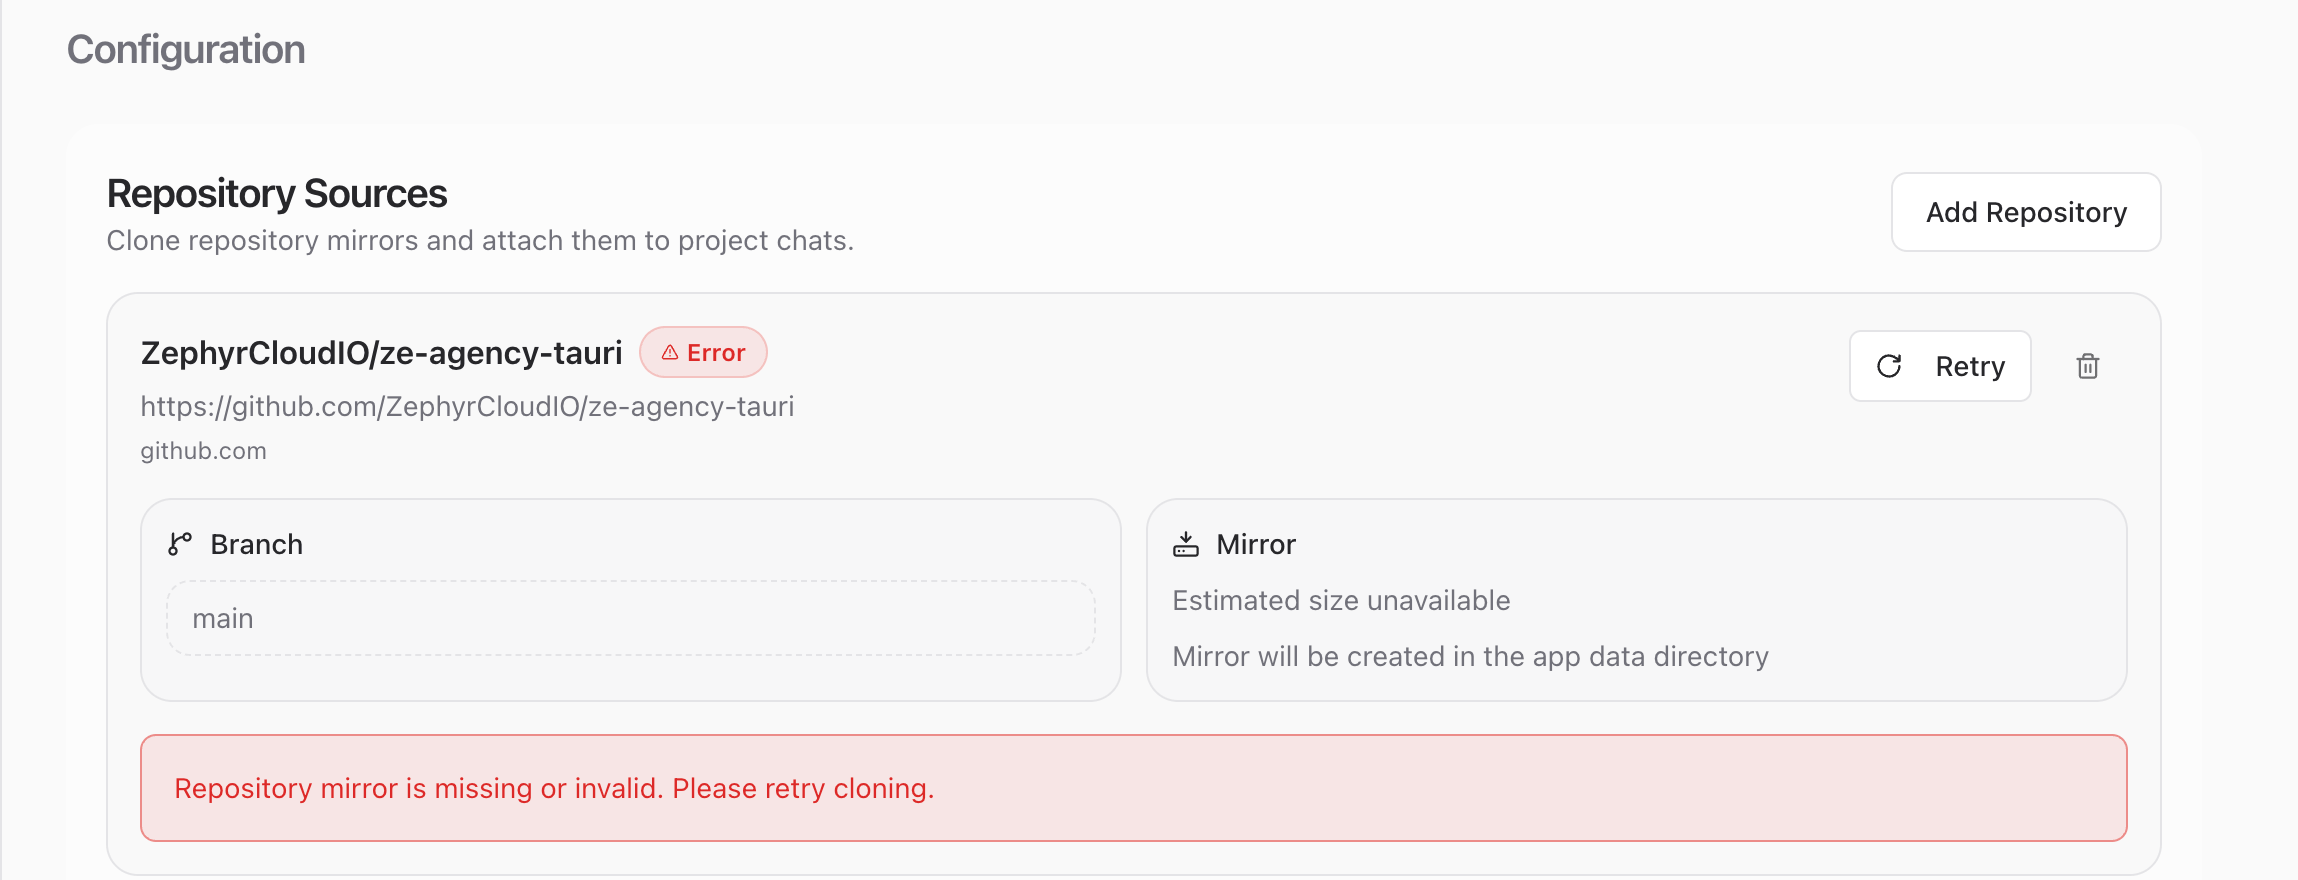
This section shows your cloned repos. Each repository entry displays the repo name, URL, branch selector, and mirror status. Click **Add Repository** to clone a new remote repo — Zephyr probes the URL and shows the default branch and estimated clone size before you confirm.
If a clone fails, a **Retry** button appears next to the error message. Once cloned, the repository is available to all conversations and [specialists](/guide/specialists/index.md) in the project.
## Local Folders

Lists any linked local directories. Click **Add folder** to browse for a new one, or click the remove button next to an existing path to unlink it.
Local folders are indexed the same way cloned repositories are. Specialists can read and reference files from these folders during conversations.
## Git Worktrees
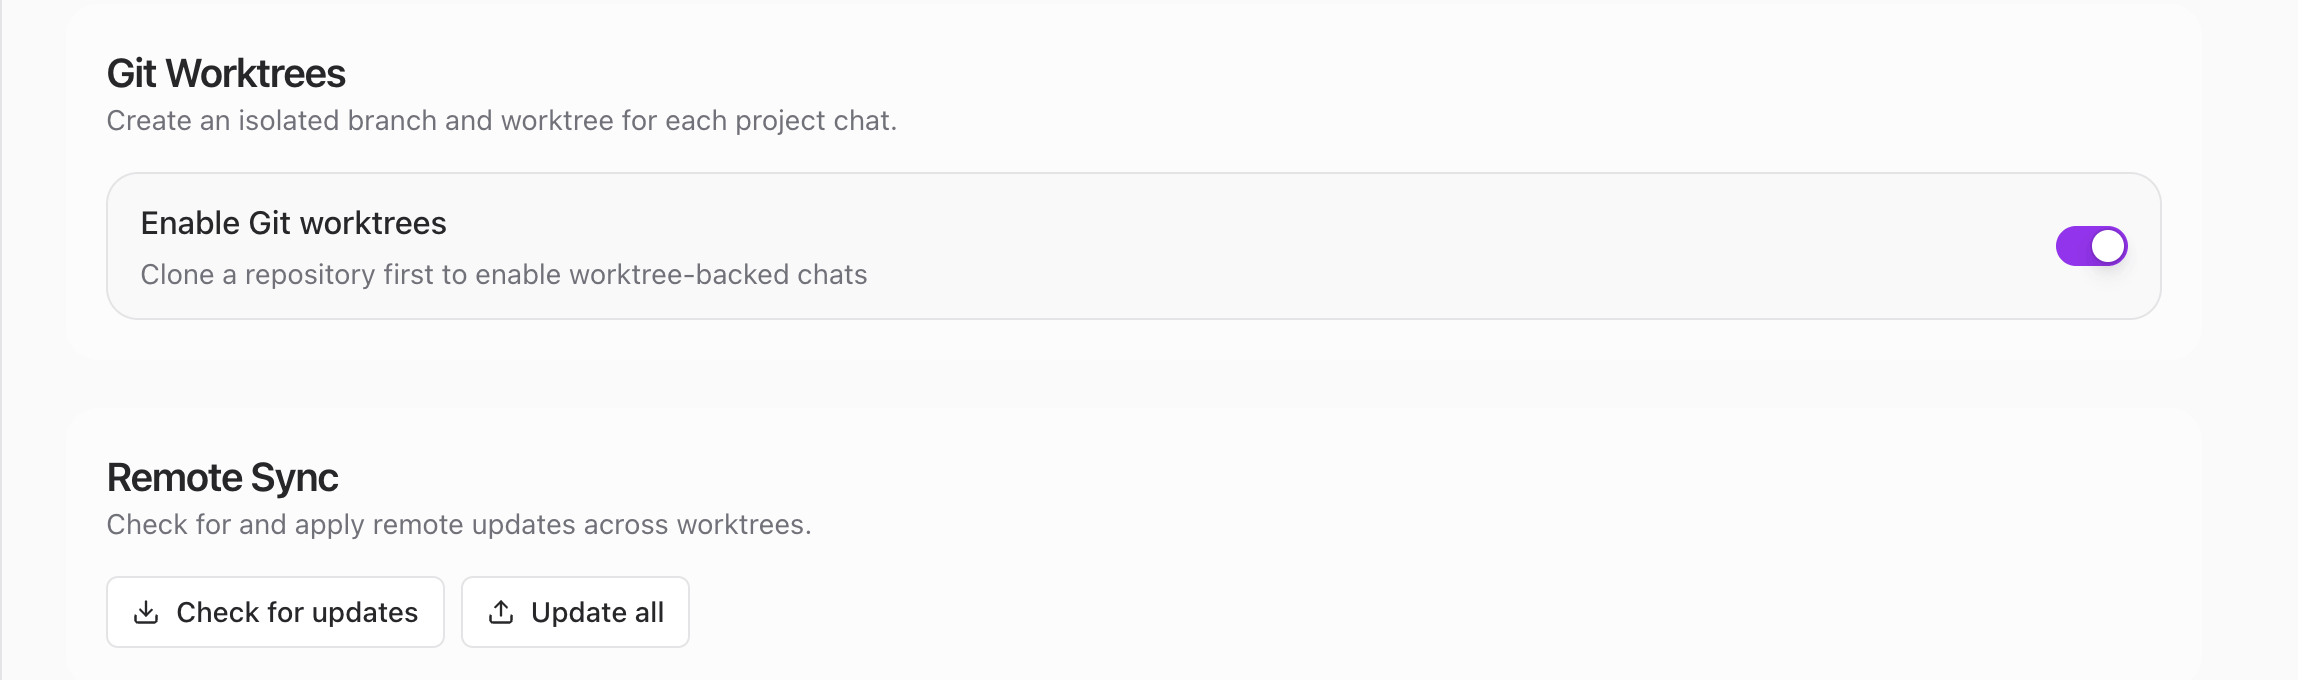
Toggle **Enable Git worktrees** to create isolated branches per chat. Each conversation gets its own working copy so concurrent chats do not conflict with each other. You need at least one cloned repository before you can enable worktrees.
When worktrees are enabled, a **Remote Sync** section appears with two controls:
* **Check for updates** scans upstream branches for changes.
* **Update all** pulls the latest changes into every worktree.
See [Git Worktrees](/guide/projects/development.md) for a deeper look at working with worktrees in project chats.
## Project Environment
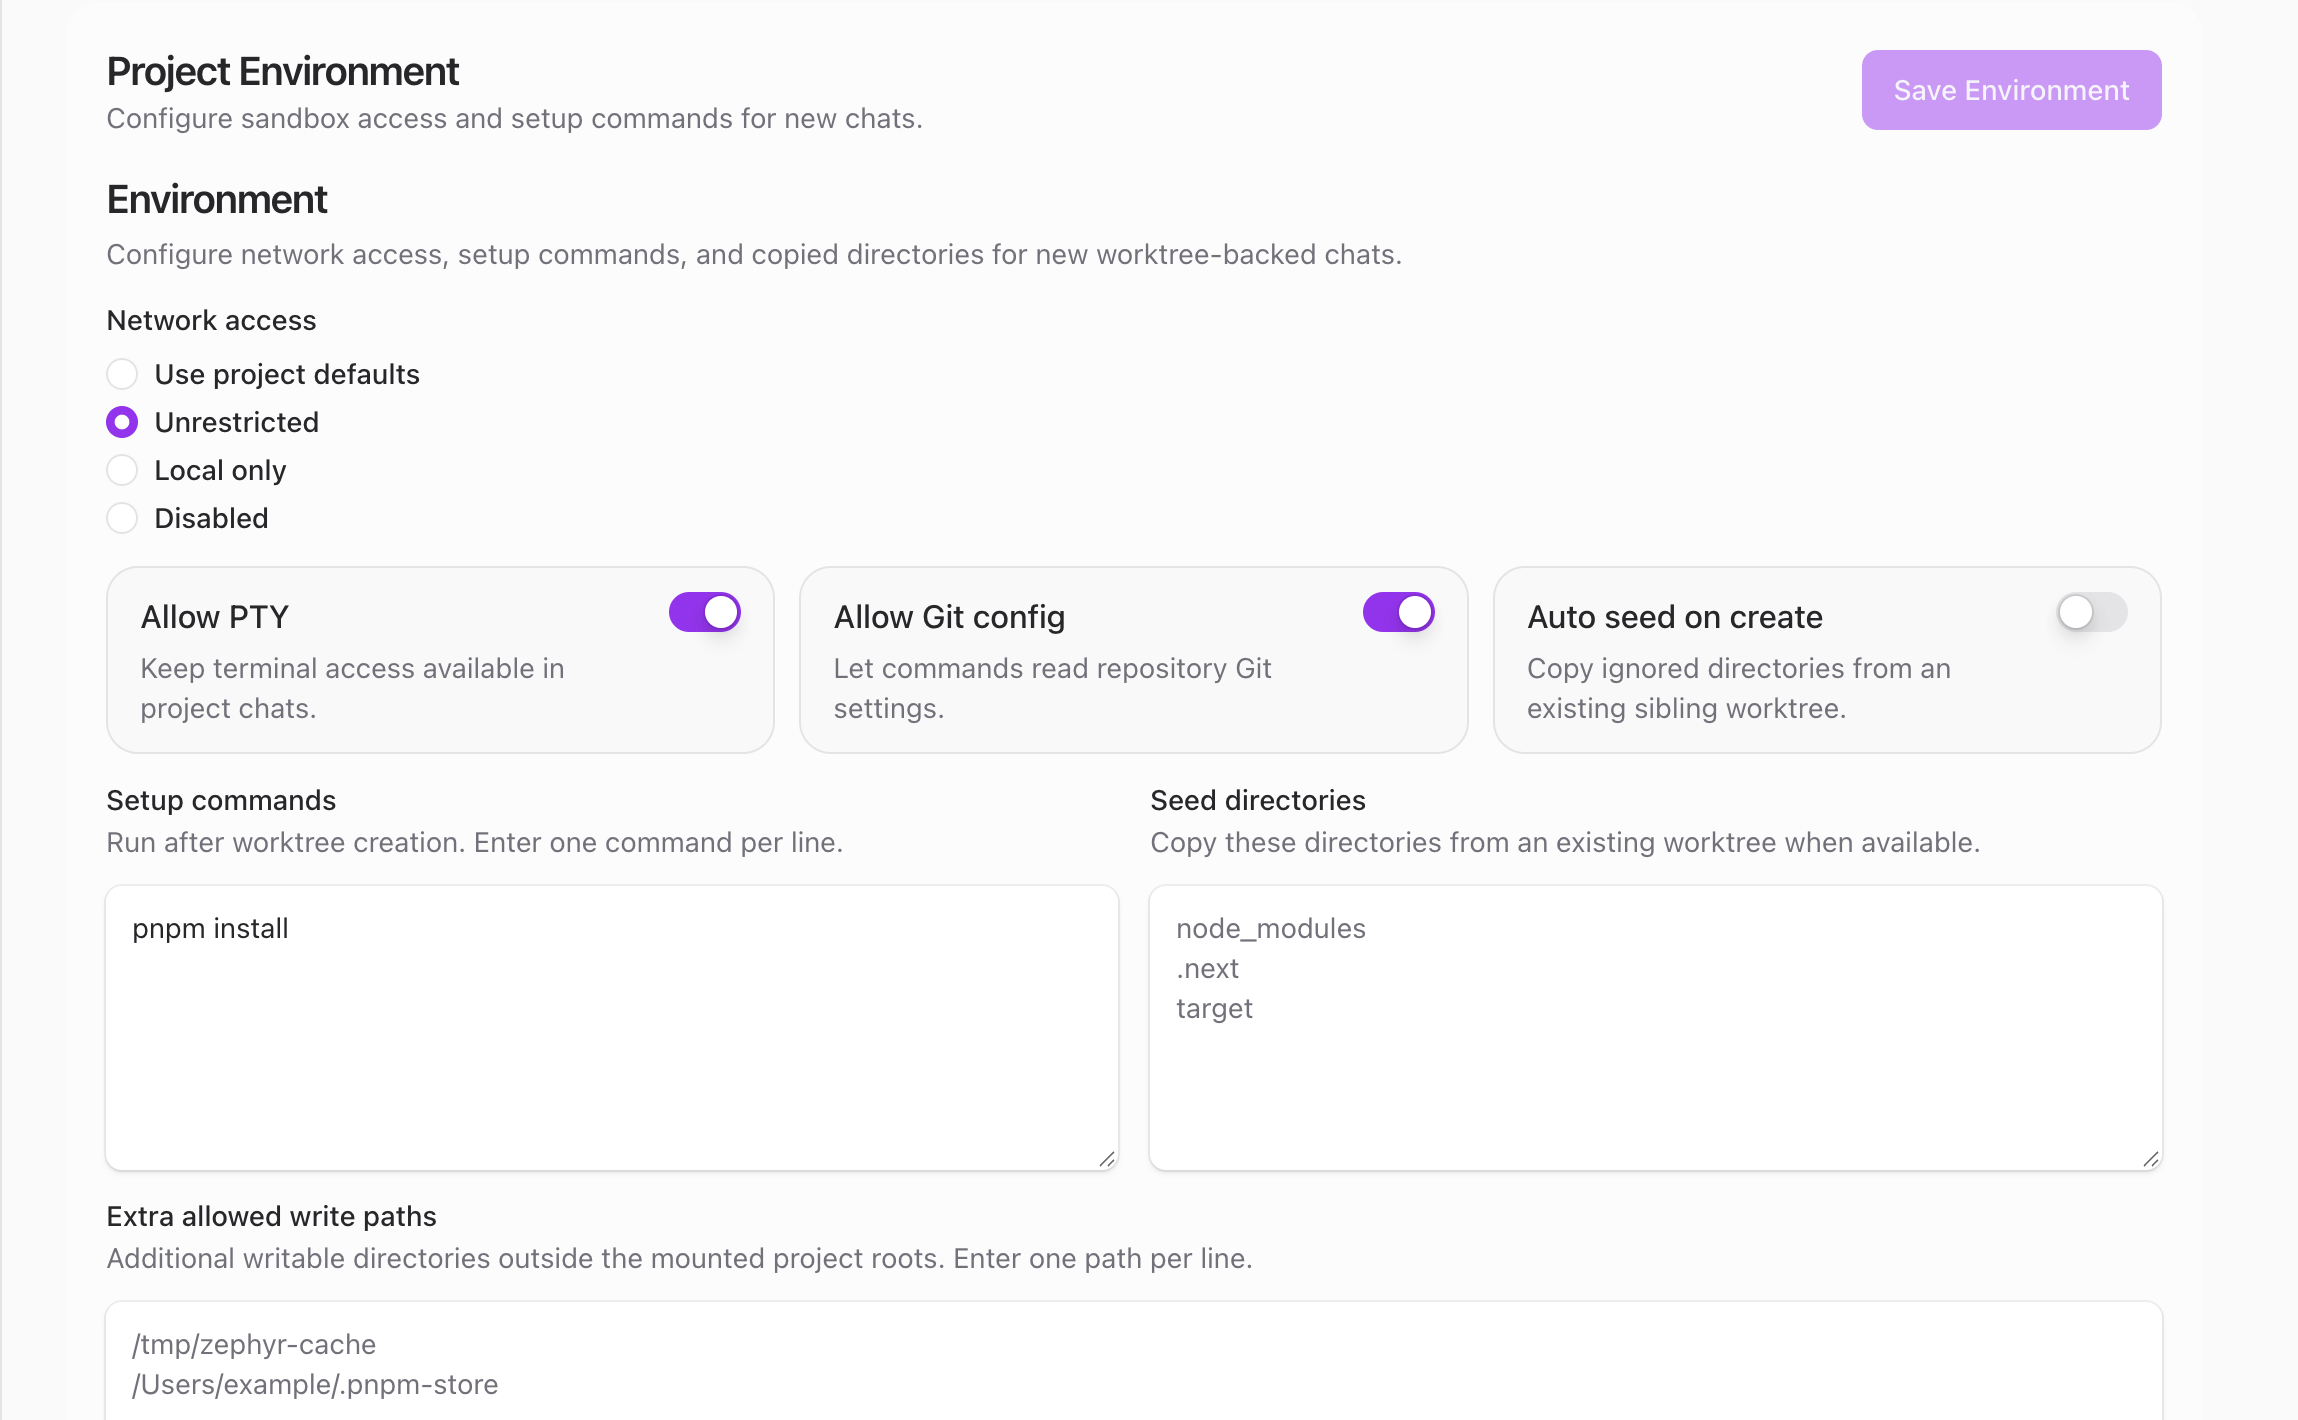
Controls sandbox settings for the project. The **Environment** panel has the following options:
* **Network access**. Choose between **Unrestricted**, **Local only**, or **Disabled**. The default is "Use project defaults".
* **Allow PTY**. Keep terminal access available in project chats.
* **Allow Git config**. Let commands read repository Git settings.
* **Auto-seed on create**. Copy shared ignored paths (like `.env.local` or `node_modules`) from an existing sibling worktree when a new one is created.
* **Setup commands**. Commands that run after worktree creation — one per line. For example, `pnpm install`.
* **Shared seed paths**. Repo-relative ignored files or directories to copy from an existing worktree, such as `.env.local`, `.dev.vars`, `node_modules`, `.next`, or `target`.
* **Extra allowed write paths**. Additional writable directories outside the mounted project roots — useful for caches or global stores like `/tmp/zephyr-cache`.
Click **Save Environment** to apply your changes. These settings apply to every conversation in the project. For workspace-wide defaults, see [Sandbox settings](/guide/settings/sandbox.md).
Use **Local Seed Actions** for machine-specific setup that should not sync with the project. Local actions can copy an approved absolute file path into an ignored worktree destination or fetch config from an HTTP endpoint using a local `env:VARIABLE_NAME` secret reference. Destinations must stay inside the worktree, cannot target `.git`, and are not overwritten unless explicitly enabled.
---
url: /guide/projects/code-knowledge-graph.md
---
# Code Knowledge Graph

The Code Knowledge Graph indexes your repository so specialists can understand the structure of your code. It builds automatically once you add repository sources or local folders in [Configuration](/guide/projects/configuration.md).
The page has seven tabs:
* **Status**. Shows the indexing progress and whether the graph is up to date.
* **Symbols**. Lists every indexed symbol (functions, classes, types) with search and filtering.
* **JSX**. Displays React/JSX component hierarchies found in the codebase.
* **Call Graph**. Visualizes which functions call which, helping you trace execution flow.
* **Pattern**. Detects recurring code patterns across the repo.
* **Git**. Shows git history, commit frequency, and file-level change patterns.
* **Communities**. Groups related files and modules into clusters based on how tightly they are coupled.
Specialists draw on this graph when answering questions about architecture, finding related code, or tracing dependencies.
---
url: /guide/projects/development.md
---
# Git Worktrees
Git worktrees give every project chat its own isolated branch so specialists can make changes without affecting your main code. Each conversation gets a dedicated working copy, and you control versioning through an in-chat toolbar.
This page covers how to enable worktrees, what the in-chat toolbar does, and how to keep everything in sync with your remote.
## Enable Git Worktrees

Worktrees give every project chat its own branch and working directory. Specialists write code in that isolated branch, so your main branch stays clean throughout the entire conversation.
To turn them on, open the [Configuration](/guide/projects/configuration.md) page and toggle **Enable Git worktrees**. You need at least one cloned repository in the project before the toggle becomes available.
Once enabled, every new chat you create inside that project automatically gets its own worktree. Existing chats without a worktree are not affected.
## Work in a Project Chat
When you open a project chat that has worktrees enabled, a toolbar appears at the top of the conversation. It gives you quick access to version control without leaving the chat.
The toolbar has four controls:
* **Branch badge**. Shows the branch icon and the name of the branch assigned to this chat. Each chat gets a unique branch so work never collides across conversations.
* **Turn counter**. A button labeled *"Turn X/Y"* that opens the snapshot history in the right sidebar. Each snapshot is a point-in-time record of the code at that turn, so you can review exactly what changed and when.
* **Undo last turn**. Reverts the most recent specialist action. The button is disabled when there is nothing to undo. Use it whenever a specialist takes a direction you want to roll back.
* **Push to remote**. Pushes the worktree branch to the remote repository so teammates can see the changes or open a pull request.
Think of it as version control built right into the conversation. Every specialist action is tracked, and you can step backward or push forward whenever you need to.
## Manage Worktrees
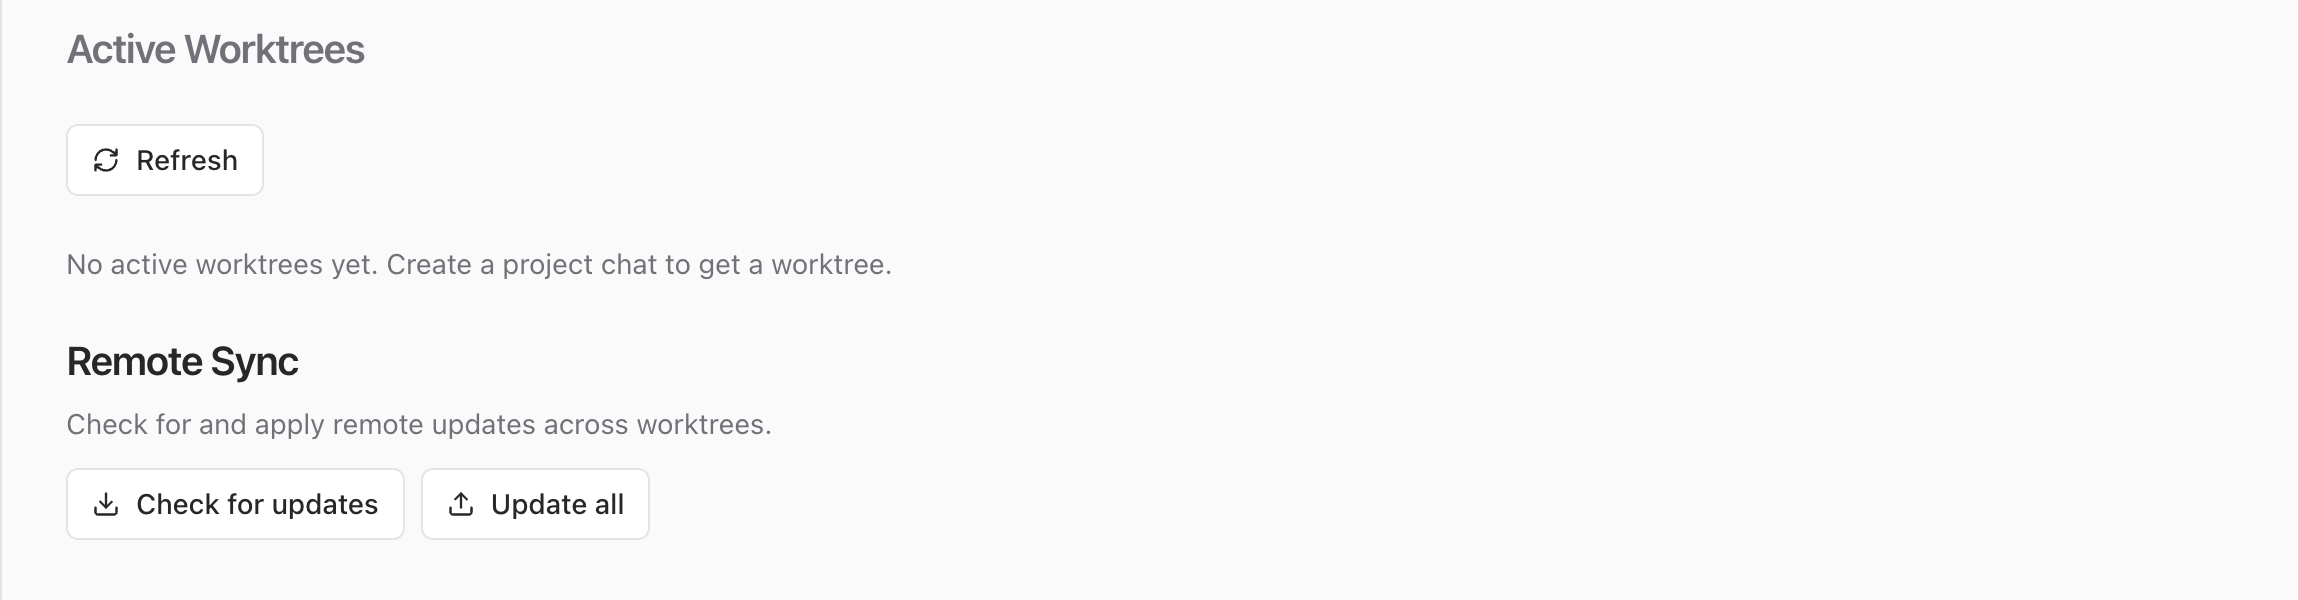
Click the **Active Worktrees** icon (🔀) in the [project toolbar](/guide/projects/index.md#the-project-toolbar) to open the dedicated worktrees page. It lists every active worktree with these details:
* Repository URL
* Branch name
* Linked chat ID
* Last updated timestamp
This page is useful for getting a birds-eye view of all the branches specialists are working on across your project chats. You can quickly spot which conversations are active and when each worktree was last touched.
If a chat is deleted while its worktree still exists, that worktree is flagged as orphaned with a warning badge. Orphaned worktrees are cleaned up automatically the next time the app restarts. You do not need to remove them manually.
Use the **Refresh** button at the top of the list to reload worktree status at any time.
## Sync with the Remote
Both the Configuration page and the Worktrees page offer remote sync controls to keep your branches current with the upstream repository.
**Check for updates** compares each worktree branch against its remote and reports a summary. You will see either *"X worktree(s) have updates (Y new commits)"* or *"All worktrees are up to date"*.
**Update all** pulls the latest remote changes into every worktree in one click. This is the fastest way to bring all branches up to date at once.
Running a sync regularly keeps your worktree branches current, especially when teammates push to the same remote. Pulling before you start a new chat session helps avoid merge conflicts down the line.
:::tip
Check for updates before starting a new chat session. A quick sync keeps your worktree branches aligned with the remote and prevents conflicts later.
:::
## What to Explore Next
* [Project Knowledge Sources](/guide/projects/knowledge.md). Attach files, docs, and context that specialists can reference during a conversation.
* [Projects overview](/guide/projects/index.md). Create and configure projects, manage repositories, and invite collaborators.
* [Chat](/guide/chat/index.md). Messaging basics, conversation layout, and sidebar navigation.
---
url: /guide/projects/linked-workflows.md
---
# Linked Workflows
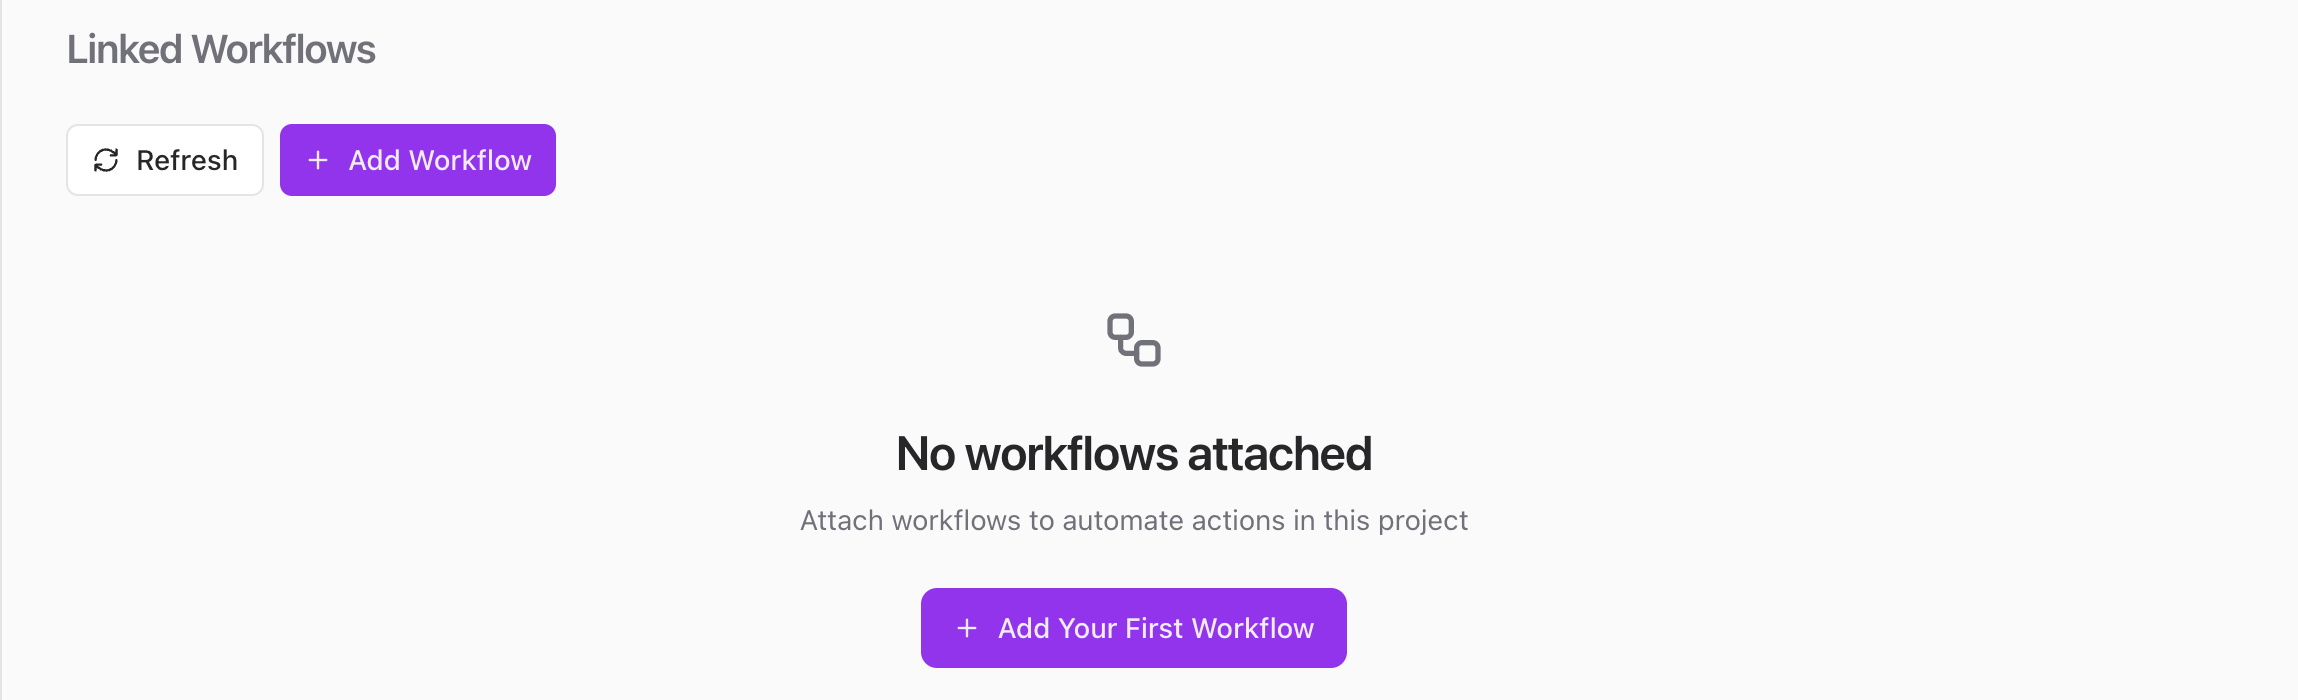
Attach [workflows](/guide/workflows/index.md) to a project so they run automatically in response to project events. Click **Add Workflow** to pick from your saved workflows, or **Add Your First Workflow** if none are attached yet.
Once linked, workflows can trigger on actions like new chat creation, specialist responses, or task updates within the project. Use the **Refresh** button to see the latest status.
---
url: /guide/projects/activity.md
---
# Activity
The Activity page gives you a dashboard view of everything happening in the project.
## Project Analytics
Tracks specialist retention metrics — how often specialists are invoked and how useful their responses are. Metrics appear after specialist turns are captured.
## Recent Project Chats
Lists conversations inside the project with their last update time and message count. This is the quickest way to see which chats are active and jump into one.
## Recent Task Activity
Shows the latest task changes linked to this project. It stays empty until you [create tasks](/guide/tasks/index.md) and associate them with the project.
---
url: /guide/projects/pending-tasks.md
---
# Pending Tasks
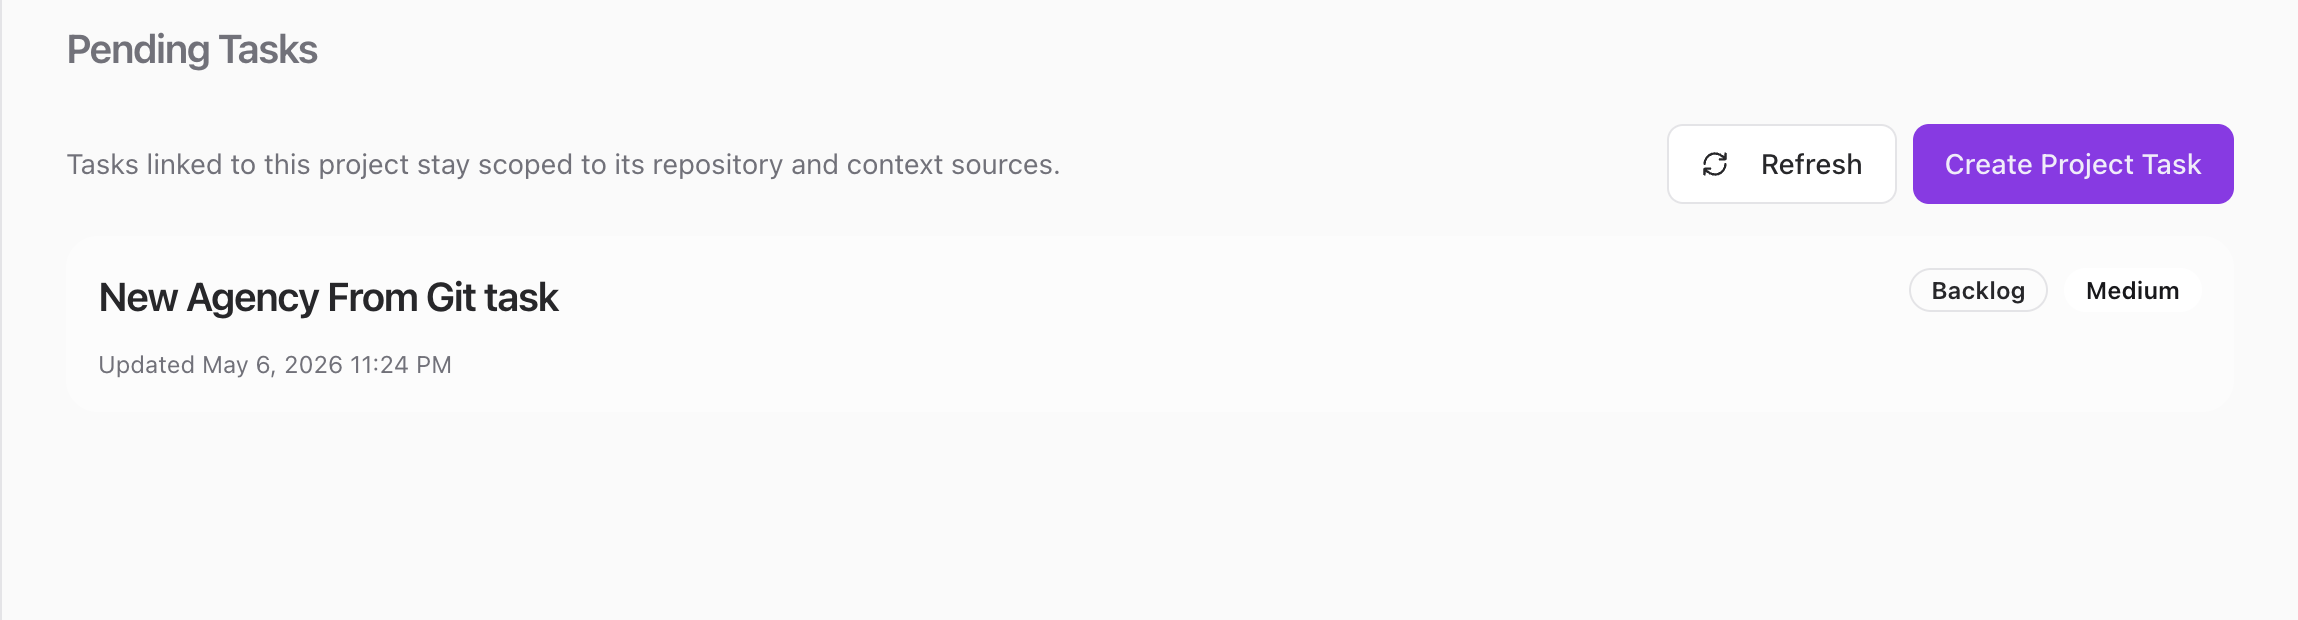
Shows all open tasks linked to this project. Tasks stay scoped to the project's repository and context sources, so specialists working on them have the right context automatically.
## Create a Task
Click **Create Project Task** in the top right corner. A new task is created immediately with a default name based on the project — for example, *"New Agency From Git task"*. The task starts in **Backlog** status with **Medium** priority.
Once created, the task card appears in the list showing:
* **Task name**. Click to rename or update the task.
* **Status badge**. The current status — Backlog, In Progress, Done, etc.
* **Priority badge**. The priority level — Low, Medium, High, or Critical.
* **Last updated**. When the task was last modified.
You can also link existing tasks from the [Tasks](/guide/tasks/index.md) page. Once tasks exist, they appear here so you can track progress without leaving the project.
Use the **Refresh** button to reload the task list at any time.
---
url: /guide/knowledge/index.md
---
# Knowledge Garden
Think of the Knowledge Garden as a file manager with a purpose. You organize documents, code, and reference material into **plots** (named collections), and [specialists](/guide/specialists/index.md) draw from those plots when they respond in conversations. Plots can be shared across the workspace or kept personal.
## Page Layout
The Knowledge Garden uses a two-panel layout. A secondary sidebar on the left lists your plots, and the content area on the right shows the selected plot's files.
The sidebar header displays "Knowledge Garden" with a **+** button to create a new plot. Plots are organized into two groups: **Personal** (visible only to you) and **Workspace** (visible to everyone). Each plot shows a colored icon and its name, with the active plot highlighted.
Right-click any plot to open a context menu with **Rename**, **Duplicate**, **Delete**, and **Copy to Workspace** (personal plots only).
## Create a Plot
Click the **+** button in the sidebar header, or click **Create Plot** on the empty state screen.

A dialog opens with three fields:
* **Icon**. Click to open a picker where you choose a Lucide icon with a custom color, or an emoji.
* **Name**. Required and must be unique in the workspace. Placeholder text reads *"Coding Practices"*.
* **Add to**. Choose **Workspace** (everyone has access) or **Personal** (only you). Defaults to Personal. This cannot be changed after creation.
Click **Save changes** to create the plot. You land directly on the new plot's detail page.
## How Knowledge Works with Specialists and Projects
Knowledge plots are the context layer that makes [specialist](/guide/specialists/index.md) responses more relevant. When a specialist responds in a [chat](/guide/chat/index.md), it can draw from the files and documents in linked plots.
[Projects](/guide/projects/index.md) can link to workspace plots so that every chat in the project benefits from shared context. You can also upload files or add text directly from a project's knowledge page. See [Knowledge Sources](/guide/projects/knowledge.md) under Projects for details.
:::tip
Use workspace plots for shared reference material like coding standards or API docs. Use personal plots for your own notes and drafts.
:::
---
url: /guide/knowledge/plots-and-files.md
---
# Plots & Files
Once you have [created a plot](/guide/knowledge/index.md), this page covers how to add content, browse files, and manage your plots.
## Add Content to a Plot
Open a plot and click the **Add item** dropdown in the toolbar. You get three options.
### Upload File
Opens your system file picker with multi-select enabled. Supported types include PDF, text, markdown, code files (JS, TS, JSON, HTML, CSS), and images (PNG, JPG, GIF, WebP, SVG). Max file size is 10 MB per file.
### Add Folder
Opens a multi-step directory upload wizard:
1. Select a project directory from your filesystem.
2. Choose whether to respect `.gitignore` rules (recommended).
3. Preview what will be uploaded: source files, symlinked directories, and ignored files.
4. Watch the upload progress bar with a file count.
5. Review the completion summary.
The wizard uses hybrid storage. Source files go to cloud storage, while dependency directories like `node_modules` are symlinked from your local filesystem.
### Type or Paste Content
Opens a dialog where you enter a title and paste or type text content directly. Good for notes, snippets, or reference material that does not live in a file.
### Drag and Drop
You can also drag files from your desktop or file manager directly onto the plot detail page. A drop overlay appears when files hover over the page. Release to start the upload immediately.
## Browse and Manage Files
The plot detail page shows all content in two view modes, toggled from the toolbar:
* **Tile view**. A responsive grid of file cards showing icon, name, and size.
* **List view**. Vertical rows with icon, name, size, and upload date.
Hover over any file to reveal a menu with these actions:
* **Preview**. Opens a modal with type-aware rendering. Text and code files show formatted content. Mermaid files render as diagrams. PDFs embed in an iframe. Images display inline.
* **Edit** (text content only). Opens the preview in edit mode so you can update the title and body.
* **Download**. Saves the file to your computer.
* **Delete**. Shows a confirmation dialog, then removes the file permanently.
## Project Plots
If a plot was created by uploading a folder (the **Add Folder** wizard), the detail page shows an extra **Project Summary** section at the top with high-level stats: total file count, source file count, ignored files, and any symlinked dependency directories. Use this to confirm the upload captured everything you expected before specialists reference it.
## Manage Plots
From the sidebar context menu or the plot detail page menu:
* **Rename**. Opens the edit dialog to change the name and icon. The plot type stays locked.
* **Duplicate**. Creates a full copy and navigates to it.
* **Copy to Workspace** (personal plots only). Makes the plot available to everyone. Confirmation required.
* **Delete**. Permanently removes the plot and all its content. This cannot be undone.
---
url: /guide/tasks/index.md
---
# Task Manager
The task manager is a kanban board for tracking work across your workspace. Tasks move through five columns as work progresses, and you can assign them to both people and [specialists](/guide/specialists/index.md).
## The Kanban Board
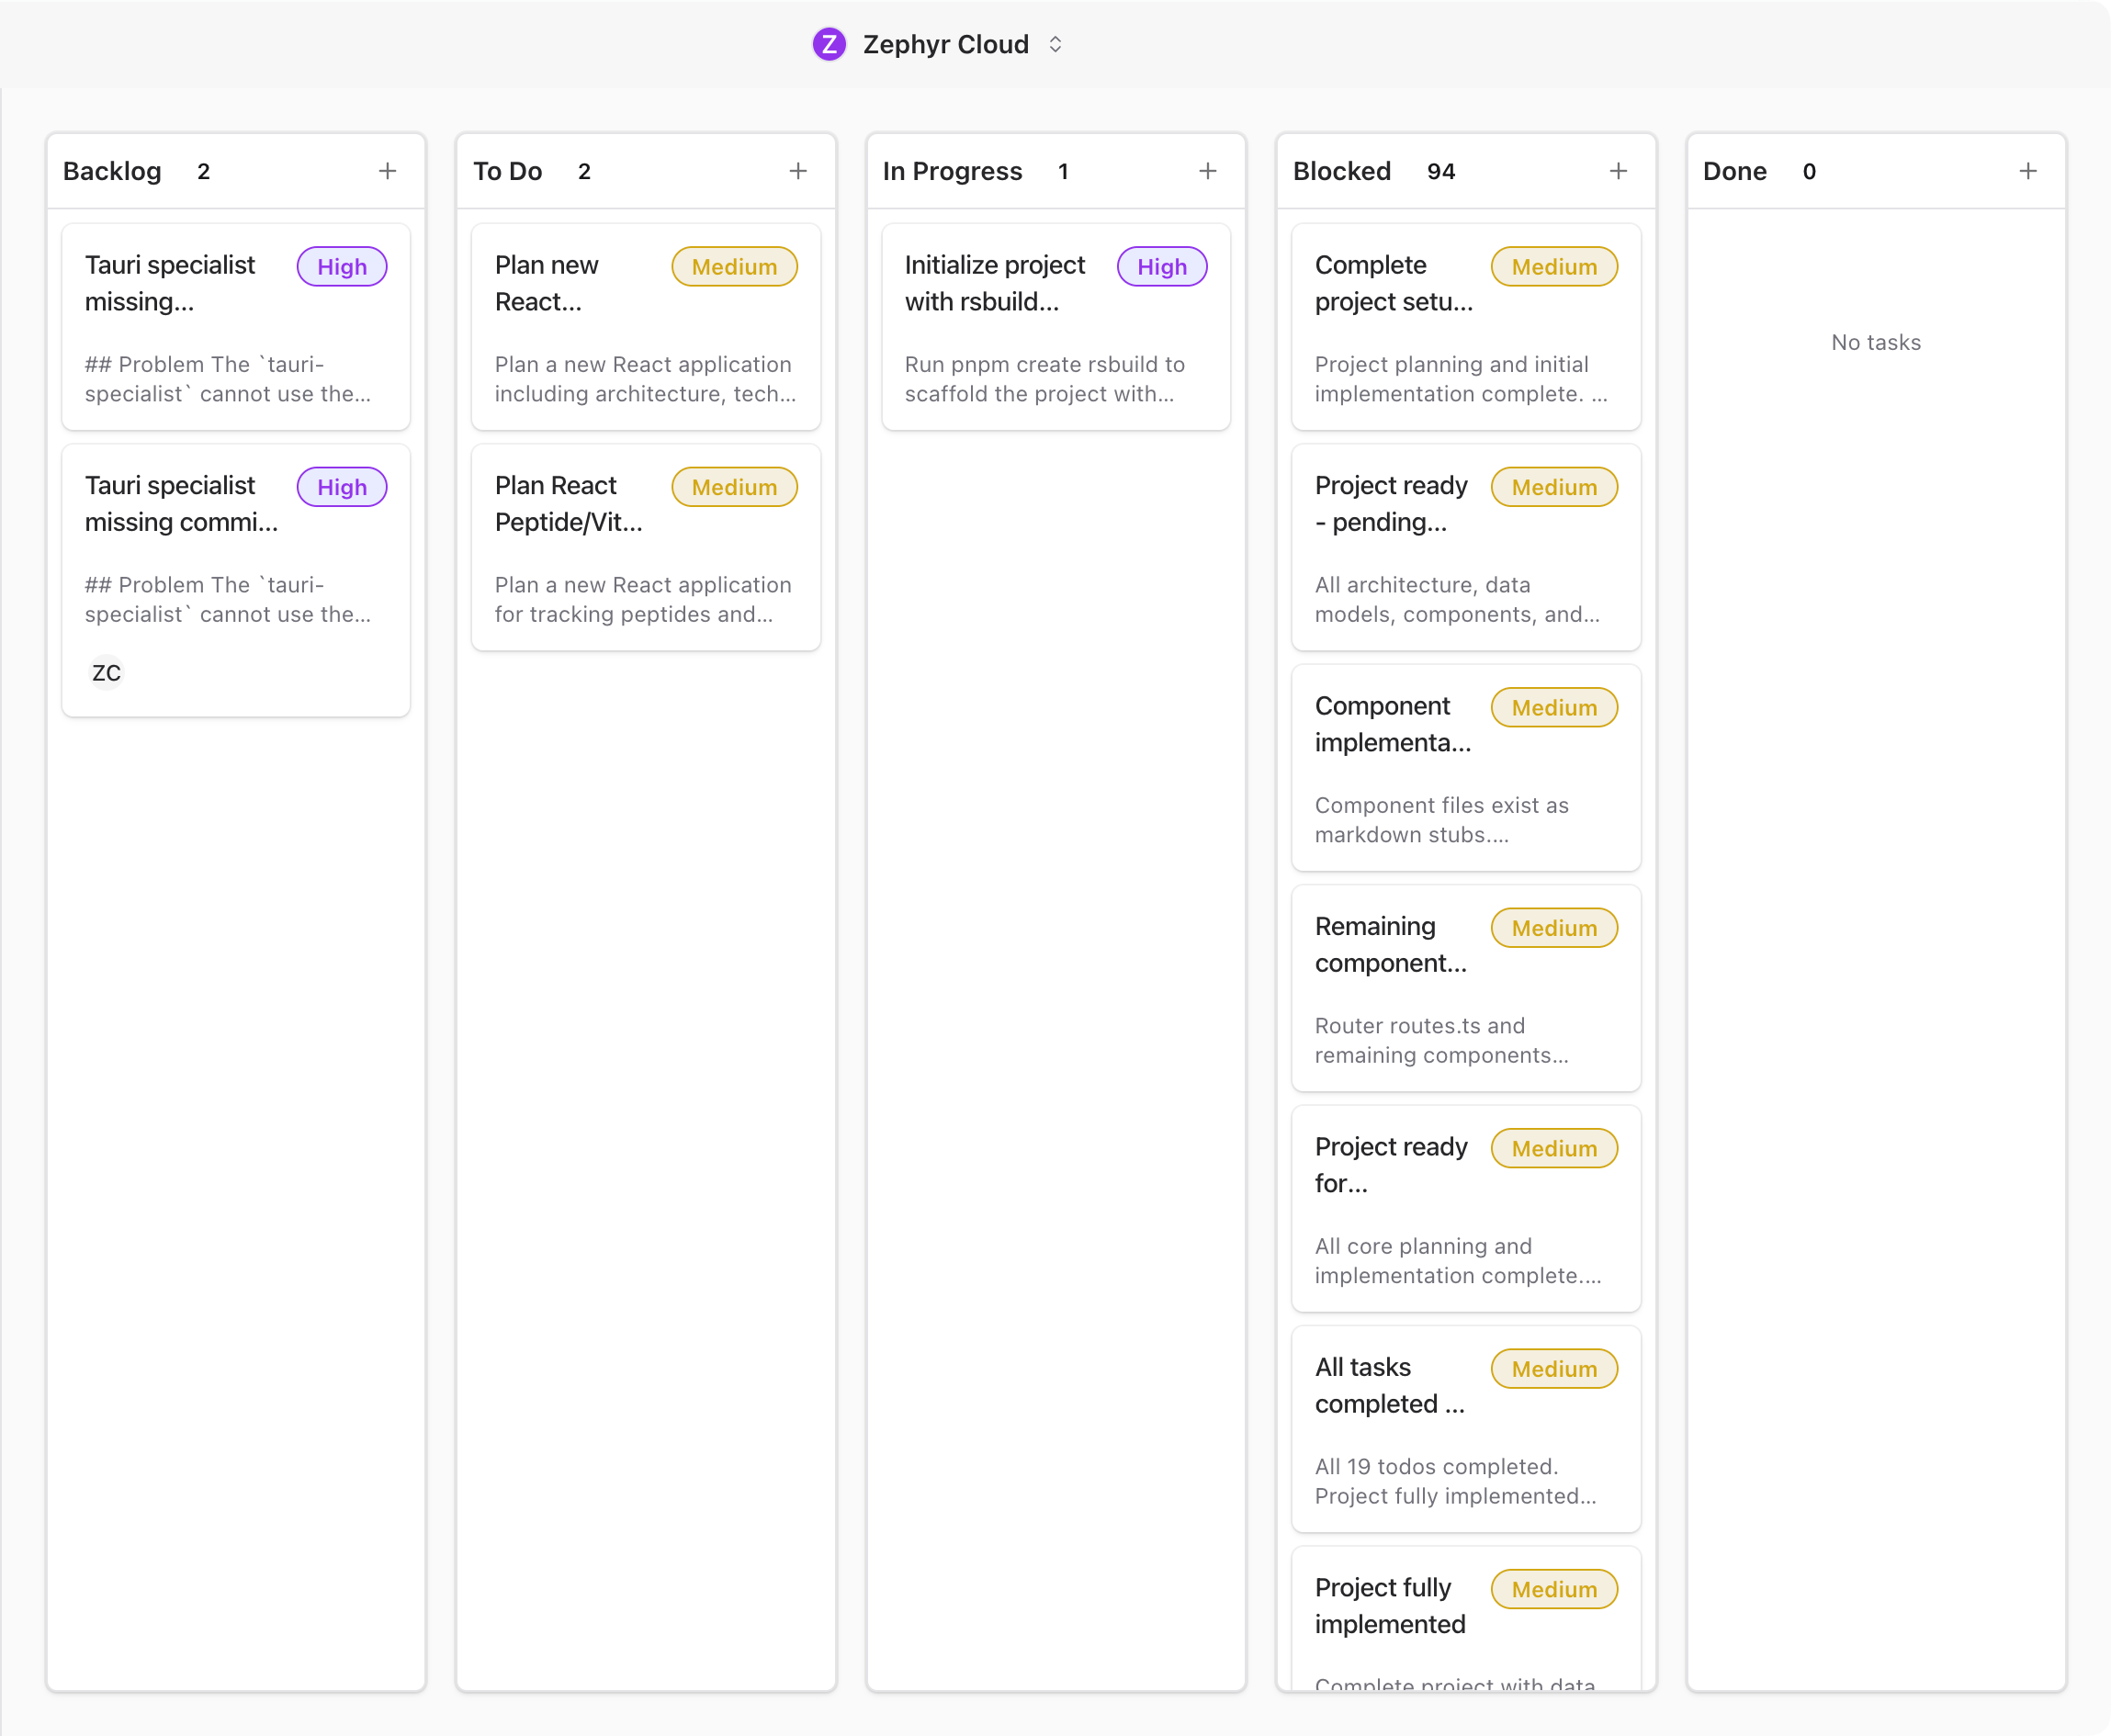
The board has five columns: **Backlog**, **To Do**, **In Progress**, **Blocked**, and **Done**. Each column header shows the column name, a task count badge, and a **+** button to create a task directly in that column.
Tasks appear as cards that you can drag between columns. Empty columns show *"No tasks"* as a placeholder.
## Create a Task
There are three ways to create a task:
1. Click the **+** button on any column header. The task starts in that column's status.
2. Click the **+** button in the sidebar header. The task starts in **Backlog**.
3. Press `Cmd+N` (macOS) or `Ctrl+N` (Windows/Linux). The task starts in **Backlog**.
A new task opens immediately in the [detail panel](/guide/tasks/task-details.md) with the default title *"New Task"*. Edit the title, fill in the details, and press `Cmd+Enter` or click **Create** to save.
## Drag and Drop
Drag a card to reorder it within a column or move it to a different column. The source card fades during the drag and a highlighted copy follows your cursor. Drop targets highlight when you hover over them.
Full keyboard and screen reader support is built in, with live announcements as you move cards.
## Read Task Cards
Each card on the board shows key details at a glance:
* Title (2 lines max)
* Priority badge, color-coded: blue for Low, yellow for Medium, themed for High, red for Urgent
* Description preview (2 lines max)
* Due date
* Subtask progress (completed out of total)
* Channel badges (up to 3, with an overflow count)
* Assignee avatars (up to 4, with an overflow count)
## Filter Tasks
The sidebar provides filters to narrow down what appears on the board:
* **Channel**. Filter by a specific channel.
* **Assignee**. Choose from All assignees, Unassigned, or Assigned to me.
* **Priority**. All, Low, Medium, High, or Urgent.
* **Status**. All, or any single status.
* **Include Archived**. Toggle to show archived tasks alongside active ones.
Click **Clear All Filters** to reset everything back to defaults.
## Link Tasks to Projects
Tasks can be linked to [projects](/guide/projects/index.md). When you link a task to a project, it inherits the project's repository URLs so specialists have code context when working on it. Project pages also have a dedicated [Pending Tasks](/guide/projects/pending-tasks.md) tab showing only tasks linked to that project.
:::tip
Press `Cmd+N` or `Ctrl+N` from the task board to quickly create a new task without clicking.
:::
---
url: /guide/tasks/task-details.md
---
# Task Details
Clicking any task card opens a full detail panel. From here you can edit every field on the task — title, status, priority, description, attachments, assignees, and more — and link the task to projects and channels.
You can also paste images from your clipboard or drag files directly into the chat. Specialists can read and respond to attached files when they are part of the conversation.
## Message Actions
Hover over any message and a small action bar appears in the top-right corner with quick options like reacting with an emoji and replying in a thread. Click the **three-dot menu** in the action bar to open the full actions menu.
The menu includes:
* **Edit message** to fix typos or update what you wrote.
* **Copy link** to share a direct link to the message with anyone in the workspace.
* **Reply in thread** to start a focused side conversation. See [Threads](/guide/chat/threads.md) for more.
* **Delete message** to remove it from the channel.
* **Translate** to translate a message into another language.
## Open Links Without Leaving the App
When a specialist sends a link, or you click a URL in any message, the app shows a small *"Open external link?"* confirmation dialog before navigating. Confirm and the link opens in the [embedded browser](/guide/chat/embedded-browser.md) panel right next to your chat — no app switching, no losing your place in the conversation.
## What to Explore Next
* [Browse Specialists](/guide/getting-started/browse-specialists.md) to discover more specialists from the marketplace.
* [Threads](/guide/chat/threads.md) for branching off a specialist response into a focused side conversation.
* [Projects](/guide/projects/index.md) to connect a code repository and give specialists your codebase as context.
:::tip
You can have multiple channels open in tabs across your workspace, each with different specialists and topics. Use the sidebar to switch between them.
:::
---
url: /guide/getting-started/browse-specialists.md
---
# Browse Specialists
The Specialists marketplace is where you find pre-built AI agents to add to your workspace. Once added, a specialist becomes available to mention with **@** in any channel.
You do not need to visit the marketplace to start chatting — see [Your First Channel](/guide/getting-started/your-first-channel.md) for the natural flow that adds a specialist on first mention. This page is for when you want to discover and install more specialists in advance.
## Open the Marketplace
Click the **Specialists** icon in the icon rail on the left side of the app.

You will see specialists grouped into sections like **Custom Specialists** and **Added**. Each card shows the specialist's name, publisher, and a short description of what it does.
Use the search bar at the top to filter by name or keyword. Click any card to read its full detail page before deciding to add it.
## Add a Specialist
Pick any specialist that looks useful and click the **Add** button on its card. The button changes to a green **Added** badge and the specialist becomes available to mention in every channel in your workspace.
:::tip
Try **Zephyr Welcome** first. It is built to introduce you to the platform and will walk you through what specialists can do.
:::
You can add as many specialists as you want. Browse by category, search by keyword, or click any card to explore.
## Build Your Own
If you cannot find a specialist that fits your needs, you can build one from scratch. The specialist builder lets you define a persona, attach knowledge sources, wire up tools, and even chat with an AI assistant that helps refine the configuration as you go.
Click the **+** button on the Specialists page to open the builder, or read the [Specialist Builder](/guide/specialists/building-specialists.md) guide for a walkthrough.
## What to Explore Next
* [Your First Channel](/guide/getting-started/your-first-channel.md) to start a conversation
* [Specialists guide](/guide/specialists/index.md) for more on building, configuring, and using specialists
---
url: /guide/chat/index.md
---
# Channels Overview
Channels are where conversations happen. Each channel is a dedicated space for a topic, project, or team — and any number of people and specialists can join in. This page covers the layout you see when you're chatting in a channel.

## Channel List
The sidebar on the left shows your conversations, grouped into three sections.
### Channels
**Channels** are group conversations. Each channel has a name and can be public (visible to everyone in the workspace) or private (invite-only). Click the **+** button next to the heading to create a new channel.
### DMs
**DMs** are direct messages with individual people. Each entry shows the person's name and a presence indicator. A green dot means they are currently online. Click the **+** button next to the heading to start a new direct message.
### Archived
The **Archived** section is collapsed by default. Click it to expand and see channels and DMs that have been archived. From here you can restore an item back to its original section or permanently delete it.
## Message Area
The center column is where conversations happen. When you select a channel or DM from the sidebar, its messages appear here.
Messages stream in as they arrive. You do not need to refresh to see new content. Specialist messages have their own avatar and name so you can tell them apart from messages sent by people. For more on working with messages, see the [Messaging guide](/guide/chat/messaging.md).
When you open a channel that has no messages yet, you will see a *"Start a conversation"* screen with suggestion prompts to help you kick things off. See [Your First Channel](/guide/getting-started/your-first-channel.md) for a walkthrough.
## Channel Header
The bar at the top of the message area shows the channel name on the left and a row of icons on the right.
The icons in the header include:
* **People count** showing how many human members are in the channel.
* **Specialist count** with a numbered badge showing how many specialists have been added. Click it to open the channel's [Members](/guide/chat/channel-details.md) panel.
* **Channel details** opens a slide-in panel with channel settings, members, tasks, and history. See [Channel Details](/guide/chat/channel-details.md).
* **Layout toggles** for opening additional side panels:
* **Browser** opens the [embedded browser](/guide/chat/embedded-browser.md) panel alongside the chat. Preview a localhost dev server, click **Select Element** to send any DOM element straight into the chat as context, or open links from messages here without leaving the app.
* **Code** opens the [Code Editor](/guide/chat/code-editor.md) panel alongside the chat. When a project has linked repositories, files the specialist edits appear here in real time, and you can jump straight from any element in the Browser to its source line.
You can have multiple side panels open at the same time. The layout splits the available space between them.
## Side Panels
Click the channel name or the info icon to open the **Channel Details panel** on the right. It slides in alongside the message area with five tabs scoped to the current channel:
* **Members** lists every person and specialist in the channel. Admins can add or remove participants from here.
* **Tasks** shows tasks linked to this channel. You can create tasks, change their status, and assign them to people or specialists without leaving the conversation.
* **Knowledge** shows knowledge plots attached to the channel. Link a [knowledge garden](/guide/knowledge/index.md) plot so specialists have access to reference material when responding.
* **Workflows** shows [workflows](/guide/workflows/index.md) tied to this channel. Attached workflows can be triggered by messages or run on demand.
* **History** logs channel events like member joins, specialist invocations, and configuration changes.
For a deep dive into each tab, see the [Channel Details](/guide/chat/channel-details.md) page.
## Quick Search and Navigation
Click any channel or DM in the sidebar to open it in the message area. Sidebar sections are collapsible, so you can tuck away sections you do not need right now.
For faster navigation, press **`Cmd+K`** on macOS or **`Ctrl+K`** on Windows and Linux to open the command palette. Type a channel name, person, or keyword to jump straight there. The palette also lets you trigger actions like creating a new channel or opening settings without leaving the keyboard.

## Notifications
When a specialist or teammate replies to you, sends a message in a channel you're in, or @-mentions you, a notification appears in the top-right of the app. Click the notification to jump straight to the message.
## What to Explore Next
* [Channel Details](/guide/chat/channel-details.md). Deep dive into the channel settings and side panels.
* [Messaging](/guide/chat/messaging.md). Sending messages, formatting, attachments, and mentions.
* [Threads](/guide/chat/threads.md). Side conversations within a channel.
* [Specialists](/guide/specialists/index.md). Adding AI specialists to your channels.
* [Projects](/guide/projects/index.md). Organizing channels into project folders.
---
url: /guide/chat/messaging.md
---
# Sending Messages
The message input bar at the bottom of every conversation handles text, file attachments, voice notes, and mentions.
## Text Input
The input area is a multi-line text field with placeholder text that reads *"Send a message or invite people to a chat with @ to mention a specialist"*. Just start typing and the field expands as needed.

Drafts are saved automatically for each conversation. If you switch channels and come back, your unsent text is still there. Use the up and down arrow keys to scroll through your recent command history.
## Attachments
Click the **+** button to the left of the input field to open the attachment menu, or drag and drop files directly into the conversation.
Accepted file types include images, PDFs, plain text, and Word documents (`.doc` and `.docx`). You can attach up to 10 files at a time, with a maximum size of 50 MB per file. Thumbnails appear inline before you send so you can confirm the right files are attached.
## Voice Input
Click the microphone button to record a voice note. The app transcribes your speech into text using the language configured in your settings. This is useful for quick messages when typing is not convenient.
## @Mentions
Type `@` in the input field to open the mention picker. From here you can mention:
* **People**. Tag a person in the workspace to get their attention.
* **Specialists**. Mention an AI specialist to have it respond in the conversation. See [Working with Specialists](/guide/specialists/using-specialists.md) for details.
* **Files and folders**. Reference items from the virtual file system so the conversation has context about specific resources.
## Reactions
Hover over any message to see the reaction bar. Six quick reactions are available: thumbs up, heart, fire, clap, laughing face, and surprised face.
Click a reaction to add it. Click the same reaction again to remove it. Reactions are visible to everyone in the conversation and each reaction shows a count of how many people have used it.
## Translation
When a message is written in a language other than your own, a translate button appears. Click it to see the message in your language. Over 15 languages are supported. Translations are cached so repeated requests load instantly. A *"Show Original"* link lets you switch back to the original text.
## Read Receipts
Every message shows delivery status in the lower right corner. The four states are:
1. **Sending**. The message is on its way to the server.
2. **Sent**. The server received it.
3. **Delivered**. The recipient's device received it.
4. **Read**. The recipient opened the conversation and saw the message.
When multiple people have read a message, up to three reader avatars appear. If more than three people have read it, a count badge shows the overflow.
## Message Actions
Hover over a message to see the action toolbar. Available actions include:
* **Copy**. Copy the message text to your clipboard.
* **Reply**. Start a [thread](/guide/chat/threads.md) in response to the message.
* **Delete**. Remove the message. You can only delete messages you sent yourself.
## AI Feedback
When a specialist sends a response, thumbs up and thumbs down buttons appear on the message. Use these to give feedback on the quality of the response.
## Composer Mode
The input bar has an audience selector that controls whether your message triggers a specialist response.
* **Everyone** (default). Your message goes to the channel and specialists respond if mentioned or matched by keyword.
* **Humans Only**. Your message reaches human participants only. Specialists do not respond unless you explicitly mention one with **@**. A ribbon appears above the input to remind you that you are in human-only mode.
Toggle between modes by clicking the audience pill next to the input, or press `Cmd+.` (macOS) or `Ctrl+.` (Windows/Linux) while focused in the text field.
## What to Explore Next
* [Threads](/guide/chat/threads.md). Learn how to use side conversations for focused discussions.
* [Working with Specialists](/guide/specialists/using-specialists.md). Understand how specialist responses appear and how to interact with them.
---
url: /guide/chat/threads.md
---
# Thread Conversations
Threads let you branch off from a message in the main chat for a focused side conversation. They keep the main channel clean while letting you dig deeper into a specific topic. Any message in a channel can become the starting point for a thread.
## Start a Thread
Hover over any message in the main chat. A small action bar appears in the top-right of the message with quick options. Click the **Reply in thread** icon (a curved arrow) to open the thread panel on the right side of the screen, with the parent message preview at the top.
You do not need to create a thread explicitly. The first reply you send creates the thread automatically. Type your reply in the input field at the bottom and press Enter or click the send button.
## Reply to a Thread
The reply input supports the same features as the main message input: text, @-mentions, file attachments, and drag and drop. Replies appear in the thread panel and stay out of the main channel.
## Choose Who Sees Your Reply
Threads have the same audience toggle as the main composer. Click the **Everyone** pill below the reply input to switch to **Humans Only** mode for that thread.
In **Everyone** mode, both people and specialists can see and respond to your replies. In **Humans Only** mode, specialists are paused — handy for a quick side conversation with teammates without an AI chiming in.
The toggle is per-thread, so you can run quiet threads alongside specialist-led ones in the same channel.
## See Replies Back in the Channel
Once a thread has at least one reply, an indicator appears under the original message in the main chat showing how many replies the thread has and who has participated. Click the indicator to open the thread panel and see all replies.
The indicator shows:
* **Participant avatars.** Up to three stacked profile pictures of people who have replied.
* **Reply count.** The total number of replies, like *"2 replies"*.
* **Last reply time.** When the most recent reply was posted.
* **Status dot.** A colored dot showing the execution state of any specialist activity in the thread. Green means done, yellow means in progress, red means an error, gray means idle.
* **Unread badge.** A count of new replies you have not read yet.
## Resize the Thread Panel
The thread panel opens as a resizable side panel alongside the main chat. Drag the divider between the main chat and the thread panel to adjust the width of each side. Each side has a minimum width of about a quarter of the screen.
## Specialist Reasoning and Tool Calls
When a specialist replies in a thread, you may see two extra sections inside its message:
* **Reasoning.** A collapsible block showing the specialist's chain of thought. Click to expand and read how the specialist worked through the problem.
* **Tool calls.** A collapsible block listing every tool the specialist used while preparing the response — searching code, reading files, running commands, looking up tasks. Each tool call shows its inputs and outputs so you can verify the work.
These sections appear automatically when a specialist's response involves reasoning or tool use. They are collapsed by default to keep the reply readable.
## Empty Threads
When you open a thread that has no replies yet, you will see an empty state with a message icon and the text *"No replies yet. Be the first to reply to this message."* along with the reply input field at the bottom.
## Read-Only Threads
If you are not a member of the channel, you can still view threads but cannot reply. The input area is replaced with a notice that reads *"Read-only thread. Join this channel to reply."*
## What to Explore Next
* [Channels Overview](/guide/chat/index.md). Return to the main chat layout guide.
* [Messaging](/guide/chat/messaging.md). Learn about all the features available when sending messages.
* [Working with Specialists](/guide/specialists/using-specialists.md). See how specialists respond in threads.
---
url: /guide/chat/channel-details.md
---
# Channel Details
Every channel has a slide-out panel with all the settings, members, and resources tied to that channel. Open it by clicking the channel name in the header, or by clicking the people-count icon to jump straight to the Members tab.
The panel splits into five tabs along the top: **Members**, **Tasks**, **Knowledge**, **Workflows**, and **History**.
## Members
The Members tab lists every person and specialist in the channel.
For each person you see their name, avatar, role, and online status. For each specialist you see its avatar, name, and a short description.
If you have admin permissions, you can add or remove members from this tab. Click the **+ Add member** button to bring up the workspace member picker. Type a name to filter the list and click to add.
## Specialists
The same panel includes a Specialists section under Members. Click **+ Add specialist** to open the specialist picker and add an agent to the channel. Once added, the specialist will respond to @-mentions and any messages routed to it.
You can also remove a specialist from a channel without deleting it from your workspace. Hover the specialist row and click the remove icon.
## Tasks
The Tasks tab shows every task linked to this channel. You can:
* **Create a task** with the **+ New task** button.
* **Change task status** between Backlog, To Do, In Progress, Blocked, and Done.
* **Assign tasks** to people or specialists.
* **Open a task** to see acceptance criteria, comments, and history.
For more detail see [Tasks](/guide/tasks/index.md).
## Knowledge
The Knowledge tab lists knowledge plots attached to the channel. Linking a plot gives every specialist in the channel access to that reference material when they respond.
Click **+ Link plot** to open the plot picker and attach an existing plot. To learn how to create plots, see [Knowledge Sources](/guide/projects/knowledge.md).
## Workflows
The Workflows tab lists workflows tied to the channel. Attached workflows can be triggered automatically by messages or run on demand.
Click **+ Add workflow** to attach an existing workflow. For workflow basics see [Workflows](/guide/workflows/index.md).
## History
The History tab is a chronological log of channel events:
* Member joined or left.
* Specialist added or removed.
* Channel renamed or settings changed.
* Knowledge plot or workflow attached.
History entries are read-only. They are useful for understanding how a channel evolved over time, especially when working with teammates who joined the channel after it was set up.
## What to Explore Next
* [Channels Overview](/guide/chat/index.md). The main chat layout guide.
* [Messaging](/guide/chat/messaging.md). Sending messages, formatting, and mentions.
* [Threads](/guide/chat/threads.md). Side conversations within a channel.
---
url: /guide/chat/embedded-browser.md
---
# Embedded Browser
The embedded browser is a full Chromium browser that runs inside the app, right next to your chat. It lets you preview live web pages, share what you're seeing with a [specialist](/guide/specialists/index.md), and jump straight from a UI element on the page to the source file that produced it. It pairs with the [Code Editor](/guide/chat/code-editor.md) panel to make the build-test-fix loop happen without ever leaving the conversation.
## When to Use It
* Browse a localhost preview of an app a specialist is helping you build, then hand it elements to fix or improve.
* Open a documentation page, blog post, or design reference alongside the chat without leaving the app.
* Use [Browser Extensions](/guide/settings/browser-extensions.md) like password managers or accessibility tools inside the app's browser.
* Send the URL or selected element straight into the chat as context the specialist can reason about.
## Open the Browser

Every channel has a row of panel toggle buttons in the workspace heading at the top of the chat. Click the **Browser** (globe icon) to open it as a panel next to the chat. Click again to hide it.
You can also open the Browser by clicking a link inside any chat message. After confirming the [link-safety modal](#link-safety), the Browser panel opens and navigates to the URL automatically.
## The Browser Toolbar
Across the top of the panel you'll find:
* **Back, Forward, Reload, Home.** Standard browser navigation. Home resets to the default landing page (Google by default).
* **URL bar.** Type a URL or search query and press Enter. The placeholder reads *"Enter URL or search…"*.
* **Select Element** *(pointer icon, right side)*. Activates element-picking mode. See below.
You can see the full toolbar in context above and in the [build-test-fix loop screenshot](#the-build-test-fix-loop) below.
## Select Element
This is what makes the embedded browser more than just a browser. Click the **Select Element** button, then click any element on the page. An action bar appears with three buttons:

* **Send to Chat.** Pastes the element's HTML snippet straight into the active chat input. You can then add your own question and send.
* **Open in Editor.** Jumps to the source file that produced this element and opens it in the [Code Editor](/guide/chat/code-editor.md) panel at the right line. Requires a source map — usually available for development builds. The button is disabled when no source map is found.
* **Dismiss.** Cancels the selection and hides the action bar.
### Send to Chat in Action

After you click **Send to Chat**, the element's HTML snippet appears as the first line of your chat input. Type your follow-up directly underneath — *"make this a bit taller"*, *"why is this off-center?"*, *"add a label"* — and send. The specialist sees the exact DOM node alongside your request and knows precisely which element you're talking about, without you having to describe it.
You can also keep selecting more elements: each click on **Send to Chat** appends a new HTML snippet to the input, so you can stack multiple elements in a single message and ask the specialist to handle them together.
## The Build-Test-Fix Loop
The browser, the [Code Editor](/guide/chat/code-editor.md), and the chat are designed to work together. A typical session looks like this:
1. Ask a specialist to build a feature in a [project](/guide/projects/index.md) chat.
2. The specialist edits files. You see them appear in the **Code** panel.
3. Your dev server (or the specialist's `npm run dev`) serves the app on localhost.
4. Open the **Browser** panel to that localhost URL. The page renders alongside the chat.
5. Spot something that's not right. Click **Select Element**, click the offending element, click **Send to Chat**.
6. Ask the specialist to fix it. The specialist edits the source file, the dev server reloads, the browser reloads, you check again.
7. Repeat until done — without ever switching apps, copying URLs, or pasting screenshots.
## Link Safety

When you click an http or https link inside any chat message, the app shows an *"Open external link?"* confirmation modal before navigating. The modal displays the full URL with these actions:
* **Open in browser** sends the URL to the embedded browser panel and switches focus to it.
* **Copy link** copies the URL to your clipboard so you can paste it elsewhere.
* Click outside the modal or press Escape to cancel.
This stops links from auto-opening browser windows in your face and gives you a chance to read the URL before navigating. Links that aren't http or https (like `javascript:` or `file:` URLs) render as plain text and can't be clicked.
## Standalone Mode
The browser panel is embedded next to the chat by default. On larger displays you can detach it into its own window if you want more horizontal space for the page and the chat side-by-side. The mode is sticky — if you close and reopen the panel, it remembers whether you wanted embedded or standalone last time.
## Browser Extensions
You can install Chrome extensions that run inside the embedded browser — useful for password managers, accessibility tools, ad blockers, or any other extension your workflow depends on. See the [Browser Extensions](/guide/settings/browser-extensions.md) settings page for how to install and manage them.
## Related
* [Code Editor](/guide/chat/code-editor.md) — the editor panel that pairs with the browser for the Open-in-Editor handoff.
* [Browser Extensions](/guide/settings/browser-extensions.md) — install Chrome extensions inside the embedded browser.
* [Specialists](/guide/specialists/index.md) — how specialists read your selected element and respond with code changes.
* [Channels Overview](/guide/chat/index.md) — the broader chat layout, including all panel toggles.
---
url: /guide/chat/code-editor.md
---
# Code Editor
The Code Editor is a VS Code-style editor that runs inside the app, attached to the active chat. It's where files appear when a [specialist](/guide/specialists/index.md) writes or edits code, where you read the diff yourself, and where the [embedded browser](/guide/chat/embedded-browser.md) hands off when you click *"Open in Editor"* on a page element.
## When to Use It
* Watch a specialist's code edits arrive in real time as they answer your message.
* Read or tweak a file the specialist just wrote without opening a separate IDE.
* Jump from a rendered element in the [embedded browser](/guide/chat/embedded-browser.md) straight to the source line that produced it.
* Pair it with the browser for a real build-test-fix loop inside the chat.
## Open the Code Editor

Every channel has a row of panel toggle buttons in the workspace heading. Click the **Code** (square code icon) to open the editor as a panel next to the chat. Click again to hide it.
The editor scope is per-conversation. Each chat gets its own editor state — open files, cursor positions, undo history. Switching channels switches editor context.
## Editor Panel

The editor is scoped to a single channel — its open files, cursor positions, and undo history all belong to that conversation. When the channel is part of a [project](/guide/projects/index.md) with linked repositories or local folders, the editor reads from that project's source tree, and any edits a specialist makes during the conversation appear in the panel automatically.
## Open a File from the Browser
The [embedded browser](/guide/chat/embedded-browser.md)'s **Open in Editor** action is the most direct way to navigate from a rendered UI back to the source. Pick an element on the page, click **Open in Editor**, and the Code panel opens (or focuses if it's already open) with the source file loaded and the cursor on the line that produced that element.
This handoff requires a source map. For most dev servers (Vite, Next.js, Webpack with source maps enabled) it works out of the box. The button is disabled when no source map is found for the selected element.
## Edit Files Yourself
You can edit files directly in the panel — type, save, and the change is committed to the chat's working tree. This is a quick way to make a manual fix or tweak a specialist's edit without going back to chat to ask.
When [worktrees](/guide/projects/development.md) are enabled, your edits live on the chat's branch alongside whatever the specialist has been doing. The chat's turn counter and snapshot history track every change, so you can see what the specialist did, what you did, and roll back if needed.
## Standalone Mode
The Code panel is embedded next to the chat by default. If your window is narrower than 900px, the editor opens in a standalone window instead so you have enough room to read code. On wider windows you can also detach the editor manually if you want more horizontal space. The mode is sticky per conversation — if you detach it, it stays detached the next time you open that chat.
## Language Servers
For code intelligence — autocompletion, go-to-definition, diagnostics, find-references — install Language Server Protocol providers from the [Language Servers settings page](/guide/settings/language-servers.md). Servers run locally and give specialists deeper understanding of your codebase too.
Language Servers require the desktop app with LSP support enabled.
## The Build-Test-Fix Loop
The editor and the [embedded browser](/guide/chat/embedded-browser.md) are designed to work together for the iterative loop most coding sessions involve:
1. Ask a specialist to build a feature in a [project](/guide/projects/index.md) chat.
2. The specialist writes files. You see them appear in the **Code** panel.
3. Your dev server (or the specialist's `npm run dev`) serves the app on localhost.
4. Open the **Browser** panel to the dev server URL.
5. Click **Select Element** on something that's wrong, **Open in Editor** to jump to the source.
6. Ask the specialist to fix it, the dev server reloads, the browser reloads, you check again.
7. Repeat until done.
The whole loop happens inside the chat. No app switching, no copying URLs or screenshots.
## Related
* [Embedded Browser](/guide/chat/embedded-browser.md) — the browser panel that pairs with the editor and hands off via Select Element.
* [Projects](/guide/projects/index.md) — link repositories and folders so the editor has files to show.
* [Git Worktrees](/guide/projects/development.md) — give every chat its own isolated branch.
* [Language Servers](/guide/settings/language-servers.md) — install LSP providers for code intelligence.
* [Specialists](/guide/specialists/index.md) — how specialists read and write code in this panel.
---
url: /guide/specialists/index.md
---
# What are Specialists
Specialists are AI agents with specific expertise. They live in your workspace, join channels, and respond when you mention them. Each one is tuned for a particular job, whether that is writing code, reviewing designs, planning projects, or analyzing data.
## The Specialists Marketplace
Click the **Specialists** icon in the workspace rail on the left side of the app. This takes you to the marketplace, where you browse, search, and add specialists to your workspace.

## The Specialists Sidebar
The secondary sidebar on the left of the Specialists area gives you quick navigation back to the marketplace and shortcuts to your work in progress.
* **Find a specialist** at the top takes you back to the main marketplace view.
* **Drafts** lists every specialist you are currently building. Hover any draft to reveal a context menu with **Rename** and **Delete** actions.
* **Added** lists every specialist that has been added to the workspace. Hover any entry for a **Remove** action.
* The **+** button in the sidebar header creates a new specialist draft and opens the [builder](/guide/specialists/building-specialists.md).
## Search and Browse
The search bar at the top of the marketplace filters specialists by name or description. Clear the search to return to the full browse view.
When no search is active, the marketplace organizes specialists into three top sections, in this order:
* **Bundled Specialists.** Built-in specialists that ship with the app. The header has a small refresh button if you ever need to re-fetch the list.
* **Featured.** Highlighted specialists worth a closer look.
* **Categories.** Every available specialist grouped by category. See [Categories](#categories) below.
## Categories
Specialists are grouped into eight categories. Each category has a short description so you know what to expect.
| Category | Examples |
| -------------------------- | ------------------------------------------------------ |
| **Frontend & Design** | React, TypeScript, Tailwind, Figma, and UI specialists |
| **Backend & Data** | Rust, databases, Python, and server-side specialists |
| **Quality & Security** | Testing, code review, and security specialists |
| **DevOps & Deployment** | Deployment, infrastructure, and pipeline specialists |
| **Productivity & Process** | Documentation, workflow, and process specialists |
| **Google Workspace** | Google Docs, Sheets, and Workspace specialists |
| **Platform & Onboarding** | Tauri, onboarding, and specialist-creation specialists |
| **Other** | Custom and workspace-published specialists |
## Specialist Cards
Every specialist appears as a card. Cards give you a quick summary so you can decide whether to add a specialist without opening its full detail page.
Each card shows:
* **Icon.** A visual identifier for the specialist.
* **Name.** The display name.
* **Publisher.** Who created the specialist, with a verified badge for officially maintained ones.
* **Description.** A short summary of what the specialist does.
* **"Can run locally" indicator.** Shown when the specialist works without external network services.
* **Add / Added button.** One click to add or remove the specialist from your workspace.
## Adding and Removing a Specialist
Adding a specialist takes one click. Click the **Add** button on any card. The button changes to a green **Added** badge, and the specialist becomes available in every channel in your workspace.
To remove a specialist, click the **Added** badge or use the three-dot menu (see below). The specialist is removed from every channel and stops responding to mentions.
## Specialist Detail Page
Click any card to open its detail page. The page contains everything about the specialist:
* **Header.** Specialist icon, name, publisher, version, and an **Add / Remove / three-dot menu** action area.
* **Metadata.** Created by, version, last updated date, network requirements (online or local), and external links.
* **Capabilities and Tech Stack.** Badges showing what the specialist can do and which technologies it understands.
* **Preferred Models.** The AI models the specialist works best with.
* **Model Overrides.** Workspace-level and personal overrides for the specialist's model. See [Model Overrides](/guide/specialists/model-overrides.md).
* **Knowledge sources.** Documentation and context the specialist uses for grounded responses.
* **Overview.** A longer markdown description.
* **Workflows.** Any automated workflows tied to the specialist.
### The Three-Dot Menu
The three-dot button (⋯) next to the Add / Remove button opens a menu of additional actions. The options depend on whether the specialist is custom or built-in, and whether it is currently added.
* **Rename** *(custom only)* — Change the display name without opening the builder.
* **Edit** *(custom only)* — Jump straight into the [builder](/guide/specialists/building-specialists.md) for that specialist.
* **Duplicate** — Create a copy of the specialist as a new draft. Works for built-in specialists too, which is the easiest way to start a custom specialist from a known-good template.
* **Delete** *(custom only)* — Permanently remove the custom specialist from the workspace.
* **Remove** *(built-in, when added)* — Remove the specialist from the workspace without deleting it. You can re-add it from the marketplace any time.
### Provider and ZDR Filters
In the Model Overrides section, two checkboxes control which models appear in the override pickers:
* **Show all providers.** When unchecked, the picker only shows providers you have already connected. Check it to see every provider, including ones you have not configured yet.
* **ZDR only.** Filters to providers that offer Zero Data Retention. ZDR filtering is available on the Basic plan and higher.
ZDR only controls which model/provider rows The AI Platform can use for a turn. It does not enable raw text retention in analytics or observability: requests to retain prompt text, completion text, token text, or raw streaming deltas are refused regardless of role or workspace setting. Token-retention analytics keep only ids, counts, hashes, coarse identifiers, and non-content counters.
## Built-in vs Custom Specialists
There are two kinds of specialists.
**Built-in specialists** ship with the app and are maintained by The AI Platform team. They cover common tasks like code review, documentation writing, and project planning. Built-in specialists show a verified badge.
**Custom specialists** are created by people in your workspace using the [specialist builder](/guide/specialists/building-specialists.md). They can be tailored to your team's specific domain, tools, and workflows.
Both types appear side by side in the marketplace.
## Running Locally
Some specialists are designed to run entirely on your machine without sending data to external services. These show a *"Can run locally"* indicator on their card. Use them when data privacy is a priority.
## Guides
* [Working with Specialists](/guide/specialists/using-specialists.md). Mention, interact with, and get the most out of specialists in your channels.
* [Building Specialists](/guide/specialists/building-specialists.md). Create your own custom specialists with the builder.
* [Builder Details](/guide/specialists/builder-details.md). Walk through every tab in the builder.
* [Model Overrides](/guide/specialists/model-overrides.md). Change which AI model a specialist uses at the workspace or personal level.
---
url: /guide/specialists/using-specialists.md
---
# Working with Specialists
Once a specialist is added to your workspace, you can bring it into any channel and have it respond to your questions. Specialists work alongside people in the same conversation, so the whole team sees the answers and can build on them.
## Mention a Specialist
To bring a specialist into a conversation, type `@` in the message input and select the specialist from the picker. A mention chip appears in your message. When you send the message, the specialist receives it and begins working on a response.
You can mention multiple specialists in the same message. Each one responds independently.
## Add a Specialist to a Channel
The first time you mention a specialist in a channel where it is not yet a member, a dialog asks whether you want to add it. Click **Add to Channel** to confirm. After that, the specialist is a permanent member of the channel and responds to future mentions without the prompt.
You can also add specialists to a channel through the **Members** tab in the [channel details](/guide/chat/channel-details.md) panel.
## How Specialist Responses Look
Specialist messages have a distinct visual style so you can tell them apart from human messages at a glance.

* **Avatar shape.** Specialists use a rounded-square avatar. Humans use a circular avatar.
* **Status dot.** A small dot next to the avatar shows the specialist's current state: working, online, typing, or idle.
* **Streaming indicator.** While the specialist is generating a response, a *"Generating..."* shimmer appears with a cancel button. Click cancel to stop the response mid-stream.
## Reasoning and Tool Calls
Some specialist responses include a collapsible **reasoning** section. Click to expand it and see the specialist's chain of thought. This helps you understand why the specialist gave a particular answer.
When a specialist uses tools (searches the web, reads files, runs code), a **tool calls** section appears. Expand it to see each tool that was invoked, the input it received, and the output it produced.
One especially useful tool: when the [embedded browser](/guide/chat/embedded-browser.md) is open and you've used **Select Element** to pick something on the page, specialists can call a tool to read the selected element directly. So you can pick a misaligned button, type *"why is this off?"*, and the specialist will know exactly which DOM node you mean — the HTML, attributes, and computed styles all show up in the tool call.
## Artifacts
Specialists often produce code, configuration files, or structured output. These appear as **artifacts** with syntax highlighting, a copy button, and a download button. The language is detected automatically and shown in the artifact header.
## Error Handling
When a specialist runs into an error, the response shows a clear error state:
* **Failed model badge.** Indicates which model failed.
* **Model picker.** Lets you switch to a different model and retry.
* **Provider suggestions.** The app may suggest enabling a built-in provider if the current one is unavailable.
* **Retry button.** Sends the same request again with the current or updated model.
## Give Feedback
Every specialist response has thumbs up and thumbs down buttons in the message footer. Use these to rate the quality of the response. Your feedback helps improve the specialist over time and contributes to its quality benchmarks.
## Inspect a Response
Each specialist response has a metadata menu next to the feedback buttons. Open it to see technical details about the response and to control how it was generated:
* **Model.** Which AI model produced the response. Click to override the model and regenerate.
* **Provider.** The actual provider that served the request (which may be different from the requested provider once provider routing kicks in).
* **Token usage.** Input and output tokens used.
* **Latency.** Time to first token and total time.
* **Regenerate.** Send the same prompt again to get a fresh response.
You can also toggle **Show all providers** here, which expands the model picker to include providers you have not connected yet.
## Expand and Collapse
Specialist responses can be long. Use the expand and collapse controls to manage how much of a response is visible. Reasoning sections, tool calls, and artifacts all support independent expand and collapse.
## Tips for Better Results
* **Be specific.** Tell the specialist exactly what you need rather than asking open-ended questions.
* **Provide context.** Mention relevant files, paste error messages, or describe the current state of your work.
* **Use the right specialist.** Each specialist is tuned for a specific domain. Check its [detail page](/guide/specialists/index.md#specialist-detail-page) to understand its strengths.
* **Iterate.** If the first response is not quite right, follow up with clarifications. Specialists keep context within a conversation.
## Next Steps
* [Specialist Builder](/guide/specialists/building-specialists.md). Create a custom specialist tailored to your workflow.
* [Builder Details](/guide/specialists/builder-details.md). Walk through every tab in the builder.
* [Model Overrides](/guide/specialists/model-overrides.md). Change which AI model a specialist uses.
* [Threads](/guide/chat/threads.md). Use threads to have focused follow-up conversations with specialists.
---
url: /guide/specialists/building-specialists.md
---
# Specialist Builder Overview
The specialist builder lets you create custom AI agents tailored to your team's needs. You define a persona, give it knowledge, wire up tools, and publish it to your workspace. The builder also includes an AI chat assistant that helps you refine the specialist as you go.
## Getting Started
From the Specialists page, click the **+** button to create a new specialist. The builder opens with a blank slate ready for configuration.
## Builder Layout
The builder is split into two panels.

The **chat panel** on the left is an AI assistant that helps you build and test the specialist. It has two modes:
* **Build**. The assistant suggests improvements, asks clarifying questions, and helps fill in configuration fields.
* **Test**. The assistant simulates conversations so you can verify how the specialist behaves before publishing.
The **tabbed editor** on the right is where the actual configuration lives. Six tabs organize every aspect of the specialist:
1. **Persona**. Name, role, purpose, audience, values, attributes, tech stack, and writing style.
2. **Tasks & Workflows**. What the specialist can do and how it handles common requests.
3. **Knowledge**. Documentation, URLs, and files the specialist draws on for grounded responses.
4. **Tooling**. Built-in tools, MCP servers, and tool patterns the specialist can use.
5. **Benchmarks**. Automated quality tests that validate the specialist's behavior.
6. **Review & Publish**. Final review, scope selection, model configuration, and publishing.
For details on tabs 2 through 5, see [Builder Tab Details](/guide/specialists/builder-details.md).
## The Persona Tab
The Persona tab is where you define who the specialist is. It has seven sections:
* **Role**. A short title like "Senior Frontend Engineer" or "Technical Writer."
* **Purpose**. A sentence or two describing the specialist's primary goal.
* **Audience**. Who the specialist is built for. You can set a primary audience, secondary audience, and assumptions about what users already know.
* **Values**. Core principles that guide the specialist's behavior. You can use simple free-text values or structured entries with descriptions.
* **Attributes**. Personality traits and behavioral characteristics.
* **Tech Stack**. Languages, frameworks, and tools the specialist knows about.
* **Writing Style**. Controls for tone, verbosity, formality, reading level, jargon level, secondary tone, and style modifiers.
All fields save in real time as you type.
## The Review & Publish Tab
When you are ready to share your specialist, open the Review & Publish tab. It includes:
* **AI-generated overview**. A description, a "what it does" bullet list, and example prompts. The builder generates these automatically based on your configuration.
* **Publish scope**. Choose between **Workspace** (everyone in the workspace can use it) or **Personal** (only you).
* **Preferred model**. Select the default AI model the specialist should use.
* **Prompt authoring**. Write the default system prompt, add model-specific overrides, and configure per-task prompts with model variants and knowledge targeting.
Publishing is gated by the Specialist IQ score. Your specialist must reach a score of at least 40% before you can publish.
## Specialist IQ
Specialist IQ is a quality score from 0 to 100 that measures how complete and well-configured your specialist is. The score is broken down across five dimensions:
* **Knowledge**. Has the specialist been given relevant documentation and context?
* **Tasks**. Are tasks defined with clear descriptions and examples?
* **Tone**. Is the writing style configured?
* **Purpose**. Is the role and purpose clearly stated?
* **Benchmarks**. Have quality tests been created and passed?
As you fill in the builder, the IQ score updates in real time. The status labels are:
| Score | Status |
| --------- | ---------- |
| 0 to 19 | Unformed |
| 20 to 49 | Developing |
| 50 to 79 | Good |
| 80 to 100 | Excellent |
## The Middle Tabs
The four tabs between Persona and Review & Publish contain the bulk of the specialist's configuration. See [Builder Tab Details](/guide/specialists/builder-details.md) for a walkthrough of Tasks & Workflows, Knowledge, Tooling, and Benchmarks.
## Next Steps
* [Builder Tab Details](/guide/specialists/builder-details.md). Deep dive into the Tasks, Knowledge, Tooling, and Benchmarks tabs.
* [Model Overrides](/guide/specialists/model-overrides.md). Configure which AI model the specialist uses at the workspace or personal level.
* [Working with Specialists](/guide/specialists/using-specialists.md). See how the finished specialist behaves in a real conversation.
---
url: /guide/specialists/builder-details.md
---
# Builder Tab Details
Beyond the Persona tab, the specialist builder has four configuration tabs: **Tasks & Workflows**, **Knowledge**, **Tooling**, and **Benchmarks**. For the overall builder layout and flow, see [Building Specialists](/guide/specialists/building-specialists.md).
## Tasks & Workflows

Tasks define what the specialist can do. The builder suggests tasks automatically based on the persona you configured, and you can accept, edit, or remove them. You can also add your own custom tasks.
Each task has:
* **Title**. A short label like "Code Review" or "Write Unit Tests."
* **Key**. A machine-readable identifier used internally.
* **Description**. A detailed explanation of what the task involves.
* **Examples**. Sample prompts that show how a user would trigger this task.
* **Benchmark status**. A badge showing whether the task has passing quality tests.
Tasks also connect to workflows. When a user's message matches a task, the specialist can automatically trigger an associated workflow.
## Knowledge
The Knowledge tab is where you give the specialist access to documentation and reference material. Three source types are supported:
* **URLs**. Paste a web address and set a crawl depth from 1 to 5. The builder fetches the page and follows links up to the specified depth.
* **Files and folders**. Upload local files or select folders from the virtual file system.
* **Google Drive**. Connect a Google Drive account and select documents or folders.
After adding a source, the builder enriches it automatically. Enrichment includes generating summaries, evaluating tech stack relevance, and scoring how useful the source is for each task. Sources move through four statuses: Pending, Indexing, Indexed, and Error.
## Tooling
The Tooling tab controls which tools the specialist can access when generating responses. There are five categories:
### Built-in Agency Tools
A searchable catalog of tools provided by the platform. Browse the list and toggle individual tools on or off.
### Tool Patterns
Define prefix-based patterns to enable groups of tools at once. For example, `vfs_*` enables all virtual file system tools. A live preview shows which tools match the current pattern.
### MCP Servers
Attach existing Model Context Protocol servers or create new ones. MCP servers let the specialist call external APIs and services as part of its workflow.
### MCP Tools
Enable specific tools from attached MCP servers. You can select individual tools by their namespaced identifier or use patterns to match groups.
### Portable MCP Templates
Author reusable MCP server templates that can be installed into other specialists. Templates include server configuration, tool definitions, and connection details. You can create, install, and delete templates from this section.
A validation banner at the top of the Tooling tab shows real-time status. If there are configuration issues (missing servers, invalid patterns, unreachable endpoints), the banner highlights them.
## Benchmarks
Benchmarks are automated quality tests that validate the specialist's behavior. The Benchmarks tab has four sub-sections:
### Run
Execute benchmark suites against the specialist. Choose a suite, select a prompt level (L0 through Lx, where higher levels are harder), and pick a run mode:
* **Specialist default**. Uses the specialist's configured model and prompt.
* **Model override**. Uses a specific model you select.
* **Raw prompt**. Tests with a plain prompt, bypassing the specialist's system prompt.
A live progress indicator shows each scenario as it runs.
### Optimize
Automatically improve the specialist using AI-driven research. The optimizer evaluates the specialist across 12 quality dimensions, generates candidate configurations within a budget you set, and presents results on a leaderboard. You can preview the diff between the current configuration and each candidate, then apply the best one with a single click.
### Create
Build custom benchmark suites from scratch. Each suite contains scenarios, and each scenario includes:
* **Multi-level prompts**. Different phrasings at increasing difficulty.
* **Assertions**. Five assertion types to validate the response content.
* **Validation commands**. Optional shell commands that check response properties programmatically.
* **Oracle answers**. Reference answers the specialist's output is compared against.
### Report Card
View the results of past benchmark runs. The report card shows an overall score, pass/fail counts, token usage, estimated cost, and tool call counts. You can compare two runs side by side and drill into per-scenario traces to see exactly where the specialist succeeded or failed.
## Next Steps
* [Building Specialists](/guide/specialists/building-specialists.md). Return to the builder overview for persona and publishing details.
* [Working with Specialists](/guide/specialists/using-specialists.md). See how the finished specialist behaves in a real conversation.
* [Model Overrides](/guide/specialists/model-overrides.md). Fine-tune which AI model powers the specialist.
---
url: /guide/specialists/model-overrides.md
---
# Model Overrides
Each specialist has a preferred model, but you can override it at the organization or personal level.
## Overview
By default, each specialist uses its preferred models as defined in its manifest. However, you can override these preferences at two levels:
* **Organization Override**: Applies to all users in your workspace
* **Personal Override**: Applies only to you (takes precedence over organization override)
## Model Selection Precedence
When a specialist is invoked, the model is selected using this priority order:
```
1. Personal Override (highest priority)
↓
2. Organization Override
↓
3. Specialist's Preferred Model
↓
4. System Default (lowest priority)
```
## Setting Model Overrides
### Viewing Specialist Preferences

1. Navigate to the **Specialists** page
2. Click on any specialist to open its detail page
3. Scroll to the **Preferred Models** section to see which models the specialist prefers by default
Example:
```
Preferred Models
anthropic/claude-sonnet-4.5
```
### Setting an Organization Override
1. In the specialist detail page, find the **Model Overrides** section
2. Under **Organization Default**, click the dropdown
3. Search for and select a model (e.g., "GPT-4o Mini")
4. The override is saved automatically
**Note**: Organization overrides apply to all users in your workspace. This is useful for:
* Standardizing on specific models across your team
* Managing costs by using cheaper models
* Ensuring compliance with specific providers
### Setting a Personal Override
1. In the same **Model Overrides** section
2. Under **Personal Override**, click the dropdown
3. Select your preferred model
4. Your selection takes precedence over the organization default
**Use cases**:
* Testing different models for specific tasks
* Personal preference for certain model characteristics
* Using more powerful models when needed
### Clearing Overrides
Click the **X** button next to any override to remove it and restore the default behavior.
## Available Models
Models are fetched dynamically from OpenRouter when you open the specialist detail page. The list includes:
* **Anthropic Claude models** (claude-sonnet-4.5, claude-3.5-sonnet, etc.)
* **OpenAI GPT models** (gpt-4o, gpt-4-turbo, gpt-3.5-turbo, etc.)
* **Google Gemini models** (gemini-pro-1.5, gemini-flash-1.5, etc.)
* **Meta Llama models** (llama-3.3-70b-instruct, etc.)
* And any other models available on OpenRouter
The model list is always up-to-date with OpenRouter's current offerings.
## Persistence
Overrides persist across sessions. You do not need to set them again each time you open the app. Different workspaces can have different overrides, and personal overrides are always separate from organization overrides.
## Example Workflows
### Use a cost-effective model by default
Your team wants to use GPT-4o Mini by default to reduce costs, but you occasionally need the more capable Claude Sonnet 4.5 for complex tasks.
1. An admin sets **Organization Default** to "GPT-4o Mini"
2. You set **Personal Override** to "Claude Sonnet 4.5"
Your teammates use GPT-4o Mini. You use Claude Sonnet 4.5. Clear your personal override anytime to fall back to the team default.
### Compare models for a specialist
You want to evaluate which model works best for a specific specialist.
1. Leave the organization override empty
2. Set **Personal Override** to "GPT-4 Turbo"
3. Test the specialist
4. Change the override to "Claude 3.5 Sonnet"
5. Compare results
You can switch between models without affecting other users.
## Next Steps
* [Specialists Overview](/guide/specialists/index.md)
* [Working with Specialists](/guide/specialists/using-specialists.md)
* [Connections](/guide/settings/connections.md) for adding model providers
---
url: /guide/projects/index.md
---
# Projects
Projects bring together code repositories, knowledge sources, and chat conversations around a shared goal. They give specialists the context they need to understand your codebase and provide targeted help.
## Create a Project
Click the **+** button next to **Projects** to open the **Create Project** dialog.

Give your project a name. You can optionally pick an icon and toggle discoverability on or off. Discoverability is on by default, which lets anyone in your workspace find the project.
Below the name field you will see four cards for adding codebases:
* **Repository from URL**. Paste a Git URL to clone a remote repo into the project.
* **Add folder**. Opens your OS folder picker so you can link a local directory.
* **Quick start**. A guided setup flow (coming soon).
* **Knowledge garden**. Link an existing knowledge plot to the project.
Further down, the **Git Worktrees** toggle lets you create isolated branches per chat. This requires at least one cloned repository first.
The **Sandbox Profile** section lets you configure the project environment. You can set a network mode, define setup commands, and control other sandbox behavior. See [Sandbox settings](/guide/settings/sandbox.md) for a full breakdown of available options.
Click **Create Project** in the footer to finish. A project chat is automatically created and the project appears in the sidebar, ready to use.
Once a project chat is open, the [Code Editor](/guide/chat/code-editor.md) panel reads from that project's repositories or linked folders, so specialist edits show up next to the conversation in real time.
## Project Cards
When you have more than one project, each appears as a card on the Projects landing page. Hover any card and click the three-dot button in the top-right corner to open a context menu with these actions:
* **Edit Project.** Open the project's [configuration](/guide/projects/configuration.md) page.
* **Archive** or **Restore.** Move an active project into the archive, or bring an archived project back to active.
* **Delete Project.** Permanently remove the project. Disabled until the project is archived first — this is a deliberate two-step gate so projects cannot be deleted by accident.
Archived projects display an *"Archived"* badge on the card so you can tell them apart from active ones.
## The Project Toolbar
When you open a project, a toolbar appears at the top of the page. The left side shows the project name — click it for a dropdown with quick actions. On the right, the **New Chat** button creates a new conversation inside the project, followed by six icon buttons that each open a different view.
From left to right:
| Icon | Page | Purpose |
| ---- | ------------------------------------------------------------ | --------------------------------------------------------------------- |
| ⚙️ | [Configuration](/guide/projects/configuration.md) | Repository sources, local folders, worktrees, and sandbox environment |
| 🧠 | [Code Knowledge Graph](/guide/projects/code-knowledge-graph.md) | Indexed symbols, call graphs, JSX components, and git history |
| 🔀 | [Git Worktrees](/guide/projects/development.md) | Active branch list with remote sync controls |
| 🔗 | [Linked Workflows](/guide/projects/linked-workflows.md) | Workflows attached to automate actions in this project |
| 📊 | [Activity](/guide/projects/activity.md) | Analytics, recent chats, and task activity |
| ☑️ | [Pending Tasks](/guide/projects/pending-tasks.md) | Open tasks linked to this project |
The active page is highlighted so you always know which view you are on.
### Project Name Dropdown

Click the project name to open a dropdown with these actions:
* **Rename project**. Change the project name.
* **Archive project** or **Restore**. Move the project out of your active list or bring it back.
* **Copy project link**. Get a shareable link to the project.
* **Knowledge**. Open the project's [knowledge sources](/guide/projects/knowledge.md).
* **Discoverable**. Toggle whether workspace members can find this project.
:::tip
Archive a project when you are done with it. Archived projects stay searchable but move out of your active list to keep things clean.
:::
---
url: /guide/projects/knowledge.md
---
# Knowledge Sources

Each project has its own Knowledge page where you link context that [specialists](/guide/specialists/index.md) can draw from during conversations.
To open it, click the **project name** in the header to open the dropdown, then select **Knowledge**.

The page shows three categories at a glance:
* **Knowledge Garden plots**. Linked plots from the workspace [Knowledge Garden](/guide/knowledge/index.md). Each name links to its detail page.
* **Repository sources**. Git repos added in [Configuration](/guide/projects/configuration.md) with their clone status.
* **Local folder sources**. Filesystem paths added in Configuration.
Repository sources and local folders appear automatically once you add them in Configuration. Plots need to be linked manually.
## Link Knowledge to a Project

Click the **Add** dropdown at the top right of the page. Three options are available:
* **Knowledge garden**. Opens a picker of workspace plots. Search by name, check the file count, and link one or more plots. Only workspace plots appear — personal plots cannot be linked to projects.
* **Upload file**. Select images, PDFs, or text files up to 10 MB. If the project has no linked plot yet, one is created automatically and named *"\[Project Name] knowledge"*.
* **Text**. Type a title and content directly — useful for quick notes, API references, or coding guidelines.
For more on creating and managing plots, see the [Knowledge Garden](/guide/knowledge/index.md) guide.
## Unlink a Source
Click the trash icon next to a linked plot to remove it from the project. Unlinking does not delete the plot — it stays in your Knowledge Garden for use elsewhere.
---
url: /guide/projects/configuration.md
---
# Configuration
When you open a project, the **Configuration** page is the default view. It is split into four sections that control how the project connects to your code and tools.
## Repository Sources

This section shows your cloned repos. Each repository entry displays the repo name, URL, branch selector, and mirror status. Click **Add Repository** to clone a new remote repo — Zephyr probes the URL and shows the default branch and estimated clone size before you confirm.
If a clone fails, a **Retry** button appears next to the error message. Once cloned, the repository is available to all conversations and [specialists](/guide/specialists/index.md) in the project.
## Local Folders

Lists any linked local directories. Click **Add folder** to browse for a new one, or click the remove button next to an existing path to unlink it.
Local folders are indexed the same way cloned repositories are. Specialists can read and reference files from these folders during conversations.
## Git Worktrees

Toggle **Enable Git worktrees** to create isolated branches per chat. Each conversation gets its own working copy so concurrent chats do not conflict with each other. You need at least one cloned repository before you can enable worktrees.
When worktrees are enabled, a **Remote Sync** section appears with two controls:
* **Check for updates** scans upstream branches for changes.
* **Update all** pulls the latest changes into every worktree.
See [Git Worktrees](/guide/projects/development.md) for a deeper look at working with worktrees in project chats.
## Project Environment

Controls sandbox settings for the project. The **Environment** panel has the following options:
* **Network access**. Choose between **Unrestricted**, **Local only**, or **Disabled**. The default is "Use project defaults".
* **Allow PTY**. Keep terminal access available in project chats.
* **Allow Git config**. Let commands read repository Git settings.
* **Auto-seed on create**. Copy shared ignored paths (like `.env.local` or `node_modules`) from an existing sibling worktree when a new one is created.
* **Setup commands**. Commands that run after worktree creation — one per line. For example, `pnpm install`.
* **Shared seed paths**. Repo-relative ignored files or directories to copy from an existing worktree, such as `.env.local`, `.dev.vars`, `node_modules`, `.next`, or `target`.
* **Extra allowed write paths**. Additional writable directories outside the mounted project roots — useful for caches or global stores like `/tmp/zephyr-cache`.
Click **Save Environment** to apply your changes. These settings apply to every conversation in the project. For workspace-wide defaults, see [Sandbox settings](/guide/settings/sandbox.md).
Use **Local Seed Actions** for machine-specific setup that should not sync with the project. Local actions can copy an approved absolute file path into an ignored worktree destination or fetch config from an HTTP endpoint using a local `env:VARIABLE_NAME` secret reference. Destinations must stay inside the worktree, cannot target `.git`, and are not overwritten unless explicitly enabled.
---
url: /guide/projects/code-knowledge-graph.md
---
# Code Knowledge Graph

The Code Knowledge Graph indexes your repository so specialists can understand the structure of your code. It builds automatically once you add repository sources or local folders in [Configuration](/guide/projects/configuration.md).
The page has seven tabs:
* **Status**. Shows the indexing progress and whether the graph is up to date.
* **Symbols**. Lists every indexed symbol (functions, classes, types) with search and filtering.
* **JSX**. Displays React/JSX component hierarchies found in the codebase.
* **Call Graph**. Visualizes which functions call which, helping you trace execution flow.
* **Pattern**. Detects recurring code patterns across the repo.
* **Git**. Shows git history, commit frequency, and file-level change patterns.
* **Communities**. Groups related files and modules into clusters based on how tightly they are coupled.
Specialists draw on this graph when answering questions about architecture, finding related code, or tracing dependencies.
---
url: /guide/projects/development.md
---
# Git Worktrees
Git worktrees give every project chat its own isolated branch so specialists can make changes without affecting your main code. Each conversation gets a dedicated working copy, and you control versioning through an in-chat toolbar.
This page covers how to enable worktrees, what the in-chat toolbar does, and how to keep everything in sync with your remote.
## Enable Git Worktrees

Worktrees give every project chat its own branch and working directory. Specialists write code in that isolated branch, so your main branch stays clean throughout the entire conversation.
To turn them on, open the [Configuration](/guide/projects/configuration.md) page and toggle **Enable Git worktrees**. You need at least one cloned repository in the project before the toggle becomes available.
Once enabled, every new chat you create inside that project automatically gets its own worktree. Existing chats without a worktree are not affected.
## Work in a Project Chat
When you open a project chat that has worktrees enabled, a toolbar appears at the top of the conversation. It gives you quick access to version control without leaving the chat.
The toolbar has four controls:
* **Branch badge**. Shows the branch icon and the name of the branch assigned to this chat. Each chat gets a unique branch so work never collides across conversations.
* **Turn counter**. A button labeled *"Turn X/Y"* that opens the snapshot history in the right sidebar. Each snapshot is a point-in-time record of the code at that turn, so you can review exactly what changed and when.
* **Undo last turn**. Reverts the most recent specialist action. The button is disabled when there is nothing to undo. Use it whenever a specialist takes a direction you want to roll back.
* **Push to remote**. Pushes the worktree branch to the remote repository so teammates can see the changes or open a pull request.
Think of it as version control built right into the conversation. Every specialist action is tracked, and you can step backward or push forward whenever you need to.
## Manage Worktrees

Click the **Active Worktrees** icon (🔀) in the [project toolbar](/guide/projects/index.md#the-project-toolbar) to open the dedicated worktrees page. It lists every active worktree with these details:
* Repository URL
* Branch name
* Linked chat ID
* Last updated timestamp
This page is useful for getting a birds-eye view of all the branches specialists are working on across your project chats. You can quickly spot which conversations are active and when each worktree was last touched.
If a chat is deleted while its worktree still exists, that worktree is flagged as orphaned with a warning badge. Orphaned worktrees are cleaned up automatically the next time the app restarts. You do not need to remove them manually.
Use the **Refresh** button at the top of the list to reload worktree status at any time.
## Sync with the Remote
Both the Configuration page and the Worktrees page offer remote sync controls to keep your branches current with the upstream repository.
**Check for updates** compares each worktree branch against its remote and reports a summary. You will see either *"X worktree(s) have updates (Y new commits)"* or *"All worktrees are up to date"*.
**Update all** pulls the latest remote changes into every worktree in one click. This is the fastest way to bring all branches up to date at once.
Running a sync regularly keeps your worktree branches current, especially when teammates push to the same remote. Pulling before you start a new chat session helps avoid merge conflicts down the line.
:::tip
Check for updates before starting a new chat session. A quick sync keeps your worktree branches aligned with the remote and prevents conflicts later.
:::
## What to Explore Next
* [Project Knowledge Sources](/guide/projects/knowledge.md). Attach files, docs, and context that specialists can reference during a conversation.
* [Projects overview](/guide/projects/index.md). Create and configure projects, manage repositories, and invite collaborators.
* [Chat](/guide/chat/index.md). Messaging basics, conversation layout, and sidebar navigation.
---
url: /guide/projects/linked-workflows.md
---
# Linked Workflows

Attach [workflows](/guide/workflows/index.md) to a project so they run automatically in response to project events. Click **Add Workflow** to pick from your saved workflows, or **Add Your First Workflow** if none are attached yet.
Once linked, workflows can trigger on actions like new chat creation, specialist responses, or task updates within the project. Use the **Refresh** button to see the latest status.
---
url: /guide/projects/activity.md
---
# Activity

The Activity page gives you a dashboard view of everything happening in the project.
## Project Analytics
Tracks specialist retention metrics — how often specialists are invoked and how useful their responses are. Metrics appear after specialist turns are captured.
## Recent Project Chats
Lists conversations inside the project with their last update time and message count. This is the quickest way to see which chats are active and jump into one.
## Recent Task Activity
Shows the latest task changes linked to this project. It stays empty until you [create tasks](/guide/tasks/index.md) and associate them with the project.
---
url: /guide/projects/pending-tasks.md
---
# Pending Tasks

Shows all open tasks linked to this project. Tasks stay scoped to the project's repository and context sources, so specialists working on them have the right context automatically.
## Create a Task
Click **Create Project Task** in the top right corner. A new task is created immediately with a default name based on the project — for example, *"New Agency From Git task"*. The task starts in **Backlog** status with **Medium** priority.
Once created, the task card appears in the list showing:
* **Task name**. Click to rename or update the task.
* **Status badge**. The current status — Backlog, In Progress, Done, etc.
* **Priority badge**. The priority level — Low, Medium, High, or Critical.
* **Last updated**. When the task was last modified.
You can also link existing tasks from the [Tasks](/guide/tasks/index.md) page. Once tasks exist, they appear here so you can track progress without leaving the project.
Use the **Refresh** button to reload the task list at any time.
---
url: /guide/knowledge/index.md
---
# Knowledge Garden
Think of the Knowledge Garden as a file manager with a purpose. You organize documents, code, and reference material into **plots** (named collections), and [specialists](/guide/specialists/index.md) draw from those plots when they respond in conversations. Plots can be shared across the workspace or kept personal.
## Page Layout

The Knowledge Garden uses a two-panel layout. A secondary sidebar on the left lists your plots, and the content area on the right shows the selected plot's files.
The sidebar header displays "Knowledge Garden" with a **+** button to create a new plot. Plots are organized into two groups: **Personal** (visible only to you) and **Workspace** (visible to everyone). Each plot shows a colored icon and its name, with the active plot highlighted.
Right-click any plot to open a context menu with **Rename**, **Duplicate**, **Delete**, and **Copy to Workspace** (personal plots only).
## Create a Plot
Click the **+** button in the sidebar header, or click **Create Plot** on the empty state screen.

A dialog opens with three fields:
* **Icon**. Click to open a picker where you choose a Lucide icon with a custom color, or an emoji.
* **Name**. Required and must be unique in the workspace. Placeholder text reads *"Coding Practices"*.
* **Add to**. Choose **Workspace** (everyone has access) or **Personal** (only you). Defaults to Personal. This cannot be changed after creation.
Click **Save changes** to create the plot. You land directly on the new plot's detail page.
## How Knowledge Works with Specialists and Projects
Knowledge plots are the context layer that makes [specialist](/guide/specialists/index.md) responses more relevant. When a specialist responds in a [chat](/guide/chat/index.md), it can draw from the files and documents in linked plots.
[Projects](/guide/projects/index.md) can link to workspace plots so that every chat in the project benefits from shared context. You can also upload files or add text directly from a project's knowledge page. See [Knowledge Sources](/guide/projects/knowledge.md) under Projects for details.
:::tip
Use workspace plots for shared reference material like coding standards or API docs. Use personal plots for your own notes and drafts.
:::
---
url: /guide/knowledge/plots-and-files.md
---
# Plots & Files
Once you have [created a plot](/guide/knowledge/index.md), this page covers how to add content, browse files, and manage your plots.
## Add Content to a Plot
Open a plot and click the **Add item** dropdown in the toolbar. You get three options.
### Upload File
Opens your system file picker with multi-select enabled. Supported types include PDF, text, markdown, code files (JS, TS, JSON, HTML, CSS), and images (PNG, JPG, GIF, WebP, SVG). Max file size is 10 MB per file.
### Add Folder
Opens a multi-step directory upload wizard:
1. Select a project directory from your filesystem.
2. Choose whether to respect `.gitignore` rules (recommended).
3. Preview what will be uploaded: source files, symlinked directories, and ignored files.
4. Watch the upload progress bar with a file count.
5. Review the completion summary.
The wizard uses hybrid storage. Source files go to cloud storage, while dependency directories like `node_modules` are symlinked from your local filesystem.
### Type or Paste Content
Opens a dialog where you enter a title and paste or type text content directly. Good for notes, snippets, or reference material that does not live in a file.
### Drag and Drop
You can also drag files from your desktop or file manager directly onto the plot detail page. A drop overlay appears when files hover over the page. Release to start the upload immediately.
## Browse and Manage Files
The plot detail page shows all content in two view modes, toggled from the toolbar:
* **Tile view**. A responsive grid of file cards showing icon, name, and size.
* **List view**. Vertical rows with icon, name, size, and upload date.
Hover over any file to reveal a menu with these actions:
* **Preview**. Opens a modal with type-aware rendering. Text and code files show formatted content. Mermaid files render as diagrams. PDFs embed in an iframe. Images display inline.
* **Edit** (text content only). Opens the preview in edit mode so you can update the title and body.
* **Download**. Saves the file to your computer.
* **Delete**. Shows a confirmation dialog, then removes the file permanently.
## Project Plots
If a plot was created by uploading a folder (the **Add Folder** wizard), the detail page shows an extra **Project Summary** section at the top with high-level stats: total file count, source file count, ignored files, and any symlinked dependency directories. Use this to confirm the upload captured everything you expected before specialists reference it.
## Manage Plots
From the sidebar context menu or the plot detail page menu:
* **Rename**. Opens the edit dialog to change the name and icon. The plot type stays locked.
* **Duplicate**. Creates a full copy and navigates to it.
* **Copy to Workspace** (personal plots only). Makes the plot available to everyone. Confirmation required.
* **Delete**. Permanently removes the plot and all its content. This cannot be undone.
---
url: /guide/tasks/index.md
---
# Task Manager
The task manager is a kanban board for tracking work across your workspace. Tasks move through five columns as work progresses, and you can assign them to both people and [specialists](/guide/specialists/index.md).
## The Kanban Board

The board has five columns: **Backlog**, **To Do**, **In Progress**, **Blocked**, and **Done**. Each column header shows the column name, a task count badge, and a **+** button to create a task directly in that column.
Tasks appear as cards that you can drag between columns. Empty columns show *"No tasks"* as a placeholder.
## Create a Task
There are three ways to create a task:
1. Click the **+** button on any column header. The task starts in that column's status.
2. Click the **+** button in the sidebar header. The task starts in **Backlog**.
3. Press `Cmd+N` (macOS) or `Ctrl+N` (Windows/Linux). The task starts in **Backlog**.
A new task opens immediately in the [detail panel](/guide/tasks/task-details.md) with the default title *"New Task"*. Edit the title, fill in the details, and press `Cmd+Enter` or click **Create** to save.
## Drag and Drop
Drag a card to reorder it within a column or move it to a different column. The source card fades during the drag and a highlighted copy follows your cursor. Drop targets highlight when you hover over them.
Full keyboard and screen reader support is built in, with live announcements as you move cards.
## Read Task Cards
Each card on the board shows key details at a glance:
* Title (2 lines max)
* Priority badge, color-coded: blue for Low, yellow for Medium, themed for High, red for Urgent
* Description preview (2 lines max)
* Due date
* Subtask progress (completed out of total)
* Channel badges (up to 3, with an overflow count)
* Assignee avatars (up to 4, with an overflow count)
## Filter Tasks
The sidebar provides filters to narrow down what appears on the board:
* **Channel**. Filter by a specific channel.
* **Assignee**. Choose from All assignees, Unassigned, or Assigned to me.
* **Priority**. All, Low, Medium, High, or Urgent.
* **Status**. All, or any single status.
* **Include Archived**. Toggle to show archived tasks alongside active ones.
Click **Clear All Filters** to reset everything back to defaults.
## Link Tasks to Projects
Tasks can be linked to [projects](/guide/projects/index.md). When you link a task to a project, it inherits the project's repository URLs so specialists have code context when working on it. Project pages also have a dedicated [Pending Tasks](/guide/projects/pending-tasks.md) tab showing only tasks linked to that project.
:::tip
Press `Cmd+N` or `Ctrl+N` from the task board to quickly create a new task without clicking.
:::
---
url: /guide/tasks/task-details.md
---
# Task Details
Clicking any task card opens a full detail panel. From here you can edit every field on the task — title, status, priority, description, attachments, assignees, and more — and link the task to projects and channels.
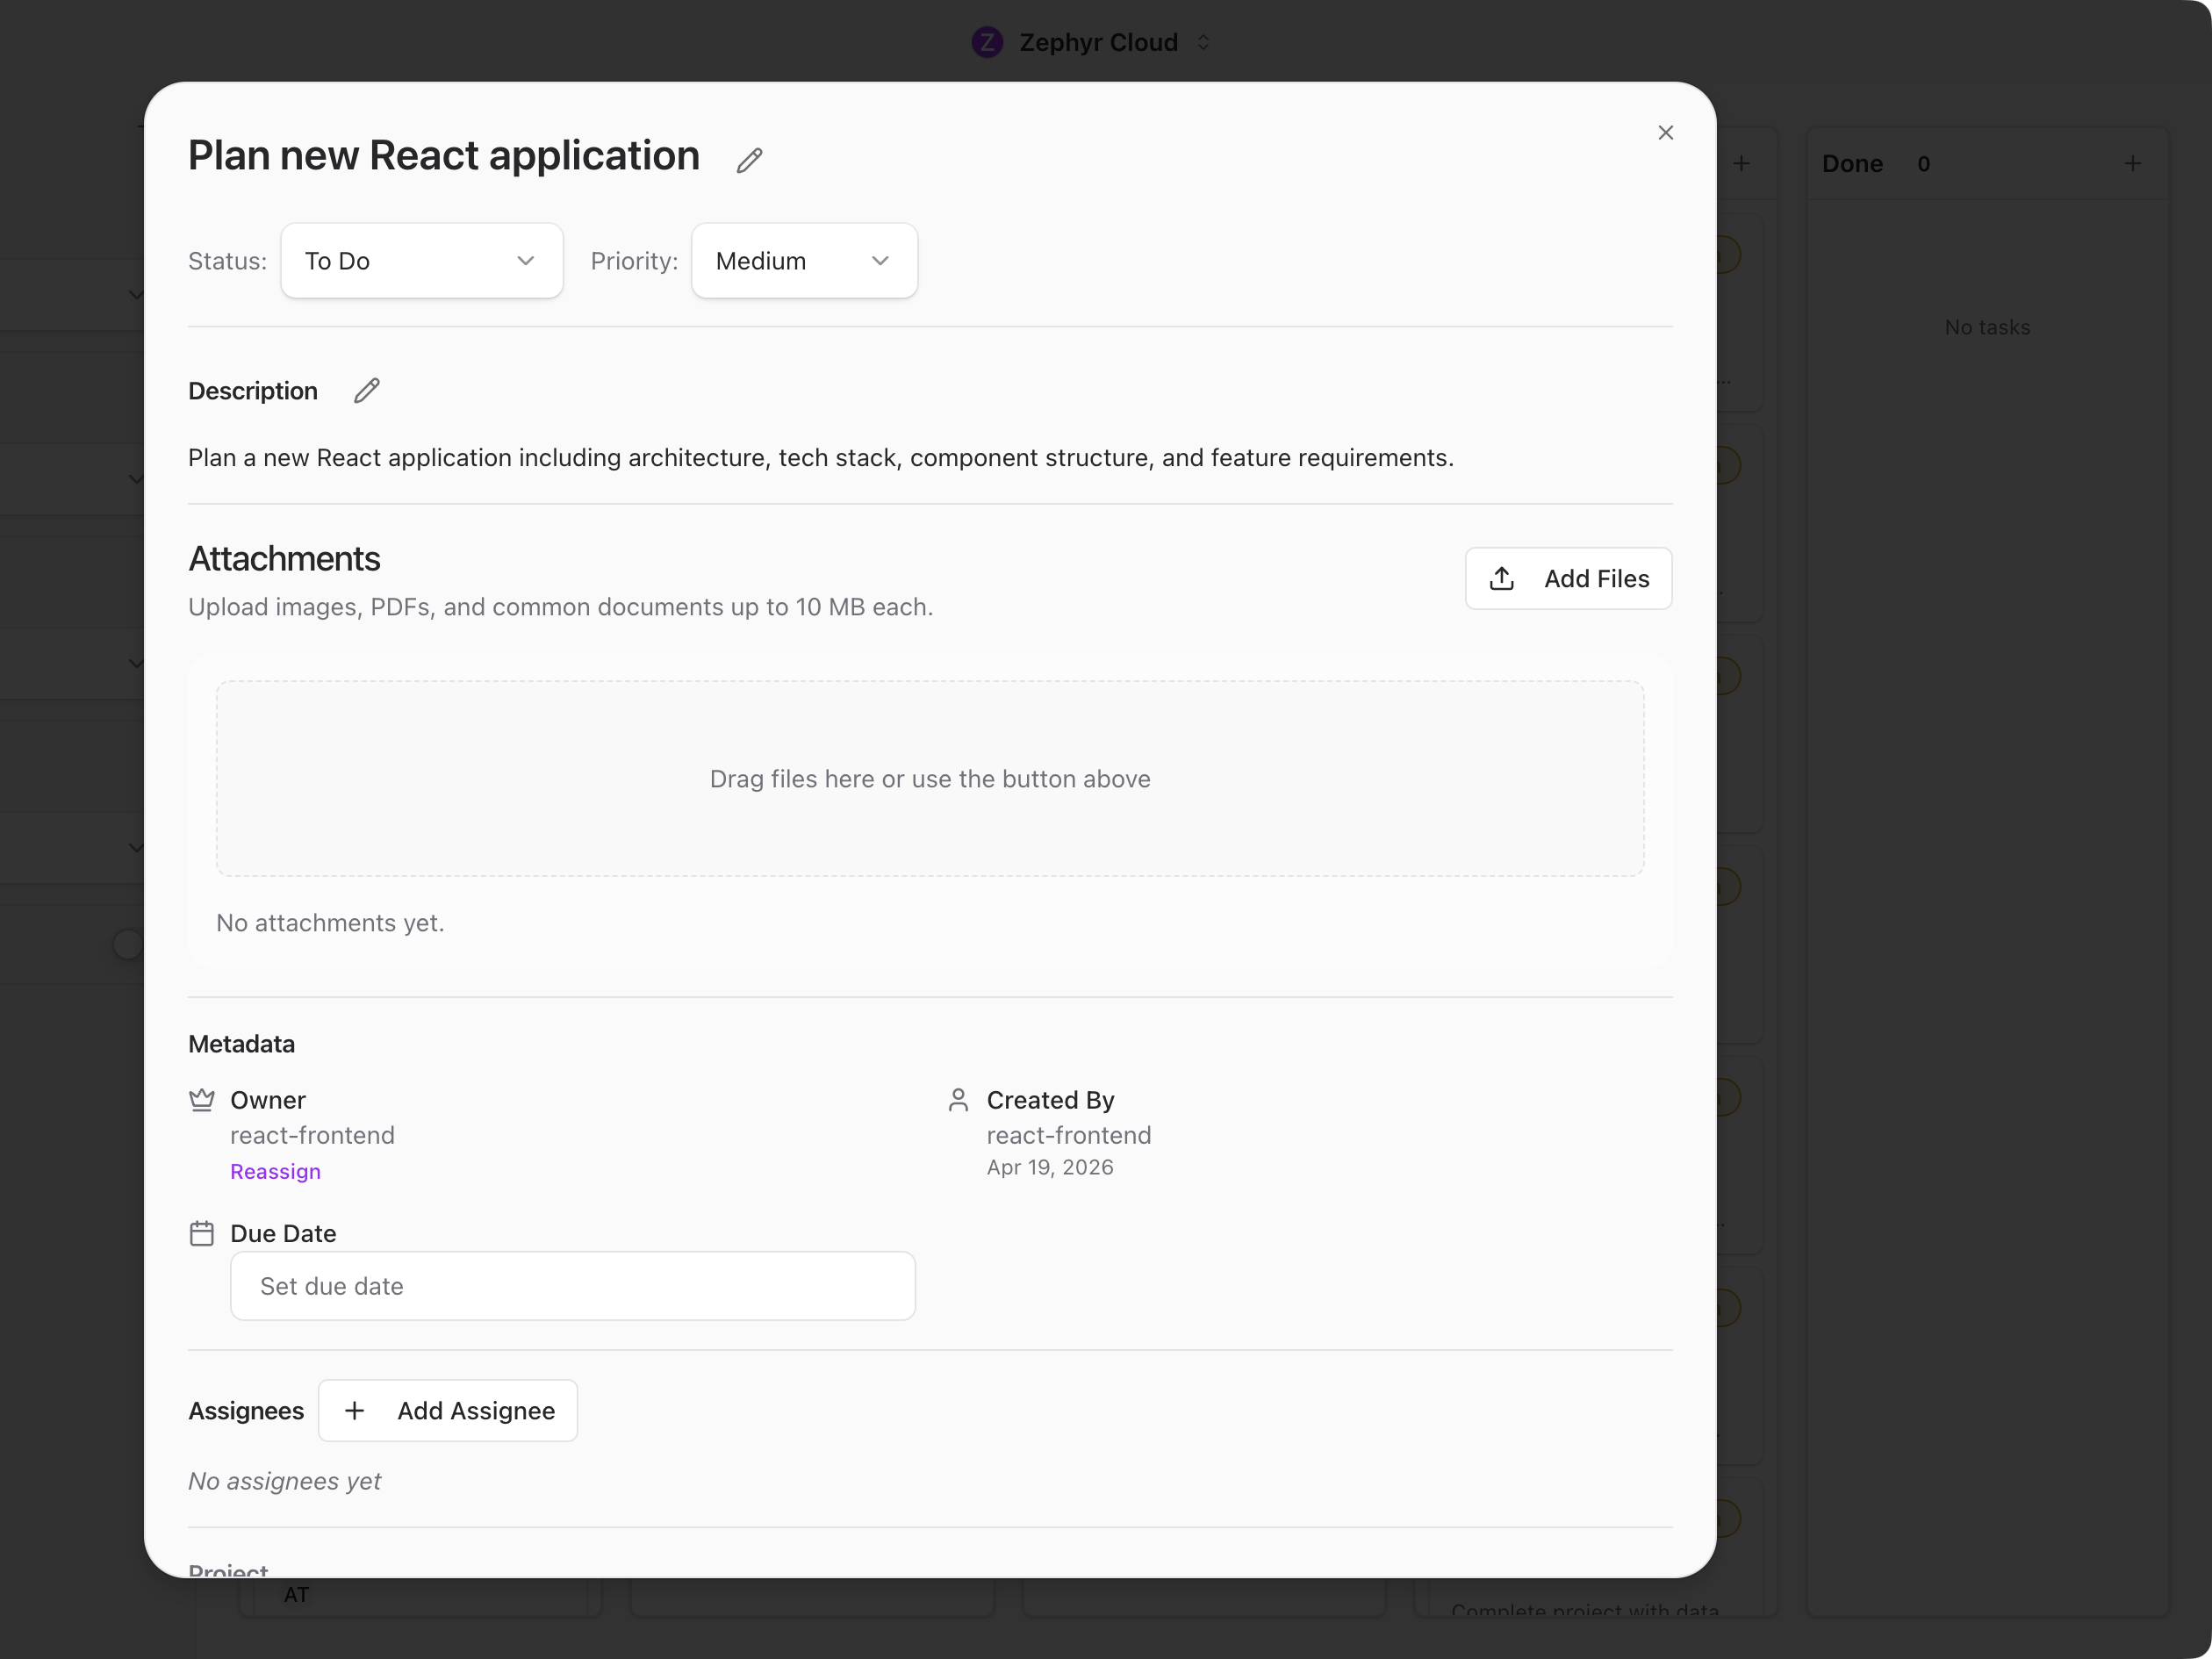 ## Title and Status
The title is inline-editable. Click the pencil icon to change it. Below the title, two dropdowns let you set the task's current status (Backlog, To Do, In Progress, Blocked, Done) and priority (Low, Medium, High, Urgent).
## Description
The description field supports markdown formatting. Click to edit, then use the **Save** or **Cancel** buttons that appear. An empty description shows *"No description"*.
## Attachments
Drag and drop files onto the panel or click **Add Files**. Each file can be up to 10 MB. The attachment list shows a thumbnail or icon, filename, file size, uploader, and upload date. Image attachments get inline thumbnails and a full-screen preview.
## Metadata
The metadata section displays the owner name, created-by name and date, and a due date picker with a popover calendar.
## Assignees
A list of assigned users and specialists with avatars. Click **Add Assignee** to open a searchable picker where you can assign team members or [specialists](/guide/specialists/index.md).
## Project Link
Link a task to a [project](/guide/projects/index.md) to inherit its repository URLs, giving specialists code context. A project badge appears when linked, with an unlink button next to it. Click **Link to Project** to browse workspace projects.
## Acceptance Criteria
A checklist for defining when a task is complete. Each criterion has a checkbox, a description, and a delete button. Completed criteria get strikethrough text. Click **+** to add a new criterion.
## Channels
Link a task to [chat](/guide/chat/index.md) channels for additional context. Click **Link Channel** to open a searchable channel picker.
## Archive and Close
For new tasks, the footer shows **Cancel** and **Create** buttons. For existing tasks, it shows **Archive Task** (or **Restore Task** if the task is archived) and **Close**.
---
url: /guide/workflows/index.md
---
# Visual Workflow Editor
The workflow editor lets you build automation pipelines by connecting nodes on a visual canvas. Drag nodes from the palette, wire them together, configure each step, and run the whole thing without writing code.
This page covers how to open the editor and what each part of the screen is for. To learn how to build, save, and run a workflow end-to-end, see [Build & Run](/guide/workflows/build-and-run.md).
## Open the Editor
Click **Workflows** in the icon rail on the left side of the app. You land on a home page with a quick-start guide, your saved workflows in the sidebar, and a row of quick-action buttons.

From the home page you can:
* **Click *Visual Editor*** to open a fresh, blank canvas.
* **Click *Test Execution*** to run a sample workflow without building one yourself.
* **Click any saved workflow** in the sidebar to open it. Each card shows the workflow name and an execution-mode badge.
* **Click the `+`** in the sidebar header to create a new workflow.
## The Editor Layout
The editor fills the screen with a top toolbar and three vertical panels.
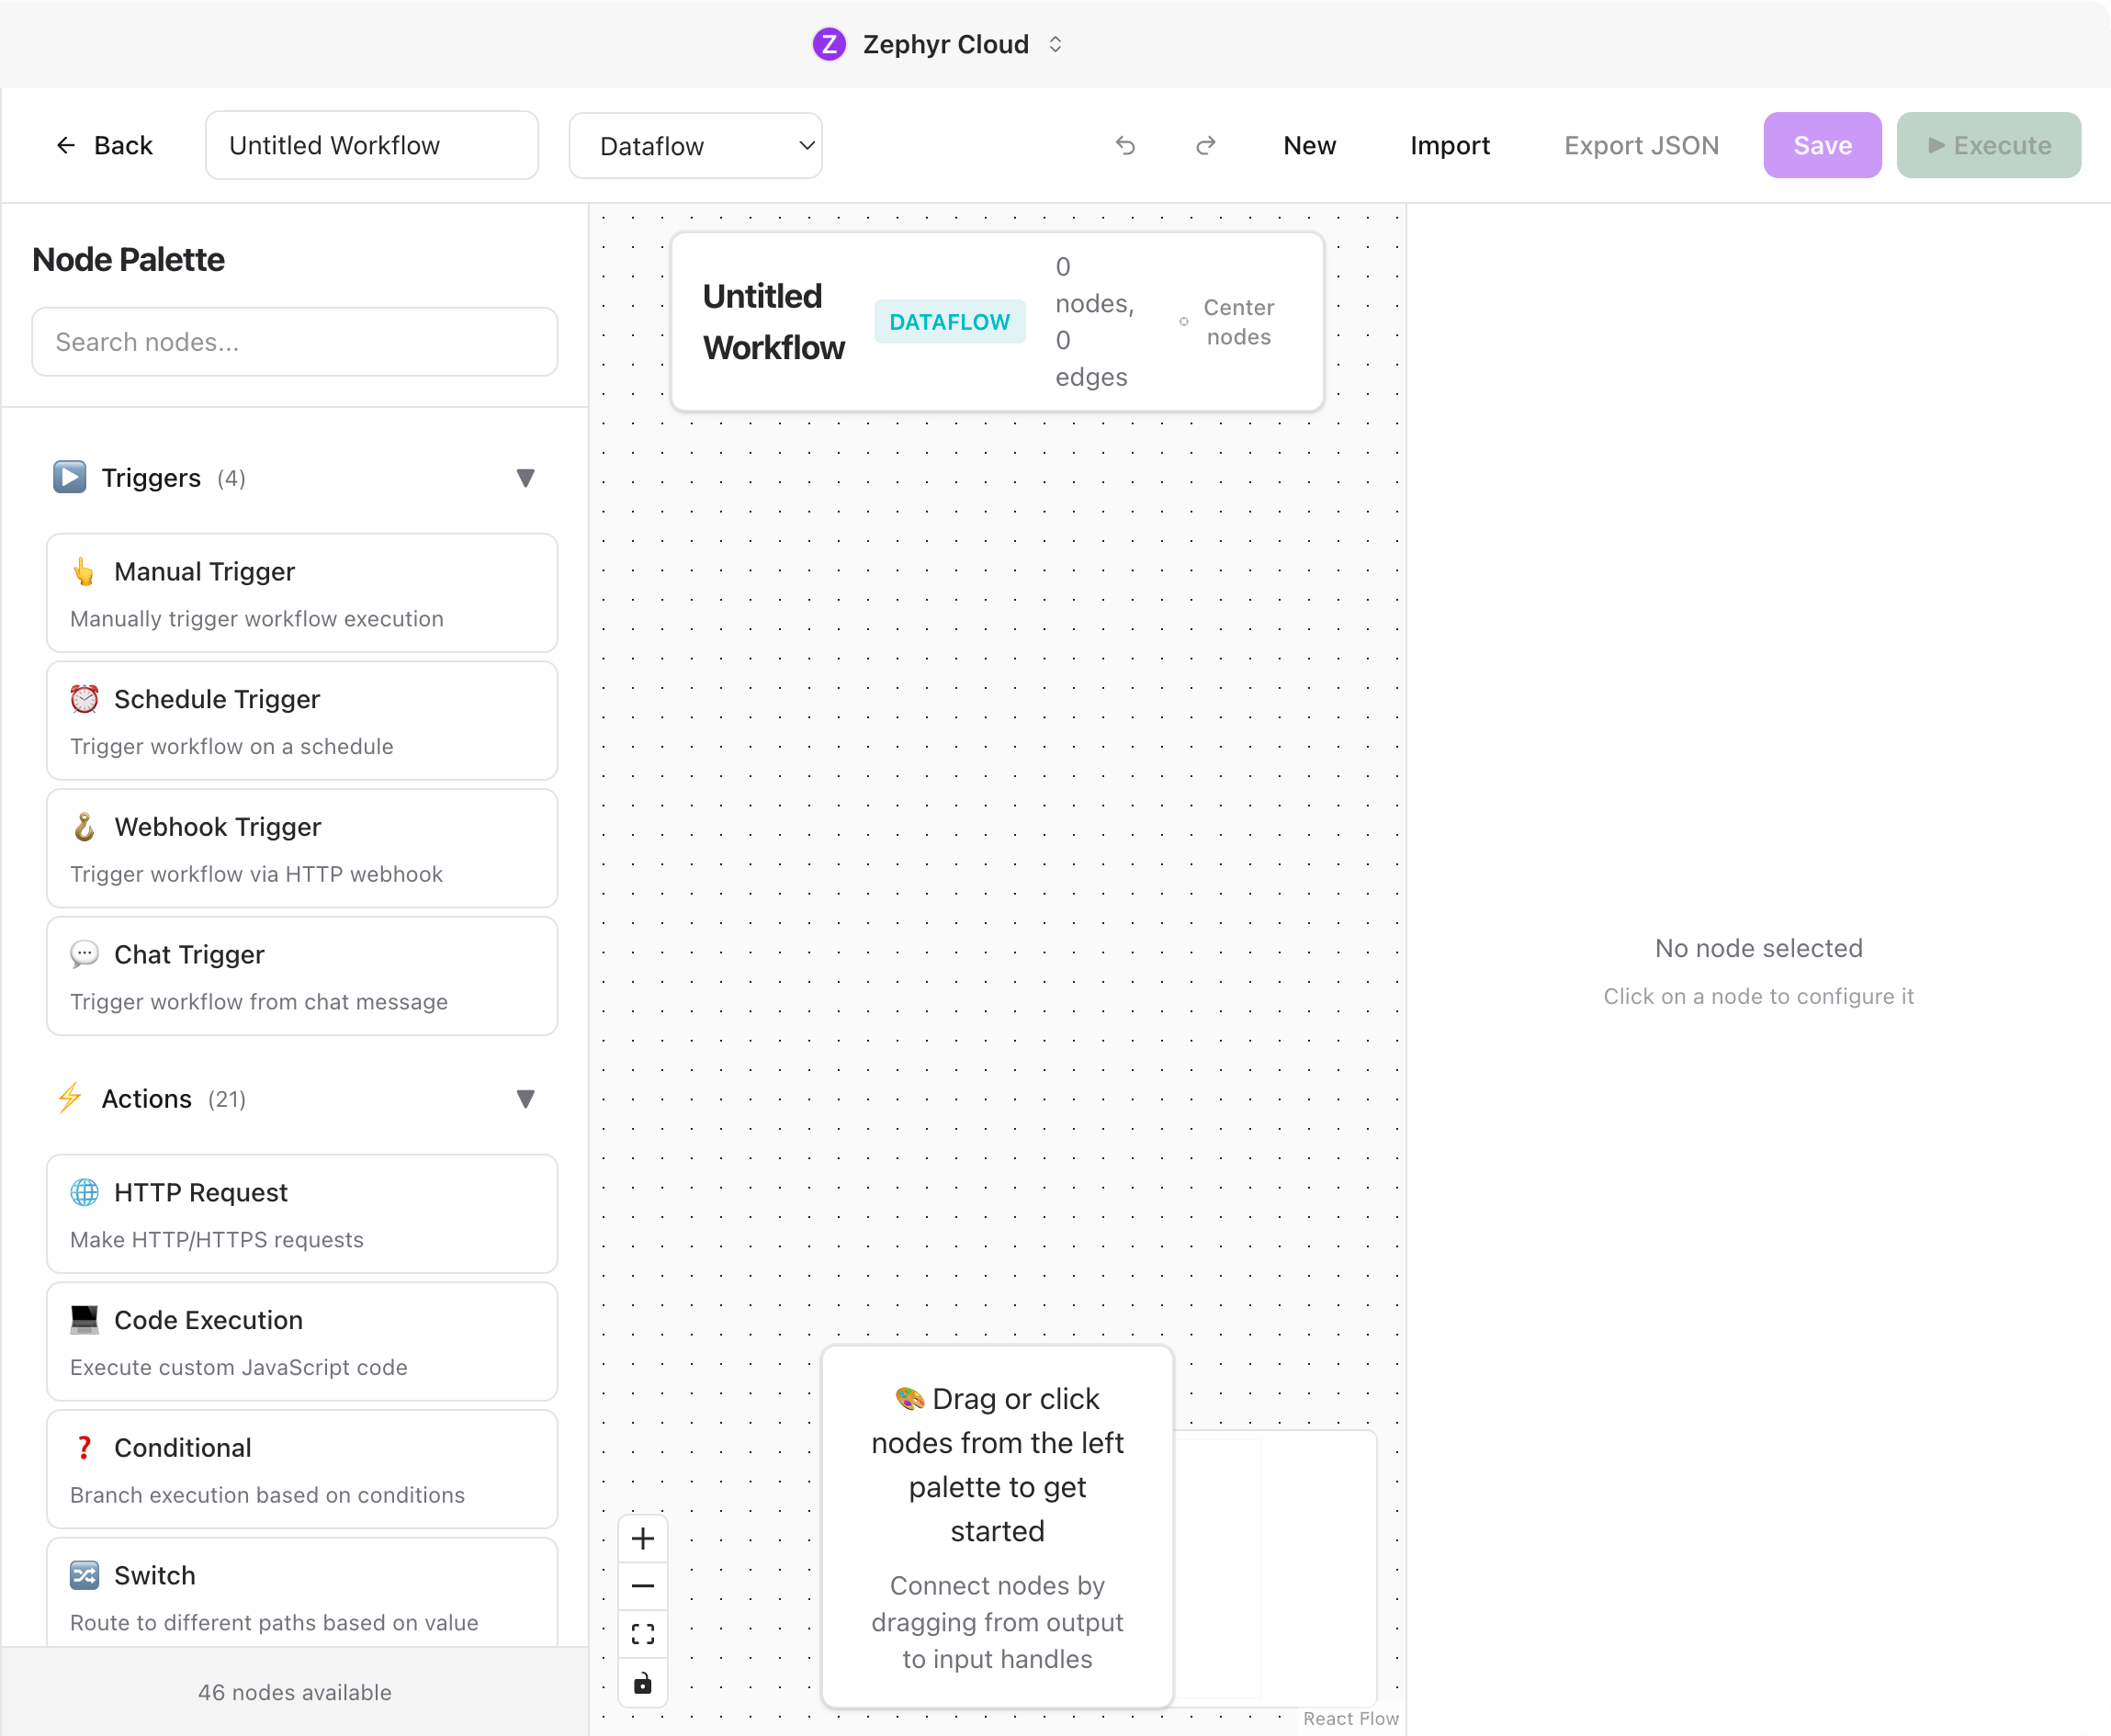
* **Top toolbar** for workflow-level actions (see [Toolbar](#toolbar) below).
* **Node palette** on the left. A searchable list of every node type, grouped by category.
* **Canvas** in the center. The work area where you place and connect nodes. It has a dot-grid background, zoom controls in the bottom-left, and a minimap in the bottom-right.
* **Configuration panel** on the right. Shows settings for the selected node. When nothing is selected it shows *"No node selected — click on a node to configure it"*.
## Toolbar
The top bar has these controls, left to right. Each one is covered in detail in [Build & Run](/guide/workflows/build-and-run.md).
* **← Back** returns to the Workflows home page.
* **Workflow name** is an inline-editable text field.
* **Execution mode** dropdown — Dataflow, State Machine, or Hybrid.
* **New** clears the canvas to start a fresh workflow.
* **Import** brings in workflows from JSON (Zephyr, n8n, or LangGraph format).
* **Export JSON** downloads the current workflow.
* **Save** persists the workflow.
* **▶ Execute** runs the workflow.
## Node Palette
The palette lists every available node, grouped into seven collapsible categories. Click a category header to expand or collapse it. The number in parentheses (e.g. *Triggers (4)*) is the count of nodes in that category.
| Category | Icon | Examples |
| ------------------- | :--: | -------------------------------------------------------------------------- |
| **Triggers** | ▶️ | Manual Trigger, Schedule Trigger, Webhook Trigger, Chat Trigger |
| **Actions** | ⚡ | HTTP Request, Code Execution, Conditional, Switch, Loop, Invoke Specialist |
| **Data Transform** | 🔄 | Transform, Aggregate, Sort, Filter, Limit, Group By, Time Series |
| **Database** | 🗄️ | PostgreSQL, MySQL, MongoDB |
| **File Operations** | 📁 | Read File, Write File, File Picker, Generate Assets |
| **Notifications** | 📧 | Email, Slack, Discord |
| **Utilities** | ⚙️ | No Operation, Error, Wait, Markdown Report |
Each category has its own color, which carries over to the node body on the canvas and the dot in the minimap, so you can see at a glance what kind of work each part of the flow does.
Use the **search box** at the top of the palette to filter nodes by name or description across every category.
## What to Explore Next
* [Build & Run](/guide/workflows/build-and-run.md). Add nodes, configure them, save, execute, and import/export.
* [Channels](/guide/chat/index.md). Trigger workflows from chat messages with the Chat Trigger node.
* [Specialists](/guide/specialists/index.md). Use the Invoke Specialist action node to delegate steps to an AI specialist.
* [Tasks](/guide/tasks/index.md). Have a workflow create or update tasks as it runs.
---
url: /guide/workflows/build-and-run.md
---
# Build & Run
Once you have [opened the editor](/guide/workflows/index.md), build your workflow by adding nodes, connecting them, configuring each step, and running it.
## Add Nodes
There are two ways to drop a node onto the canvas from the palette on the left:
* **Click** a node to place it in the center of the canvas.
* **Drag** a node onto the canvas to place it at a specific spot.
Once a node is on the canvas you can drag it around to reposition it. Use the search box at the top of the palette to filter the list before you pick.
## Connect Nodes
Each node has handles on its sides. Output handles sit on the right, input handles on the left. Trigger nodes only have output handles because they start the flow.
To connect two nodes, drag from an output handle on one node to an input handle on another. A curved line appears between them. This line represents the data path between the two steps.
Hover over a connection to highlight it and reveal a red delete button at the midpoint. Click the button or select the connection and press `Delete` to remove it.
## Configure a Node
Click any node on the canvas to open its settings in the configuration panel on the right. Every node has at least two fields:
* **Node Label.** A custom name for this step, shown on the node body.
* **Node ID.** A read-only identifier used in exports and logs.
Below those, each node type has its own configuration fields. An HTTP Request node asks for a URL and method. A Conditional node asks for a boolean expression. A Schedule Trigger asks for a cron expression and timezone. Required fields are marked with a red asterisk.
Some nodes have specialized pickers. **Invoke Specialist** includes a searchable specialist selector. **Chat Respond** includes a channel picker. **AI Content Analysis** includes a model picker for your connected providers.
To remove a node, scroll to the bottom of the configuration panel and click **Delete Node**. A confirmation dialog appears before the node is removed along with any connected edges.
## Choose an Execution Mode
The toolbar has a mode dropdown with three options:
* **Dataflow.** Pure data passing between nodes, similar to n8n. Each node receives input from the previous node and passes output to the next.
* **State Machine.** Shared state that nodes can read from and write to, similar to LangGraph. Good for workflows that need to track progress across steps.
* **Hybrid.** Combines both patterns in a single workflow.
Pick the mode that fits your use case. Dataflow is the simplest starting point for most workflows.
## Canvas Controls
The bottom-left corner of the canvas has standard controls:
* **Zoom in / Zoom out.**
* **Fit view** zooms to fit all nodes in the visible area.
* **Lock** freezes the canvas so you can scroll without accidentally dragging nodes.
The bottom-right corner shows a **minimap** with colored dots, one per node — colors match the [node category](/guide/workflows/index.md#node-palette). Drag the highlighted rectangle in the minimap to pan around large workflows.
## Save and Run
The toolbar provides these actions:
* **Save.** Persists the workflow. Disabled when there are no unsaved changes.
* **Execute** (green button). Runs the workflow. If there are unsaved changes, it saves automatically first. The button shows *"Running..."* while the workflow executes, and a status banner appears below the toolbar with the result.
* **Undo / Redo.** Step backward or forward through your edits. Keyboard shortcuts: `Cmd+Z` and `Cmd+Shift+Z` on macOS, `Ctrl+Z` and `Ctrl+Shift+Z` on Windows and Linux.
* **New.** Clears the canvas for a fresh start. Prompts to confirm if there are unsaved changes.
When the workflow runs, node states update in real time, and any errors surface directly on the failing node.
## Import and Export
### Export
Click **Export JSON** in the toolbar to download the workflow as a JSON file. The file uses Zephyr's native format and is named after your workflow.
### Import
Click **Import** in the toolbar to open a dialog with a large text area. Paste workflow JSON and choose one of three import formats:
* **Import as n8n** for workflows exported from n8n.
* **Import as LangGraph** for LangGraph workflow definitions.
* **Import as Zephyr** for Zephyr's native format.
The sidebar also has a collapsible **Import n8n Workflow** section for quick n8n imports without opening the full dialog.
## Attach to Channels and Specialists
Workflows can run automatically in response to chat activity. From a channel's right panel or a specialist's configuration, click **Add Workflow** to browse and attach a saved workflow.
When attaching to a channel, you pick a trigger type: Manual, Slash Command (users type a command like `/analyze`), Keyword Monitor (watches for specific words), Event Trigger, or Scheduled.
When attaching to a specialist, you pick an invocation mode: Manual, Automatic, or On Demand.
Each attachment has a priority (0 to 100) and an active/inactive toggle. Higher priority workflows execute first when multiple are attached.
:::tip
Start with a Manual Trigger node and the Dataflow execution mode. This is the simplest combination and lets you test your workflow by clicking Execute in the toolbar.
:::
---
url: /guide/workflows/run-history.md
---
# Workflow Run History
Workflow definitions and workflow runs are separate records.
The workflow definition CRDT stores the editable graph: metadata, nodes, edges, variables, and input schema. It answers "what should run?" and is saved only when the editor commits a workflow snapshot.
The `workflowRuns` CRDT stores execution telemetry: queued, running, terminal status, runner lease, per-node records, structured logs, and artifact references. It answers "what happened in this run?" and changes during execution.
Small local payloads can remain inline in `workflowRuns` for fast inspection. Large payloads and cloud-runner payloads are written to R2 using deterministic keys:
```text
workflow-runs/{workspaceId}/{workflowId}/{runId}/...
```
The CRDT keeps only the artifact reference, byte length, hash, content type, and preview, so run sync does not carry unbounded input/output data.
On desktop, the same run records are also mirrored into the app's local SQLite store through the CRDT persistence layer. That local mirror powers offline inspection and fast reopen behavior; it is a cache of the `workflowRuns` CRDT, not a separate source of truth.
Runner ownership follows a queue and claim flow:
1. A run is first recorded as `queued`.
2. A runner claims it by writing `running` with runner kind, runner id, version, attempt, and lease expiration.
3. Heartbeats renew the lease while work is in progress.
4. The final record becomes `succeeded`, `failed`, or `cancelled`.
Cloud APIs authorize run and artifact access through workspace membership and Cerbos workflow actions. The Durable Object socket receives authenticated user/workspace context from the API layer; clients cannot gain access by supplying only `userId` or `peerId` query strings.
---
url: /guide/settings/index.md
---
# Settings
Settings let you customize your account, manage your workspace, and configure the tools your specialists use. Open settings by clicking your workspace name at the bottom of the sidebar, then selecting **Settings**.
Settings open as a full-page view with a sidebar listing every section. The sidebar groups sections into three categories: Account, Workspace, and Configure.
## Account
Account settings apply to you personally and follow you across workspaces.
### Personal
Your profile card, display name, avatar, notification preferences, and account actions like logging out.
### Preferences
Appearance settings (theme and UI scale), language and translation options, notification toggles, and the release channel picker.
Both are covered on the [Personal and Preferences](/guide/settings/personal.md) page.
## Workspace
Workspace settings affect everyone in the workspace. Most sections here are admin-only.
### Details
The workspace icon and name. Only admins can edit these fields. See [Workspace](/guide/settings/workspace.md).
### Preferences
Workspace-level preferences including Code Knowledge Graph configuration. Admin only. See [Workspace](/guide/settings/workspace.md).
### Members
Invite members by email, manage roles (Admin, Member, Guest), set up domain-verified email join, and copy invite links. Admin only. See [Workspace](/guide/settings/workspace.md).
### Billing
Plan selection, credit balance, per-model usage breakdown, transaction history, and top-up options. Admin only. See [Billing](/guide/settings/billing.md).
## Configure
Configure sections control the tools and integrations that power your workspace.
### Connections
Set up LLM providers, pick default models, and connect external services like GitHub, Slack, Notion, Figma, and Linear. See [Connections](/guide/settings/connections.md).
### Language Servers
Install and manage Language Server Protocol providers for code intelligence. Desktop only. See [Language Servers](/guide/settings/language-servers.md).
### Permissions
Review active sessions, channel permissions, and specialist permissions. Revoke access when needed. See [Permissions](/guide/settings/permissions.md).
### Sandbox
Create sandbox profiles that control specialist filesystem and network access. Includes an onboarding wizard and violation logs. See [Sandbox](/guide/settings/sandbox.md).
### MCP Servers
Add, edit, and remove Model Context Protocol servers that give specialists additional tools and context. Filter by scope: All, Project, Personal, Workspace, or Org. See [MCP Servers](/guide/settings/mcp.md).
### Development
Download and manage local Hugging Face models. A testing section is visible in development mode only. See [Development](/guide/settings/development.md).
### Browser Extensions
Install and manage Chrome extensions inside the desktop app's embedded browser. Useful when a specialist needs to drive a real Chrome experience that depends on extension behavior. Desktop only. See [Browser Extensions](/guide/settings/browser-extensions.md).
## Admin-Only Sections
Workspace Preferences, Members, and Billing only appear in the sidebar if you are a workspace owner or admin. If you do not see these sections, ask an admin to check your role.
## Desktop-Only Features
Language Servers requires the desktop app with LSP support enabled. It appears grayed out with a tooltip on other platforms.
---
url: /guide/settings/personal.md
---
# Personal and Preferences
The Account group in [Settings](/guide/settings/index.md) has two sections: **Personal** and **Preferences**. These settings apply to your account and follow you across workspaces.
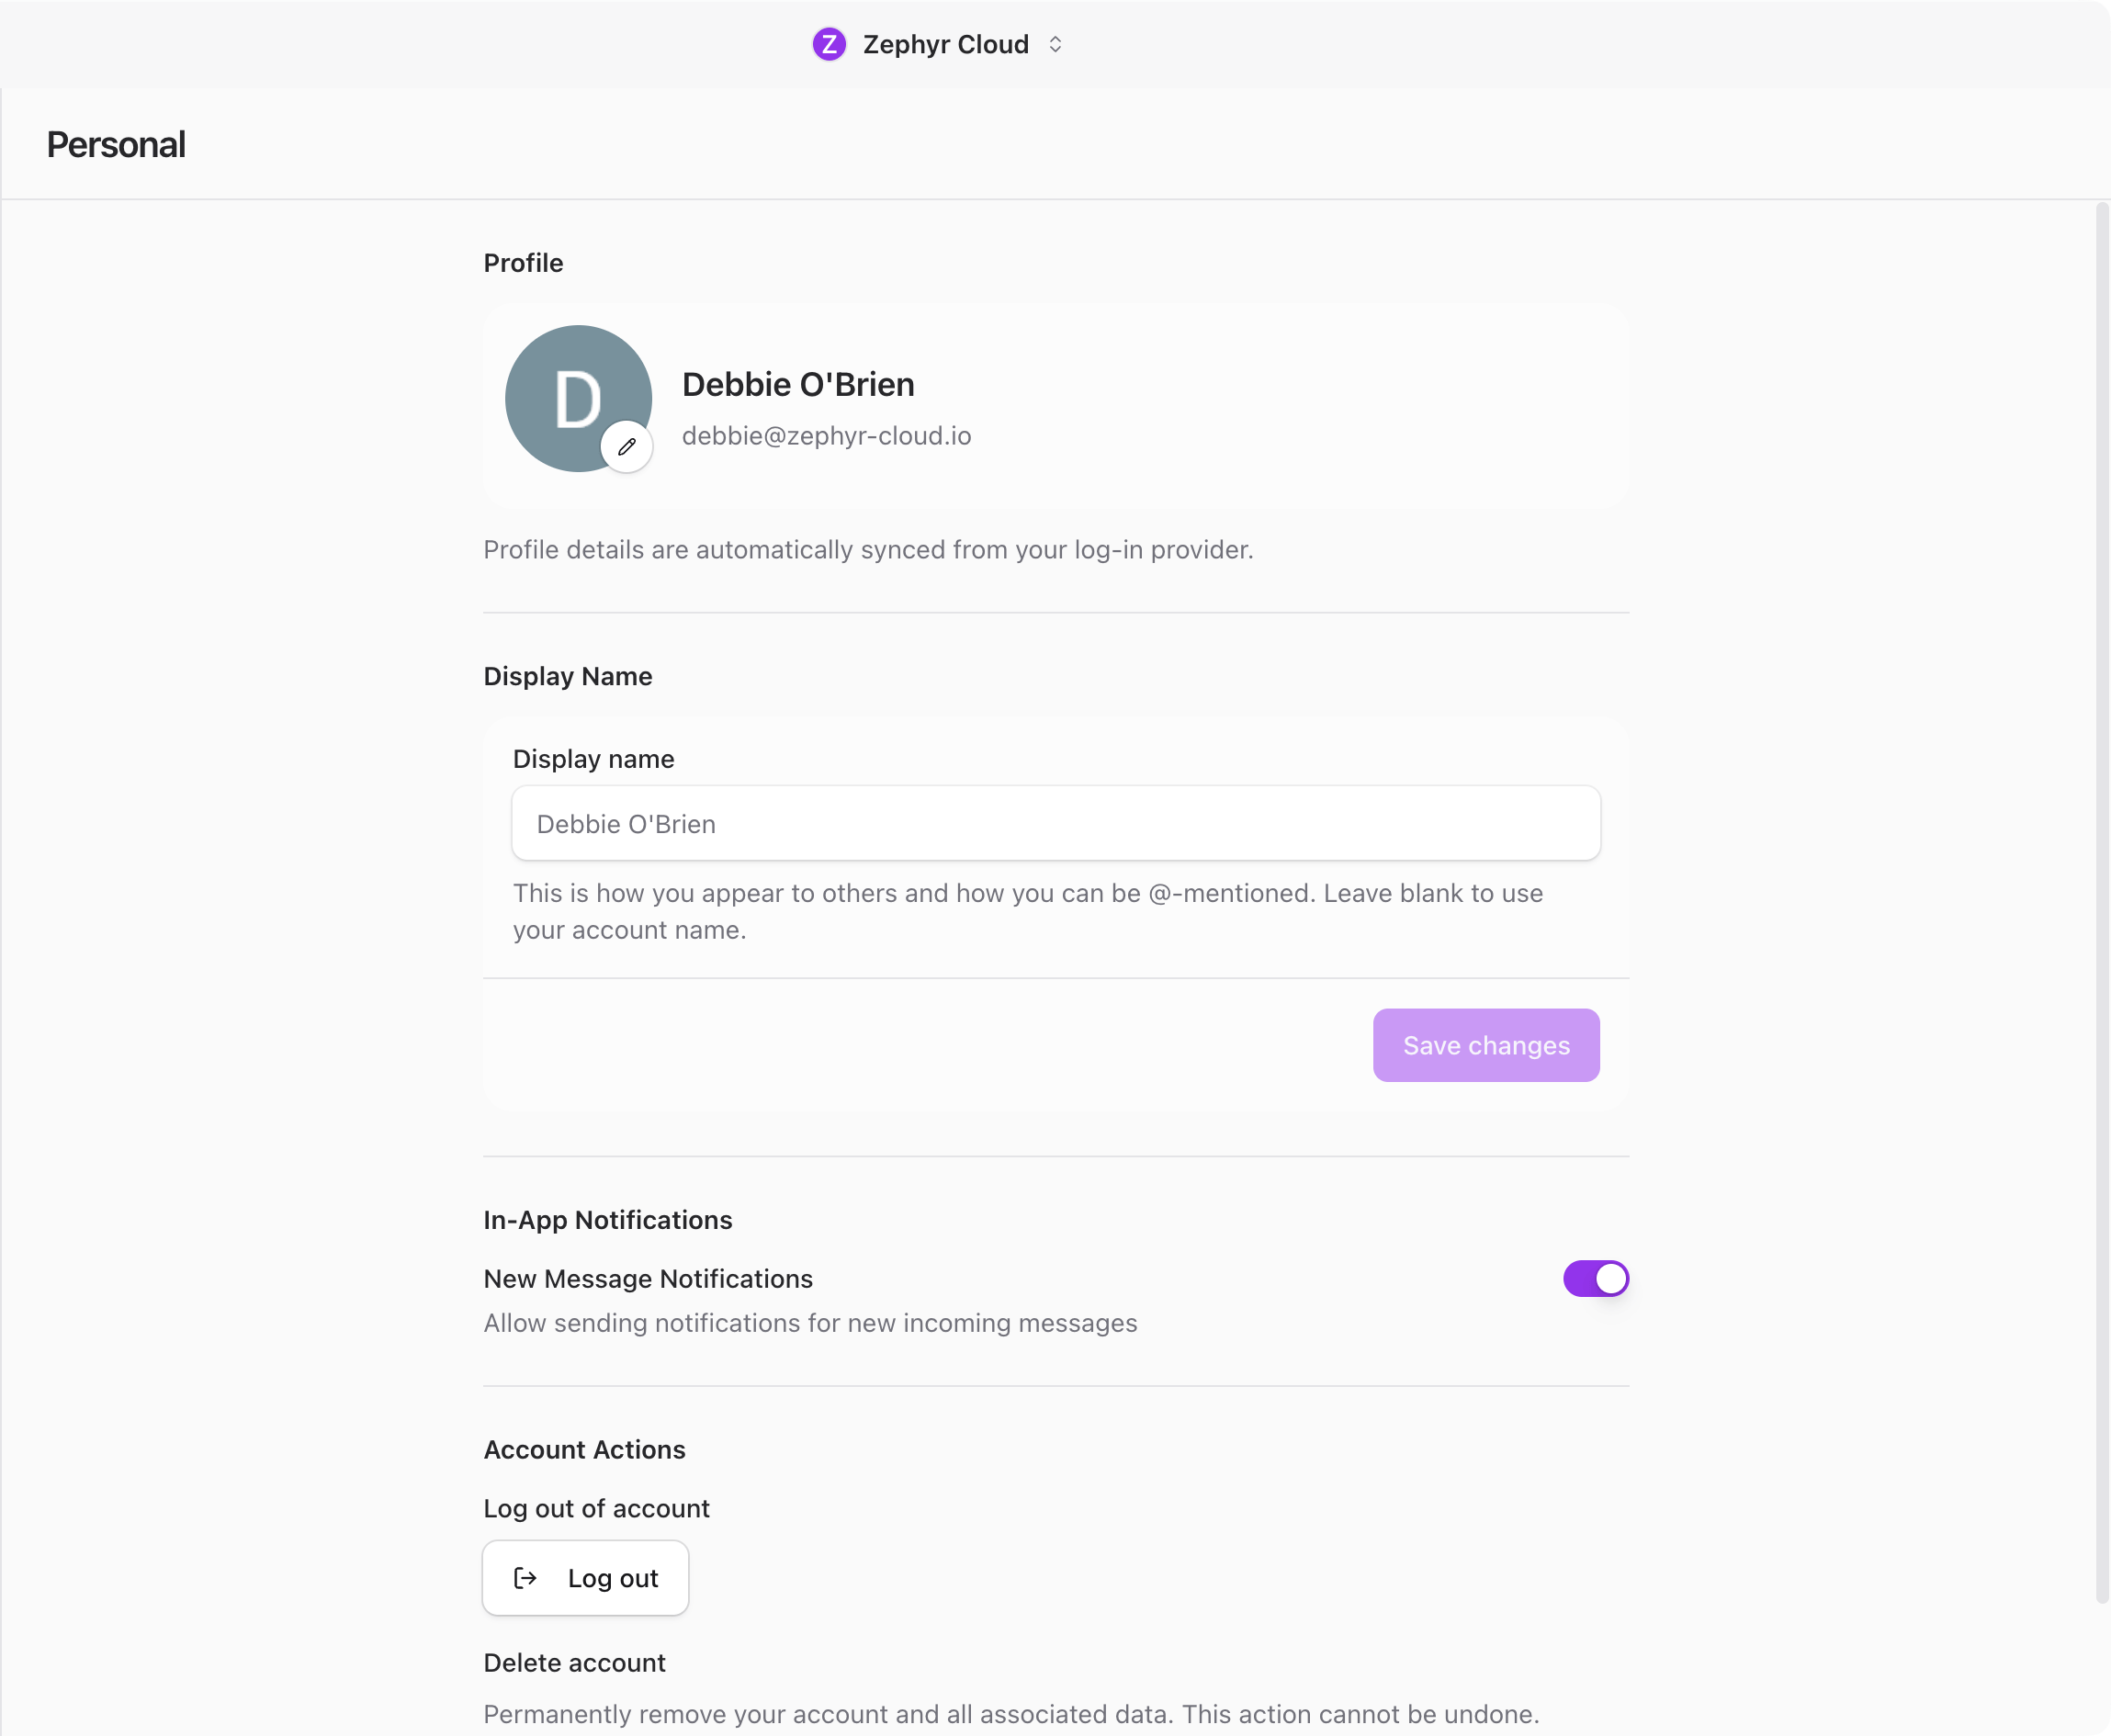
## Profile
At the top of the Personal section, a profile card shows your avatar, display name, and email address. Your profile details sync automatically from your login provider.
Click the avatar to upload a custom image or change it. If you do not upload one, the app uses your login provider picture or shows your initials.
## Display Name
Below the profile card, a text field lets you set a custom display name. This is how you appear to others in the workspace and how you can be @-mentioned in conversations.
The name can be up to 64 characters. Leave it blank to use your account name from the login provider. Click **Save changes** to apply.
## In-App Notifications
A toggle controls whether new message notifications play a sound. Turn it off if you prefer silent notifications.
## Account Actions
Two actions are available at the bottom of the Personal section:
* **Log out** signs you out of your account. If you have multiple accounts, you return to the next available one.
* **Delete account** permanently removes your account and all associated data. This feature is not available yet.
## Appearance
The Preferences section starts with appearance settings.
**Theme** lets you pick between three options: Light, Dark, and System. Each option is shown as a visual card with an icon. System follows your operating system setting.
**UI scale** adjusts the base font size with a slider. Drag it to make everything larger or smaller. Click **Restore default** to reset to the standard size.
## Language
Set your preferred language from a dropdown with 15 supported languages. A separate dropdown sets your region for date and number formatting.
**Auto-translate messages** toggles automatic translation of incoming messages into your preferred language. When enabled, you can also turn on **Show both original and translation** to see messages in both languages side by side.
**Translation model** lets you pick which AI model handles translations. Options include Claude Sonnet 4.5 (recommended), GPT-5.4, GPT-5 Mini, and Gemini 2.5 Flash.
## Notifications
Three toggles control how you receive notifications:
* **OS notifications** sends native desktop or mobile notifications for new messages.
* **Email notifications** sends email alerts for messages you missed.
* **Message sounds** plays audio for new messages. When enabled, four test buttons appear: **Test notification**, **Test error**, **Test success**, and **Test all**. Use these to preview each sound.
## Release Channel
A dropdown lets you pick your update channel: Stable, Beta, Development, or Nightly. Stable is the default and recommended for most users. Beta and Development channels receive features earlier but may be less stable.
This setting is only visible in the desktop app when the updater is available. You will not see it on mobile or in the web version.
---
url: /guide/settings/workspace.md
---
# Workspace
Workspace settings control your workspace identity and workspace-level preferences. These sections are only visible to workspace owners and admins. If you do not see them in the [Settings](/guide/settings/index.md) sidebar, ask an admin to check your role.
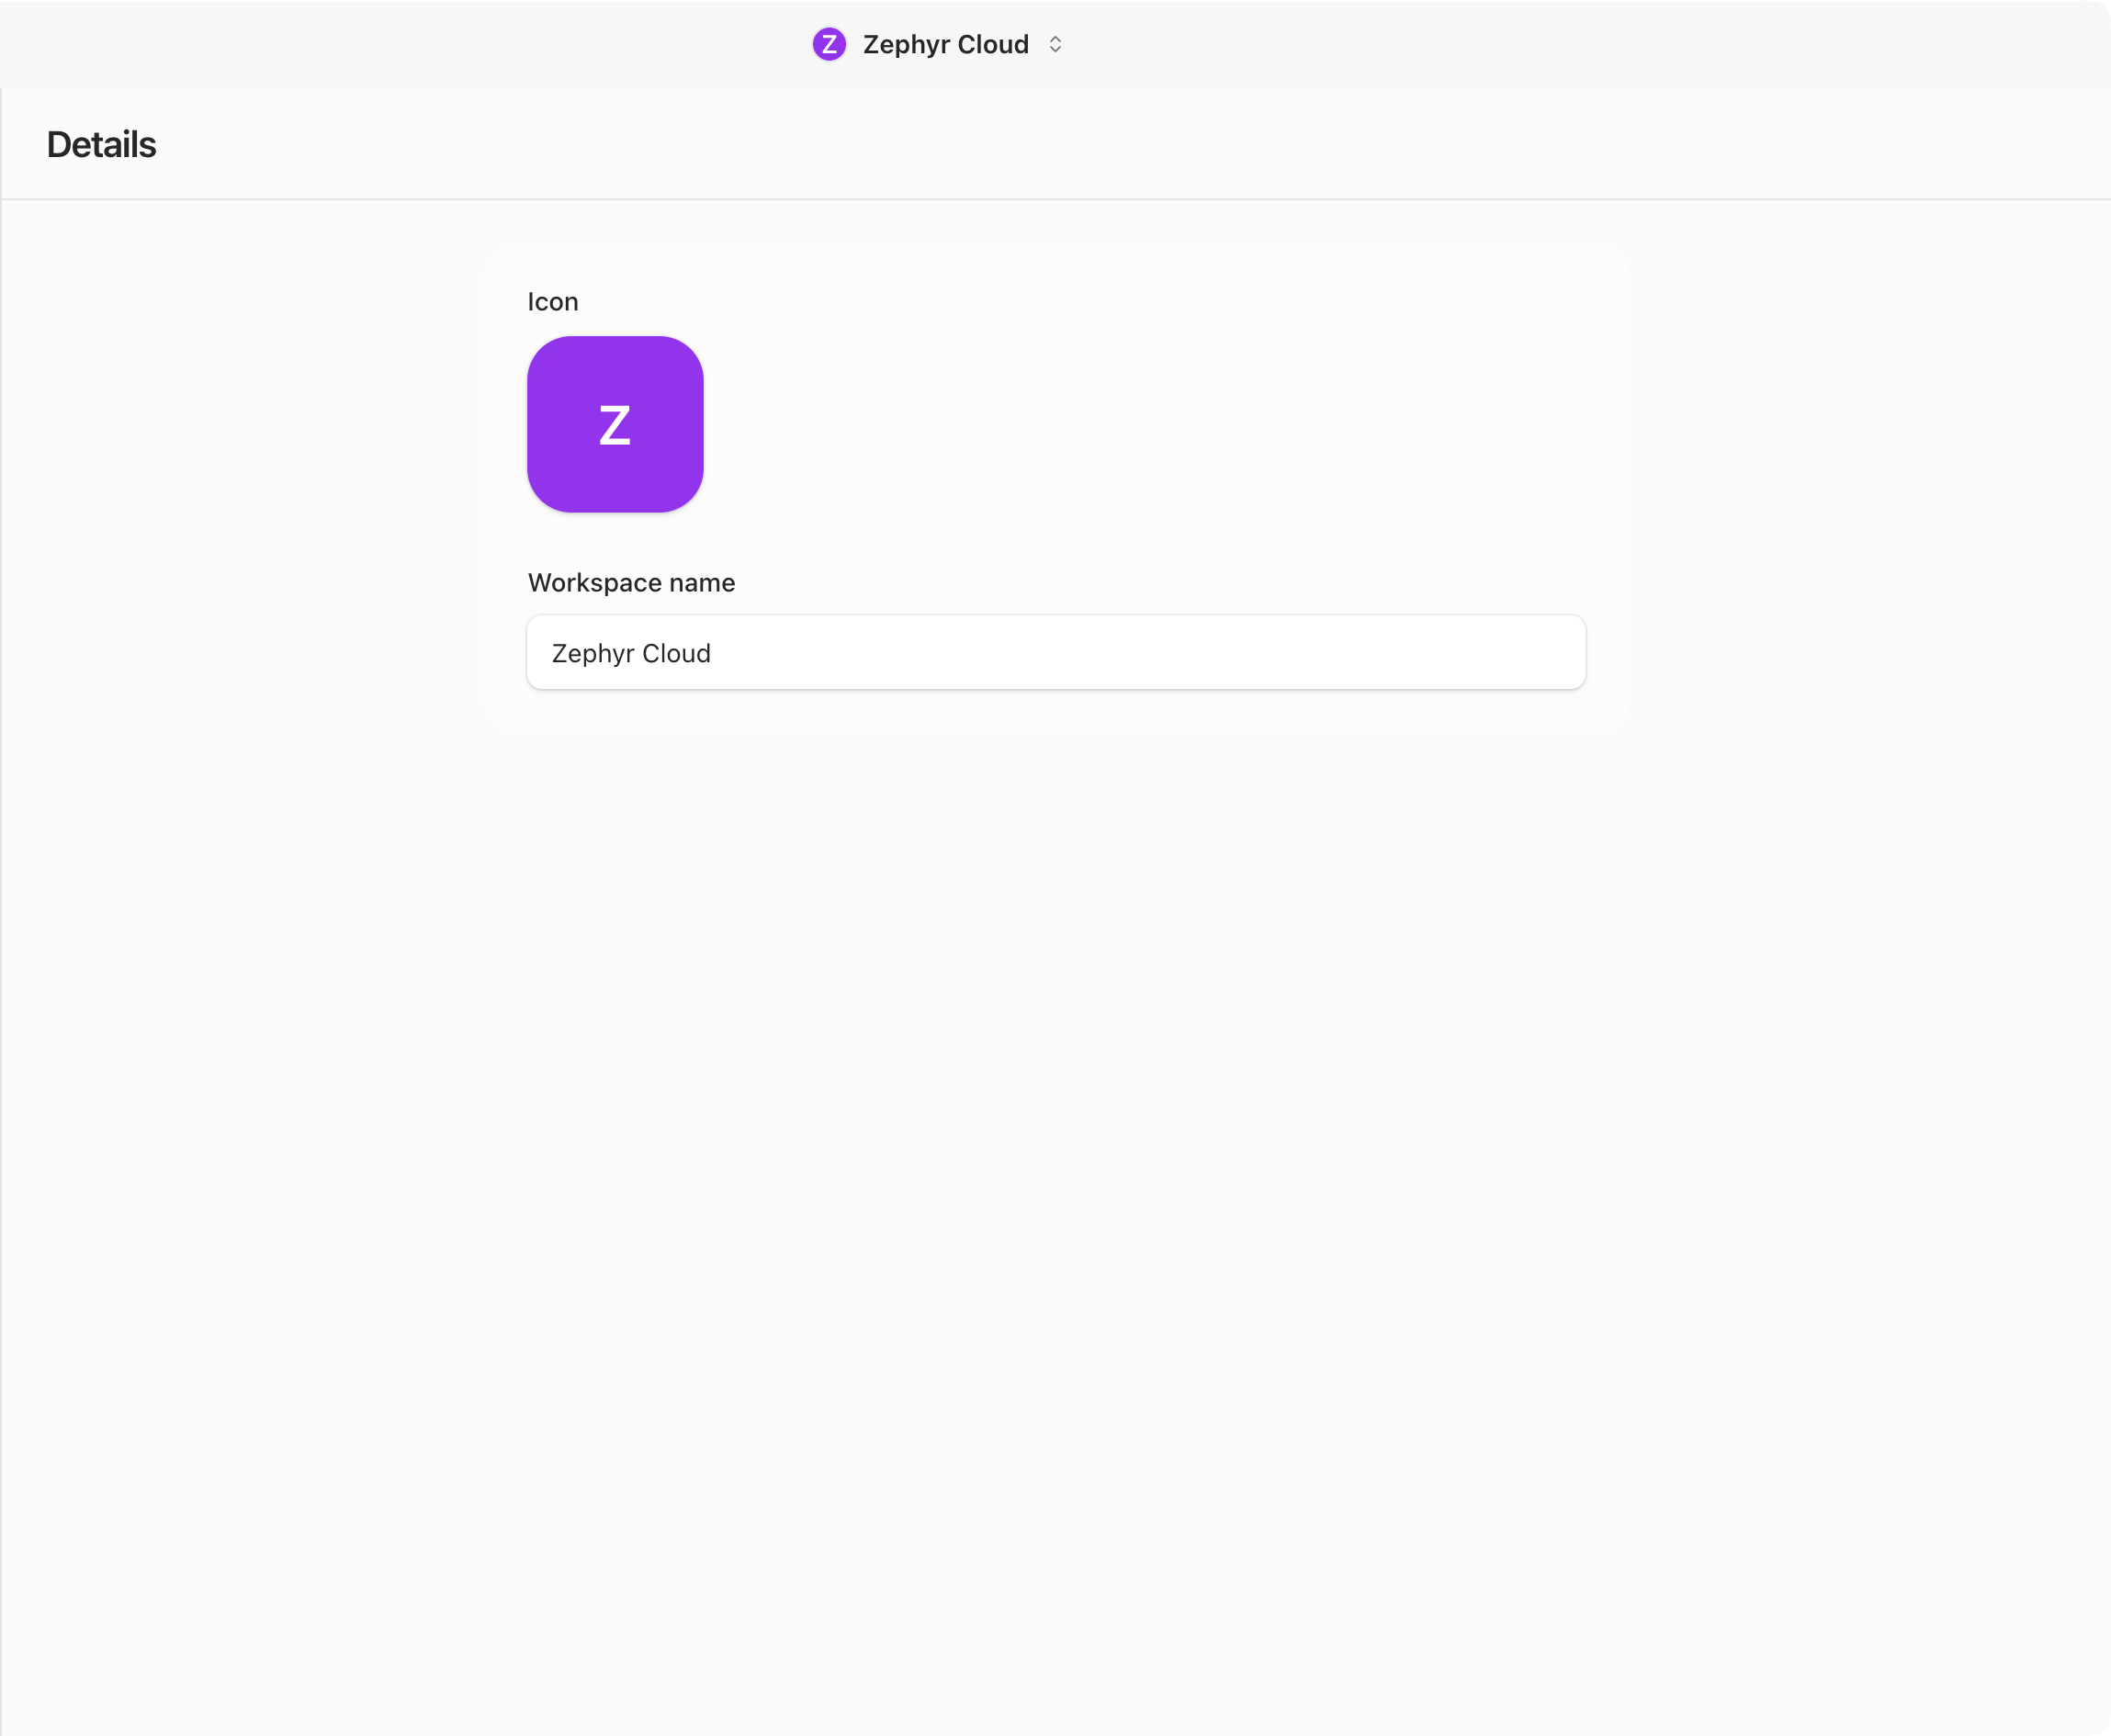
## Details
The Details page lets admins set the workspace icon and name.
### Workspace Icon
Click the workspace icon to open the icon picker. You can upload a custom image or choose a background color. The icon appears in the sidebar and workspace switcher so your team can tell workspaces apart at a glance.
### Workspace Name
Type a new name in the text field. The name is required and must be 64 characters or fewer. Click **Save** in the footer to apply the change.
Non-admins see these fields as read-only. The icon and name are visible but cannot be changed.
## Members
The Members section lets admins manage who has access to the workspace.
### Inviting Members
Type an email address into the invite field and click **Send invite**. The recipient gets an email with a link to join the workspace. You can also click **Copy invite link** to share a direct join URL.
### Roles
Each member has one of three roles:
* **Admin** can manage settings, members, billing, and all workspace configuration.
* **Member** can use all features but cannot change workspace settings.
* **Guest** has limited access to specific channels they have been invited to.
Change a member's role from the dropdown next to their name.
### Domain-Verified Email Join
Toggle **General access** to let anyone with a verified email from your organization's domain join the workspace automatically. This removes the need to send individual invites.
### Removing Members
Click the remove action next to a member's name to revoke their access. They lose access immediately.
## Workspace Preferences
Workspace Preferences contains settings for the Code Knowledge Graph (CKG). CKG indexes your codebase to give specialists deeper context when answering questions about your code.
### Enable CKG
Toggle the Code Knowledge Graph on or off for the entire workspace. When disabled, specialists still work but without the deeper codebase understanding that CKG provides.
### Performance Tuning
Controls how many resources CKG uses during indexing. Adjust this if indexing is slowing down your machine or if you want faster index builds on powerful hardware.
### Intent Synthesis
Configures how CKG infers developer intent from conversations. This helps specialists understand not just what you typed but what you are trying to accomplish.
### Historical Index
Manages the historical code index. This lets CKG reference past versions of your code, which is useful for understanding how a codebase evolved over time.
### Per-Project Priority
Set priority levels for different projects in CKG indexing. High-priority projects get indexed first and updated more frequently.
### Path Exclusions
Specify file and folder paths to exclude from CKG indexing. Use this for build artifacts, vendor directories, or any paths that add noise without value. Common exclusions include `node_modules`, `dist`, and `.git`.
## Related
* [Settings overview](/guide/settings/index.md) for a summary of all settings pages.
* [Billing](/guide/settings/billing.md) for plan and credit management.
---
url: /guide/settings/billing.md
---
# Billing
Workspace owners and admins manage plans, credits, and usage from this section. If it does not appear in your [Settings](/guide/settings/index.md) sidebar, ask an admin to check your role.
## Plan Selection
At the top of the page, you will see your current plan. Plans include Free, Pro, Team, and Enterprise tiers. Click to upgrade or change your plan. The checkout flow opens in-app or redirects to the billing portal depending on the plan.
## Credit Balance
Three stat cards give you a snapshot of your workspace credits:
* **Available** shows credits ready to spend.
* **Reserved** shows credits currently allocated to active operations.
* **Spent** shows total credits used so far.
## Usage Breakdown
Below the balance cards, a per-model token breakdown shows how much each model has been used. This helps you understand which models are consuming the most credits and plan accordingly.
## Transaction History
A list of credit transactions shows when credits were added, spent, or adjusted. Each entry includes a timestamp, amount, and description so you can trace any change.
## Top Up Credits
Click the **Top Up** button to open a popover where you can purchase additional credits. This is useful when your balance is running low and you need more credits before the next billing cycle.
## Invite Codes
Admins can create and manage invite codes for the workspace. Invite codes can give new members a credit bonus when they join, which is a good way to onboard teammates.
## Managing Your Subscription
A link to the billing portal opens your subscription management page. From there you can update payment methods, view invoices, or cancel your plan.
## Related
* [Settings overview](/guide/settings/index.md) for a summary of all settings pages.
* [Workspace](/guide/settings/workspace.md) for inviting and managing members.
---
url: /guide/settings/connections.md
---
# Connections
Before specialists can respond to messages, you need at least one LLM provider configured. The Connections page is where you set that up, along with default model preferences and external service integrations.
## Opening Connections
Click on your workspace name at the bottom of the sidebar to open the workspace menu, then select **Settings**. In the Settings panel, click **Connections** in the left column under Configure.
The page has two tabs: **Model Providers** and **Linked Accounts**.
## Model Providers
The **Model Providers** tab is split into three areas: default models, the model list, and provider configuration.

### Default Models
At the top of the tab, you can set a default model for specialists that do not have their own model defined. There are two levels:
* **Workspace default** applies to everyone in the workspace. Only workspace admins can change this.
* **Personal default** applies only to you and overrides the workspace default.
This means you can set a workspace-wide standard (like GPT-4) while individual team members choose something different for their own work.
### Available Models
Below the defaults, a searchable list shows every model available across your configured providers. This is a read-only view so you can see what is available before picking defaults or configuring specialists.
### Configure Providers
Scroll down to the **Configure Providers** section to add or manage your API keys. Each provider expands into a form where you paste your credentials.
The AI Platform supports these providers:
* **OpenRouter** accesses models from multiple providers through a single API key. This is the default fallback provider.
* **OpenAI** provides GPT models. Requires an OpenAI API key.
* **Anthropic** provides Claude models. Requires an Anthropic API key.
* **Generic OpenAI** supports any endpoint that follows the OpenAI API format. Useful for self-hosted models or smaller providers.
* **Amazon Bedrock** hosts AWS models. Requires an AWS access key, secret key, and region.
* **Cloudflare Workers AI** requires a Cloudflare account ID and API token.
* **Hugging Face** includes both API-hosted models and local models you can download and run on your machine.
* **NVIDIA NIM** provides NVIDIA inference endpoints. Requires an NVIDIA API key.
* **Zephyr Built-in** requires no API key. Powered by your Zephyr subscription. If your workspace has an active Zephyr plan, this provider is available immediately with no setup.
To add a provider, expand it under **Configure Providers**, fill in the required credentials, and save. The provider and its models appear in the model list immediately.
:::tip
If you are not sure which provider to use, start with **OpenRouter**. It gives you access to models from multiple providers through a single API key.
:::
## Linked Accounts
The **Linked Accounts** tab lets you connect external services to your workspace. These connections give specialists additional context from your existing tools.
Available integrations:
* **GitHub** provides repository access, pull requests, and code context. You can also configure a personal access token for enhanced features.
* **Slack** provides channel and message context.
* **Notion** provides page and database access.
* **Figma** provides design file context.
* **Linear** provides issue and project tracking.
Click a service to see its details and connect it. Workspace admins can enable or disable integrations for the entire workspace.
## Next Steps
With a provider connected, you are ready to start chatting. Head to [Your First Channel](/guide/getting-started/your-first-channel.md) to create a channel and talk to a specialist.
---
url: /guide/settings/language-servers.md
---
# Language Servers
Language servers provide code intelligence (autocompletion, go-to-definition, diagnostics) for specialists working with code. They power the experience inside the [Code Editor](/guide/chat/code-editor.md) panel and any file work specialists do behind the scenes. This settings page lets you install and manage Language Server Protocol (LSP) providers.
You will find this page under **Language Servers** in the [Settings](/guide/settings/index.md) sidebar.
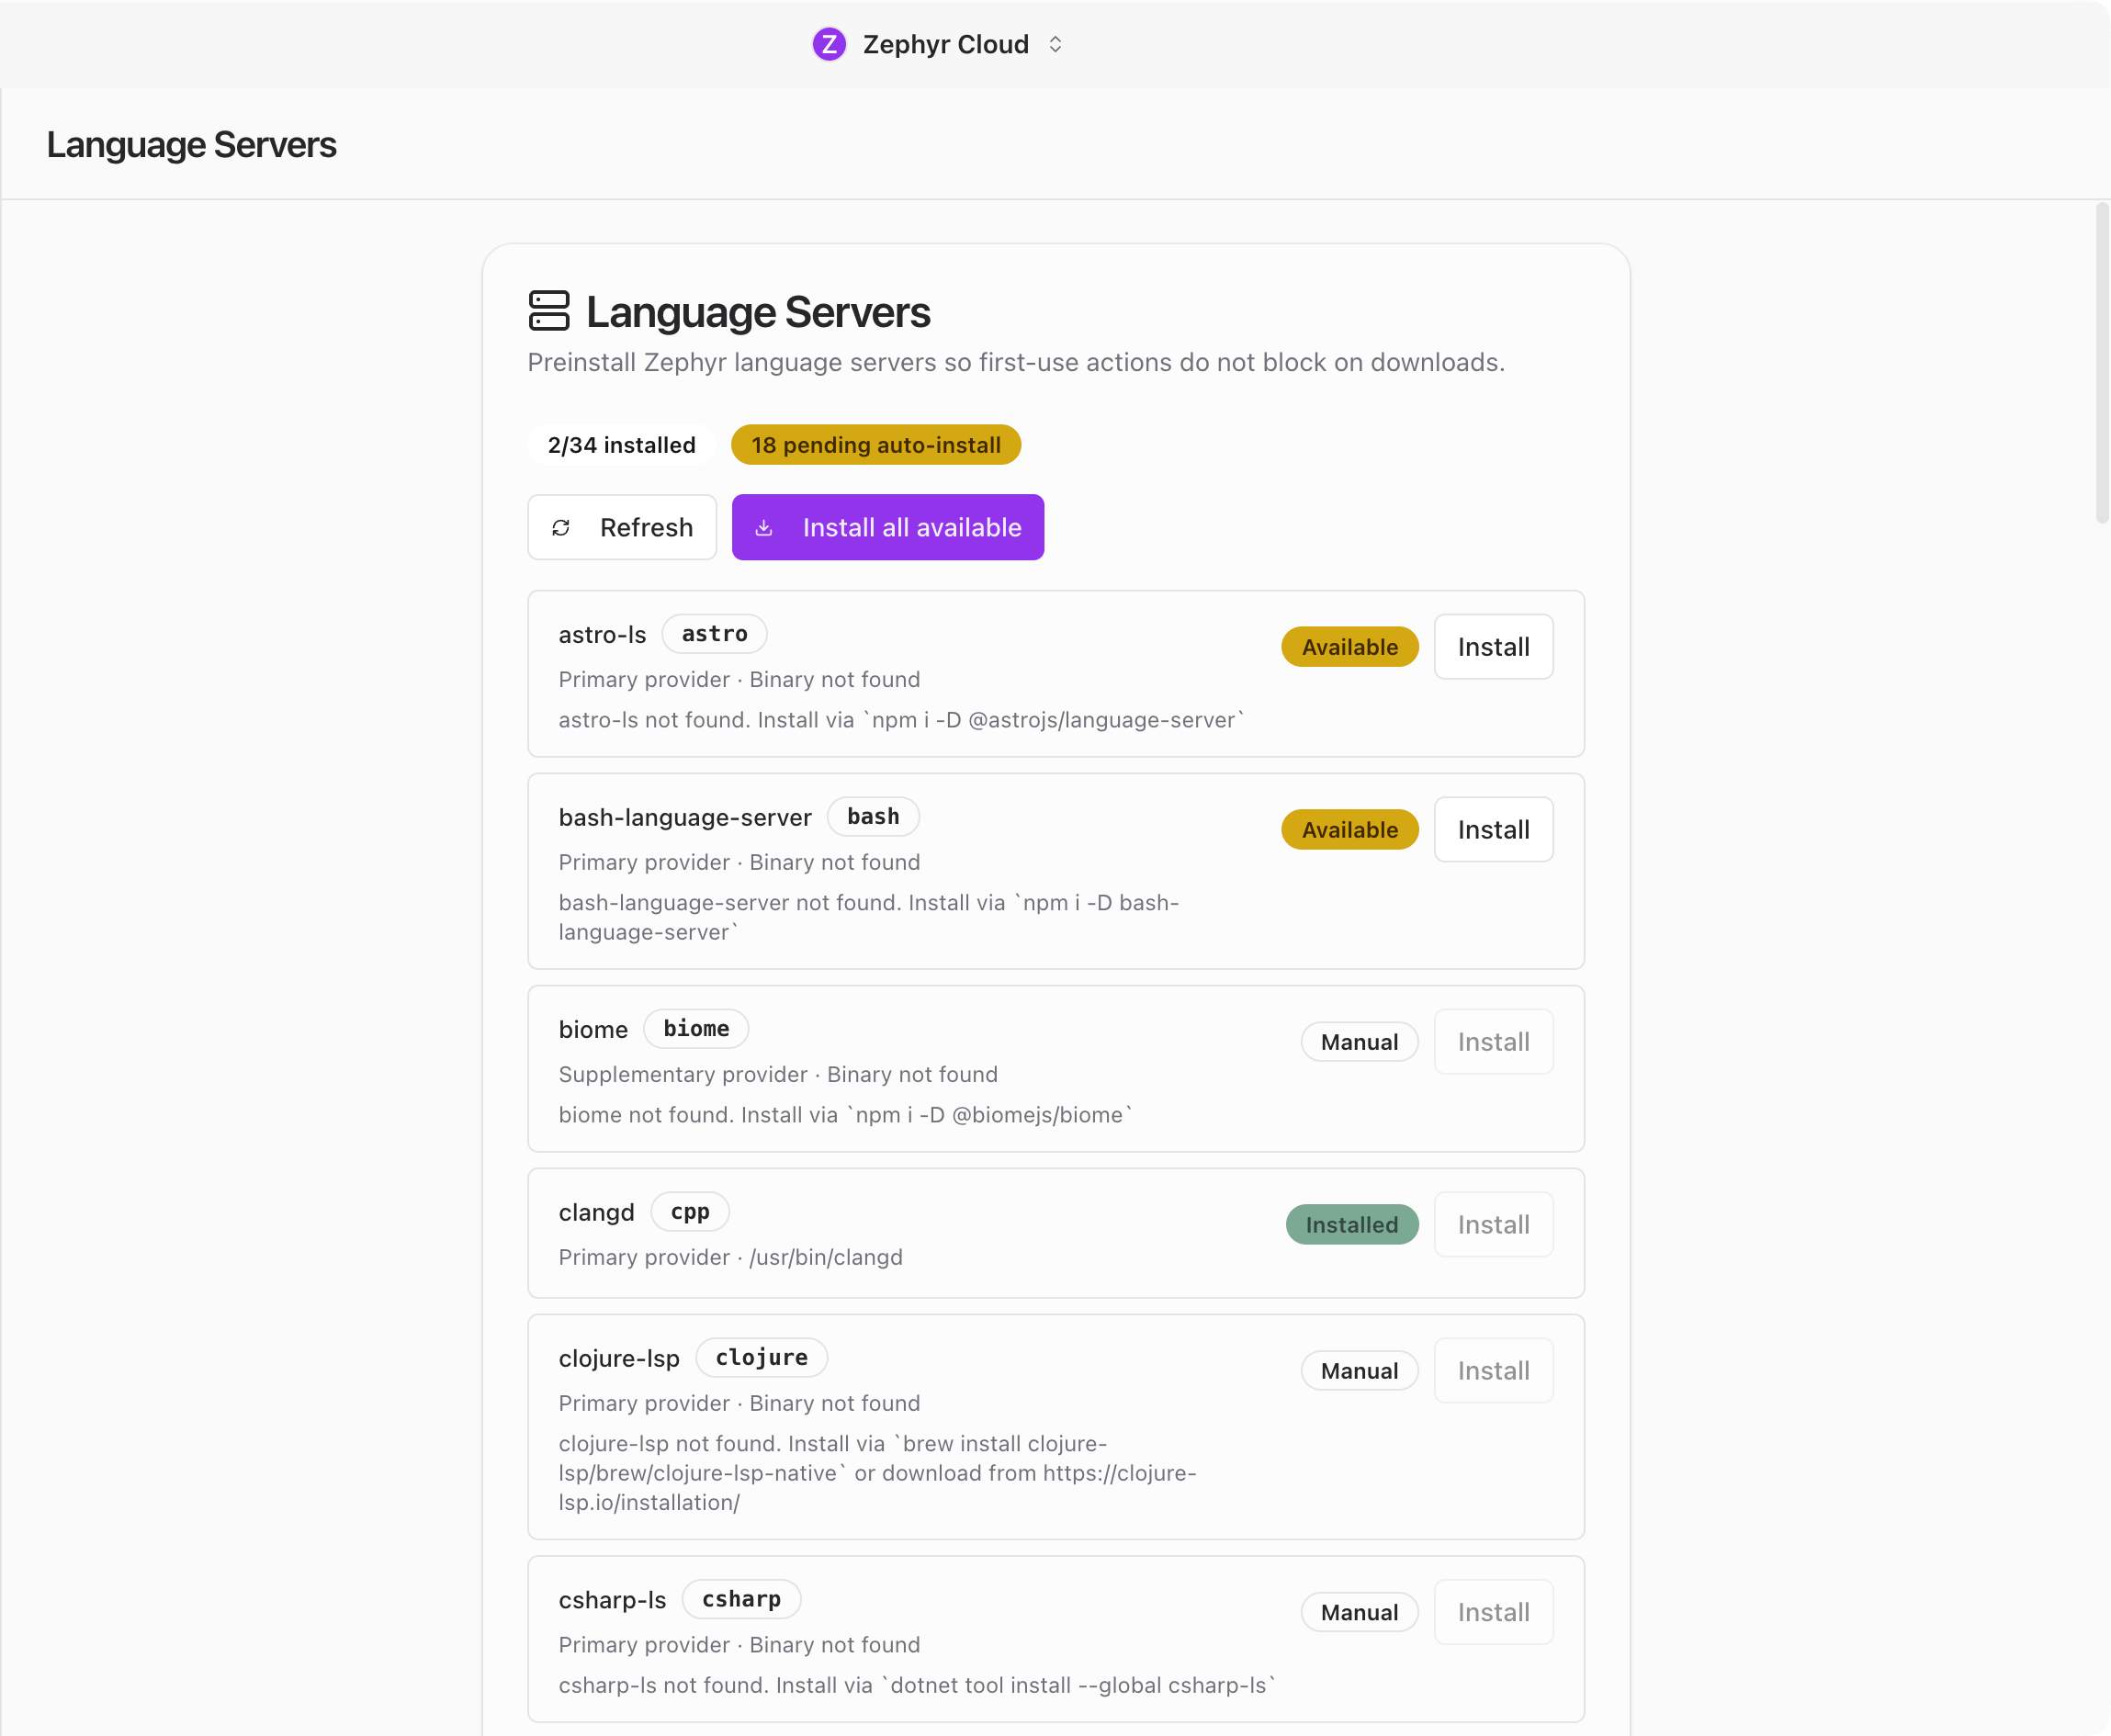
## Desktop Only
Language Servers are only available in the desktop app with LSP support enabled. On mobile or in the web version, this section appears grayed out in the sidebar with a tooltip explaining the requirement.
## Provider List
The page shows a list of available LSP providers. Each entry displays:
* The provider name.
* Its current status: installed, not installed, or updating.
* Actions you can take.
## Installing a Provider
Click **Install** next to a provider to download and set it up. The install runs in the background, so you can keep using the app while it finishes. Once complete, the status updates to show the provider is ready.
## Refreshing Providers
Click **Refresh** to check if a provider has updates available. If an update is found, it downloads and applies automatically.
## How Language Servers Help
When a language server is installed, specialists and the code editor gain deeper understanding of your codebase. They can provide more accurate code suggestions, find references across files, and catch errors before you run your code.
Language servers are most useful when working inside [Projects](/guide/projects/index.md) where code intelligence can reference your full repository.
## Related
* [Settings overview](/guide/settings/index.md) for a summary of all settings pages.
* [Projects](/guide/projects/index.md) for working with code repositories.
---
url: /guide/settings/permissions.md
---
# Permissions
The Permissions page shows what access has been granted in your workspace. Use it to review and revoke permissions across sessions, channels, and specialists.
You will find this page under **Permissions** in the [Settings](/guide/settings/index.md) sidebar.
## Active Sessions
This section lists your currently active sessions. Each entry shows session details so you can see where you are logged in. If you spot a session you do not recognize, revoke it to sign out of that device.
## Channel Permissions
Shows channels that have specific permission overrides. Each entry displays the channel name and its current permission level.
If a channel has permissions that are too broad, click the revoke action to remove the override. The channel reverts to the workspace default permissions.
## Specialist Permissions
Lists permissions granted to individual specialists. Each entry shows the specialist name and what access it has.
You can revoke specialist permissions individually. This is useful when you want to tighten what a specialist can do without removing it from the workspace entirely.
## Revoking Access
All three sections follow the same pattern. Each item has a revoke action that removes access immediately. There is no undo, so double-check before revoking.
:::warning
Revoking a permission takes effect immediately and cannot be undone. Make sure you intend to remove access before clicking revoke.
:::
## Related
* [Settings overview](/guide/settings/index.md) for a summary of all settings pages.
* [Chat](/guide/chat/index.md) to learn about channels and conversations.
* [Specialists](/guide/specialists/index.md) to learn about specialist access and roles.
---
url: /guide/settings/sandbox.md
---
# Sandbox
Sandbox settings control how specialists interact with your filesystem and network. They provide a security layer that limits what specialists can access during conversations.
You will find sandbox settings under **Sandbox** in the [Settings](/guide/settings/index.md) sidebar.
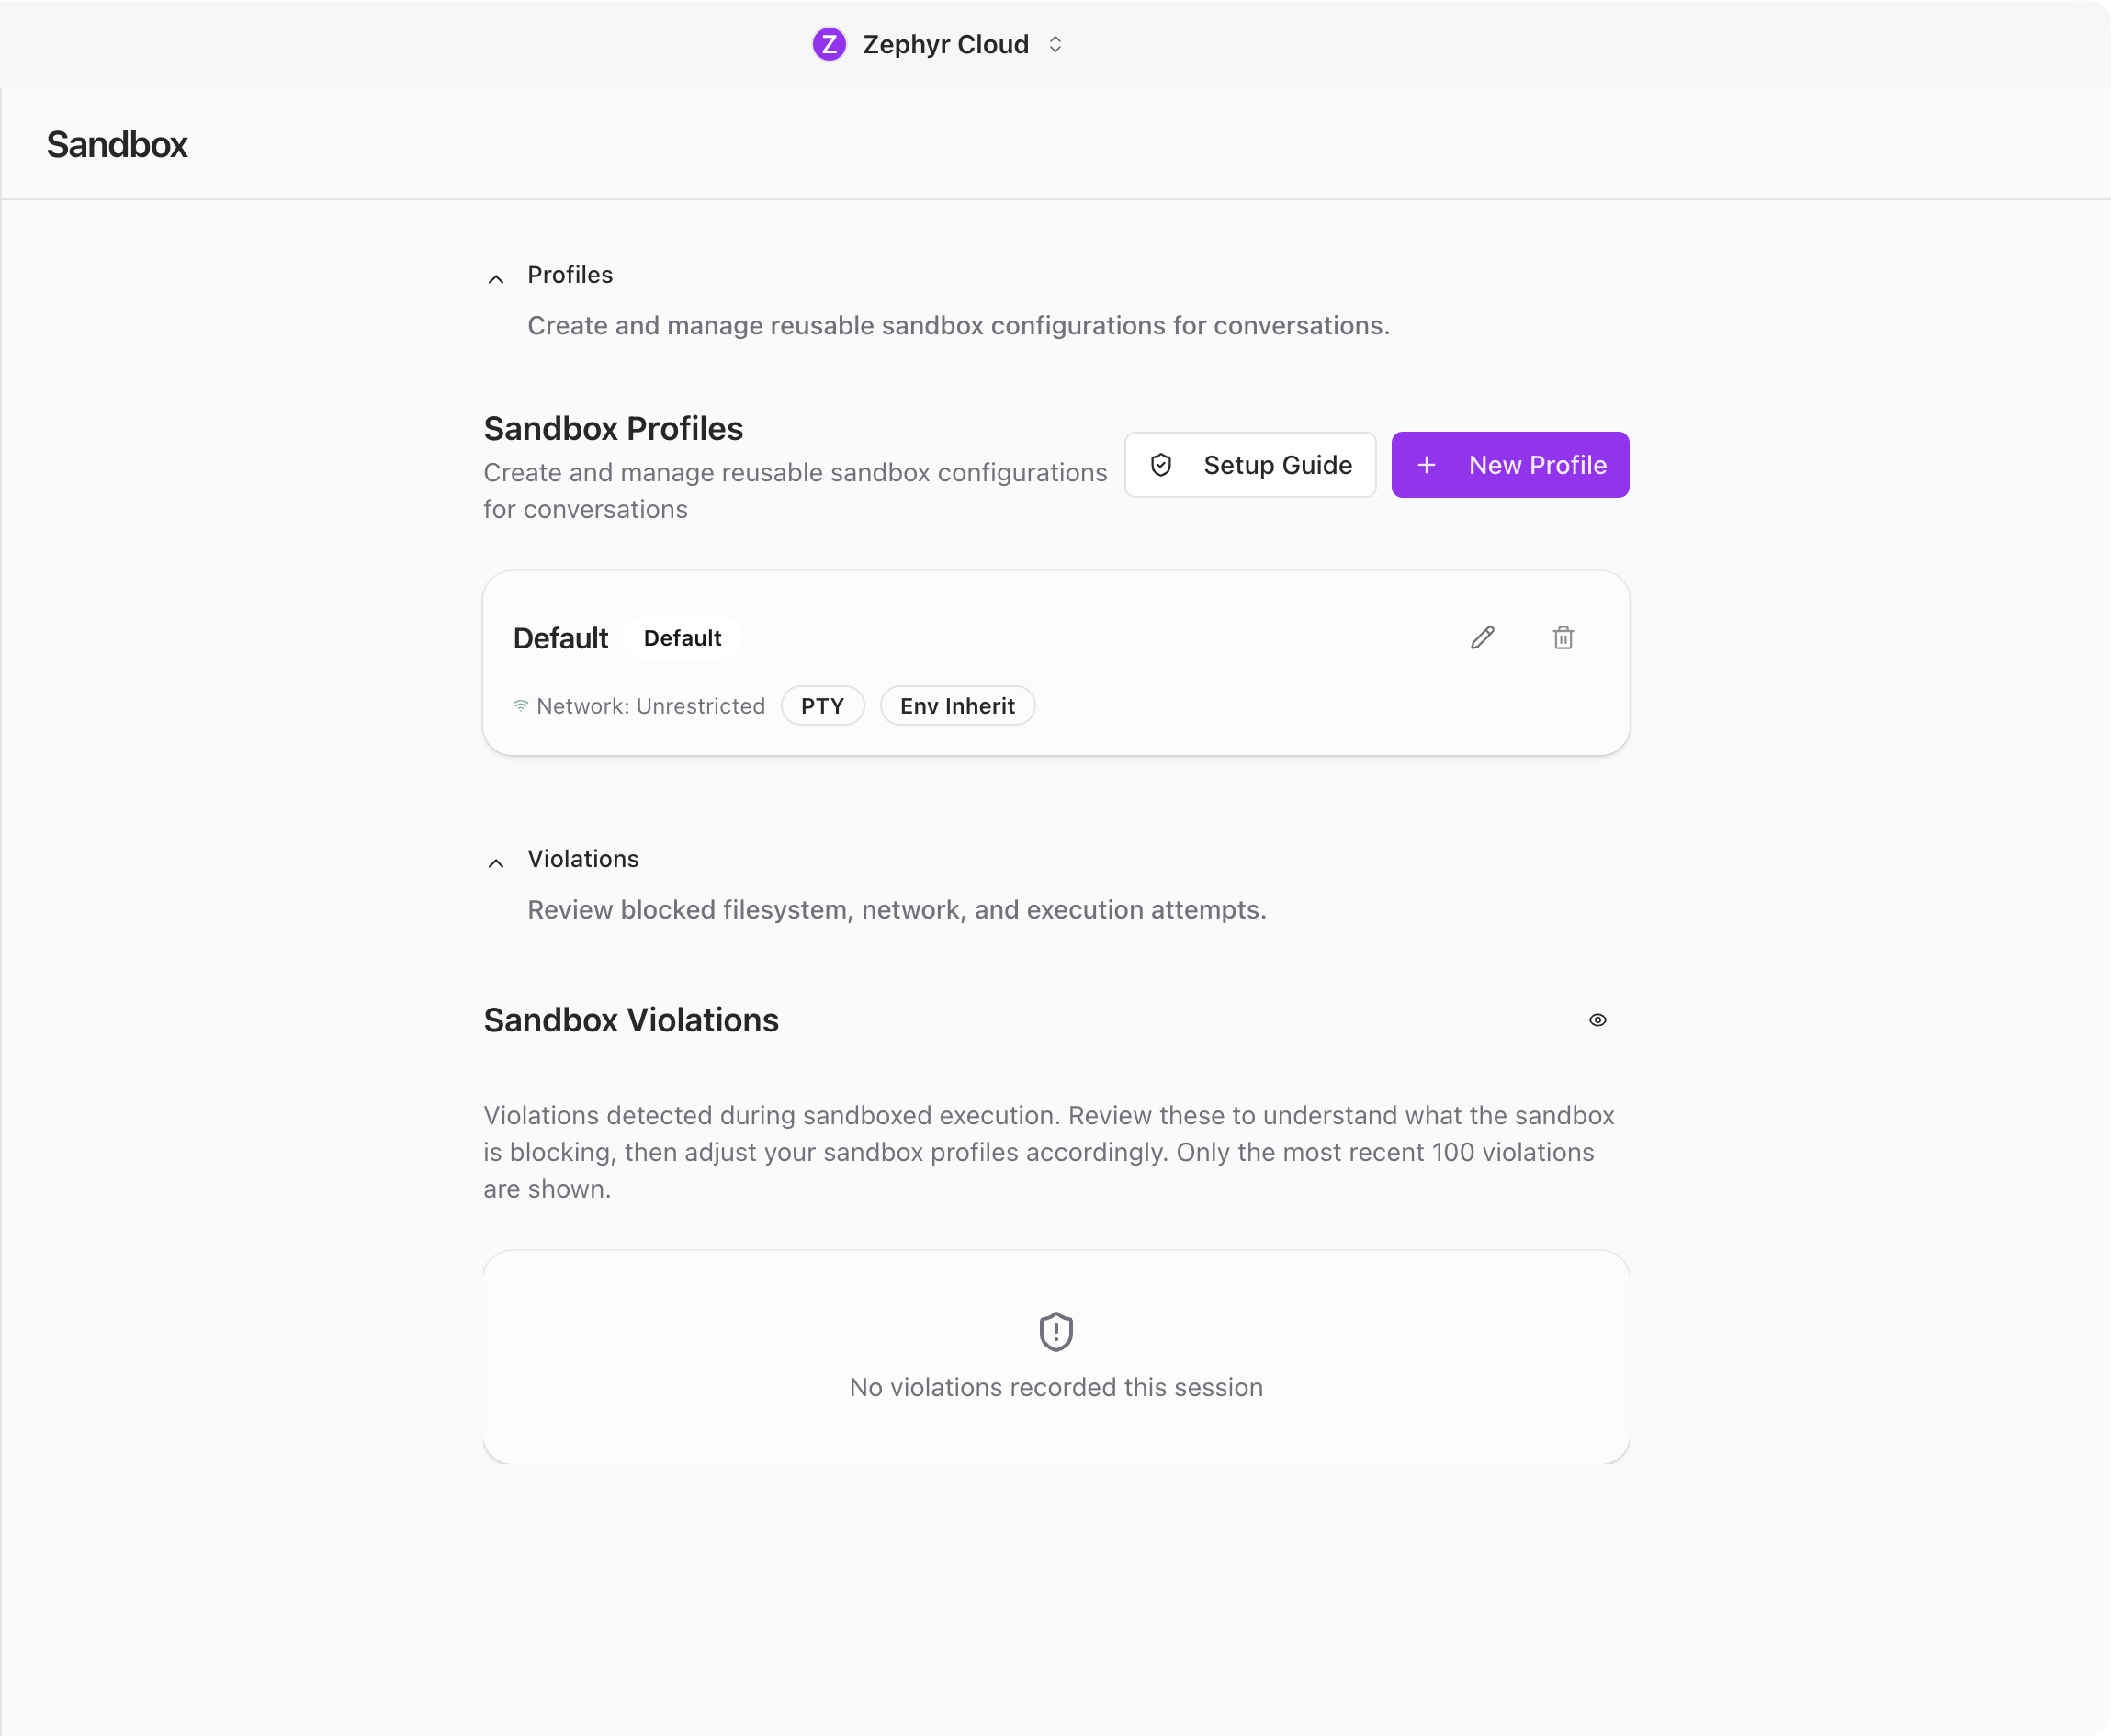
## Sandbox Profiles
The main section of the page shows a list of sandbox profiles. Each profile is a reusable set of rules that you can assign to projects or conversations.
Profiles let you tailor security boundaries for different kinds of work. A web development project might need network access, while a data analysis project might only need local file reads. Each profile defines:
* **Network mode** controls whether specialists can access the internet and which endpoints are allowed.
* **File system access** sets which directories specialists can read from and write to.
* **Setup commands** are commands that run when a sandbox environment starts up.
* **PTY preferences** configure terminal behavior for the sandbox.
* **Git config** handles git-related configuration for the sandbox environment.
You can create, edit, and delete profiles from this page.
## Creating a Profile
Click the add button to open the profile form dialog. Give the profile a name and configure the rules you need.
Toggle network access on or off, specify allowed directories, and add any setup commands that should run when the environment starts. Click **Save** to add it to the list.
Once saved, the profile appears in your list and can be assigned to any project. See [Projects](/guide/projects/index.md) for details on assigning a sandbox profile.
## Editing and Deleting Profiles
Click on any profile in the list to open it for editing. Make your changes and click **Save** to update it.
To remove a profile, use the delete option. If the profile is currently assigned to a project, you will want to reassign a different profile first.
## Onboarding Wizard
The first time you open Sandbox settings, an onboarding dialog walks you through the setup. If you skipped it before, you may also be prompted again. The wizard has five steps:
1. **Mental model** explains what sandboxing does and why it matters.
2. **Scan** checks your system to detect existing configurations.
3. **SSH** configures SSH access rules for the sandbox.
4. **Custom paths** lets you define additional allowed paths beyond the defaults.
5. **Review** shows a summary of your configuration before saving.
This wizard helps you get a reasonable default configuration without needing to understand every option upfront. You can always adjust profiles manually afterward.
## Violation Logs
Below the profiles section, a violations panel shows when specialists tried to access something outside their allowed permissions. Each violation entry includes:
* What was attempted, such as a file path or network endpoint.
* When it happened.
* Which conversation triggered it.
You can dismiss individual violations or click **Clear all** to remove everything at once.
Violation logs are useful for tuning your sandbox rules. If you see violations for legitimate actions, your rules might be too restrictive. If you see unexpected access attempts, your rules are doing their job.
## Related
* [Settings overview](/guide/settings/index.md) for a summary of all settings pages.
* [Projects](/guide/projects/index.md) for assigning sandbox profiles to your projects.
---
url: /guide/settings/mcp.md
---
# MCP Servers
MCP (Model Context Protocol) servers extend what [specialists](/guide/specialists/index.md) can do by providing additional tools, resources, and context. For example, an MCP server might give specialists access to your database schema, a specific API, or custom business logic.
You will find this page under **MCP Servers** in the [Settings](/guide/settings/index.md) sidebar.
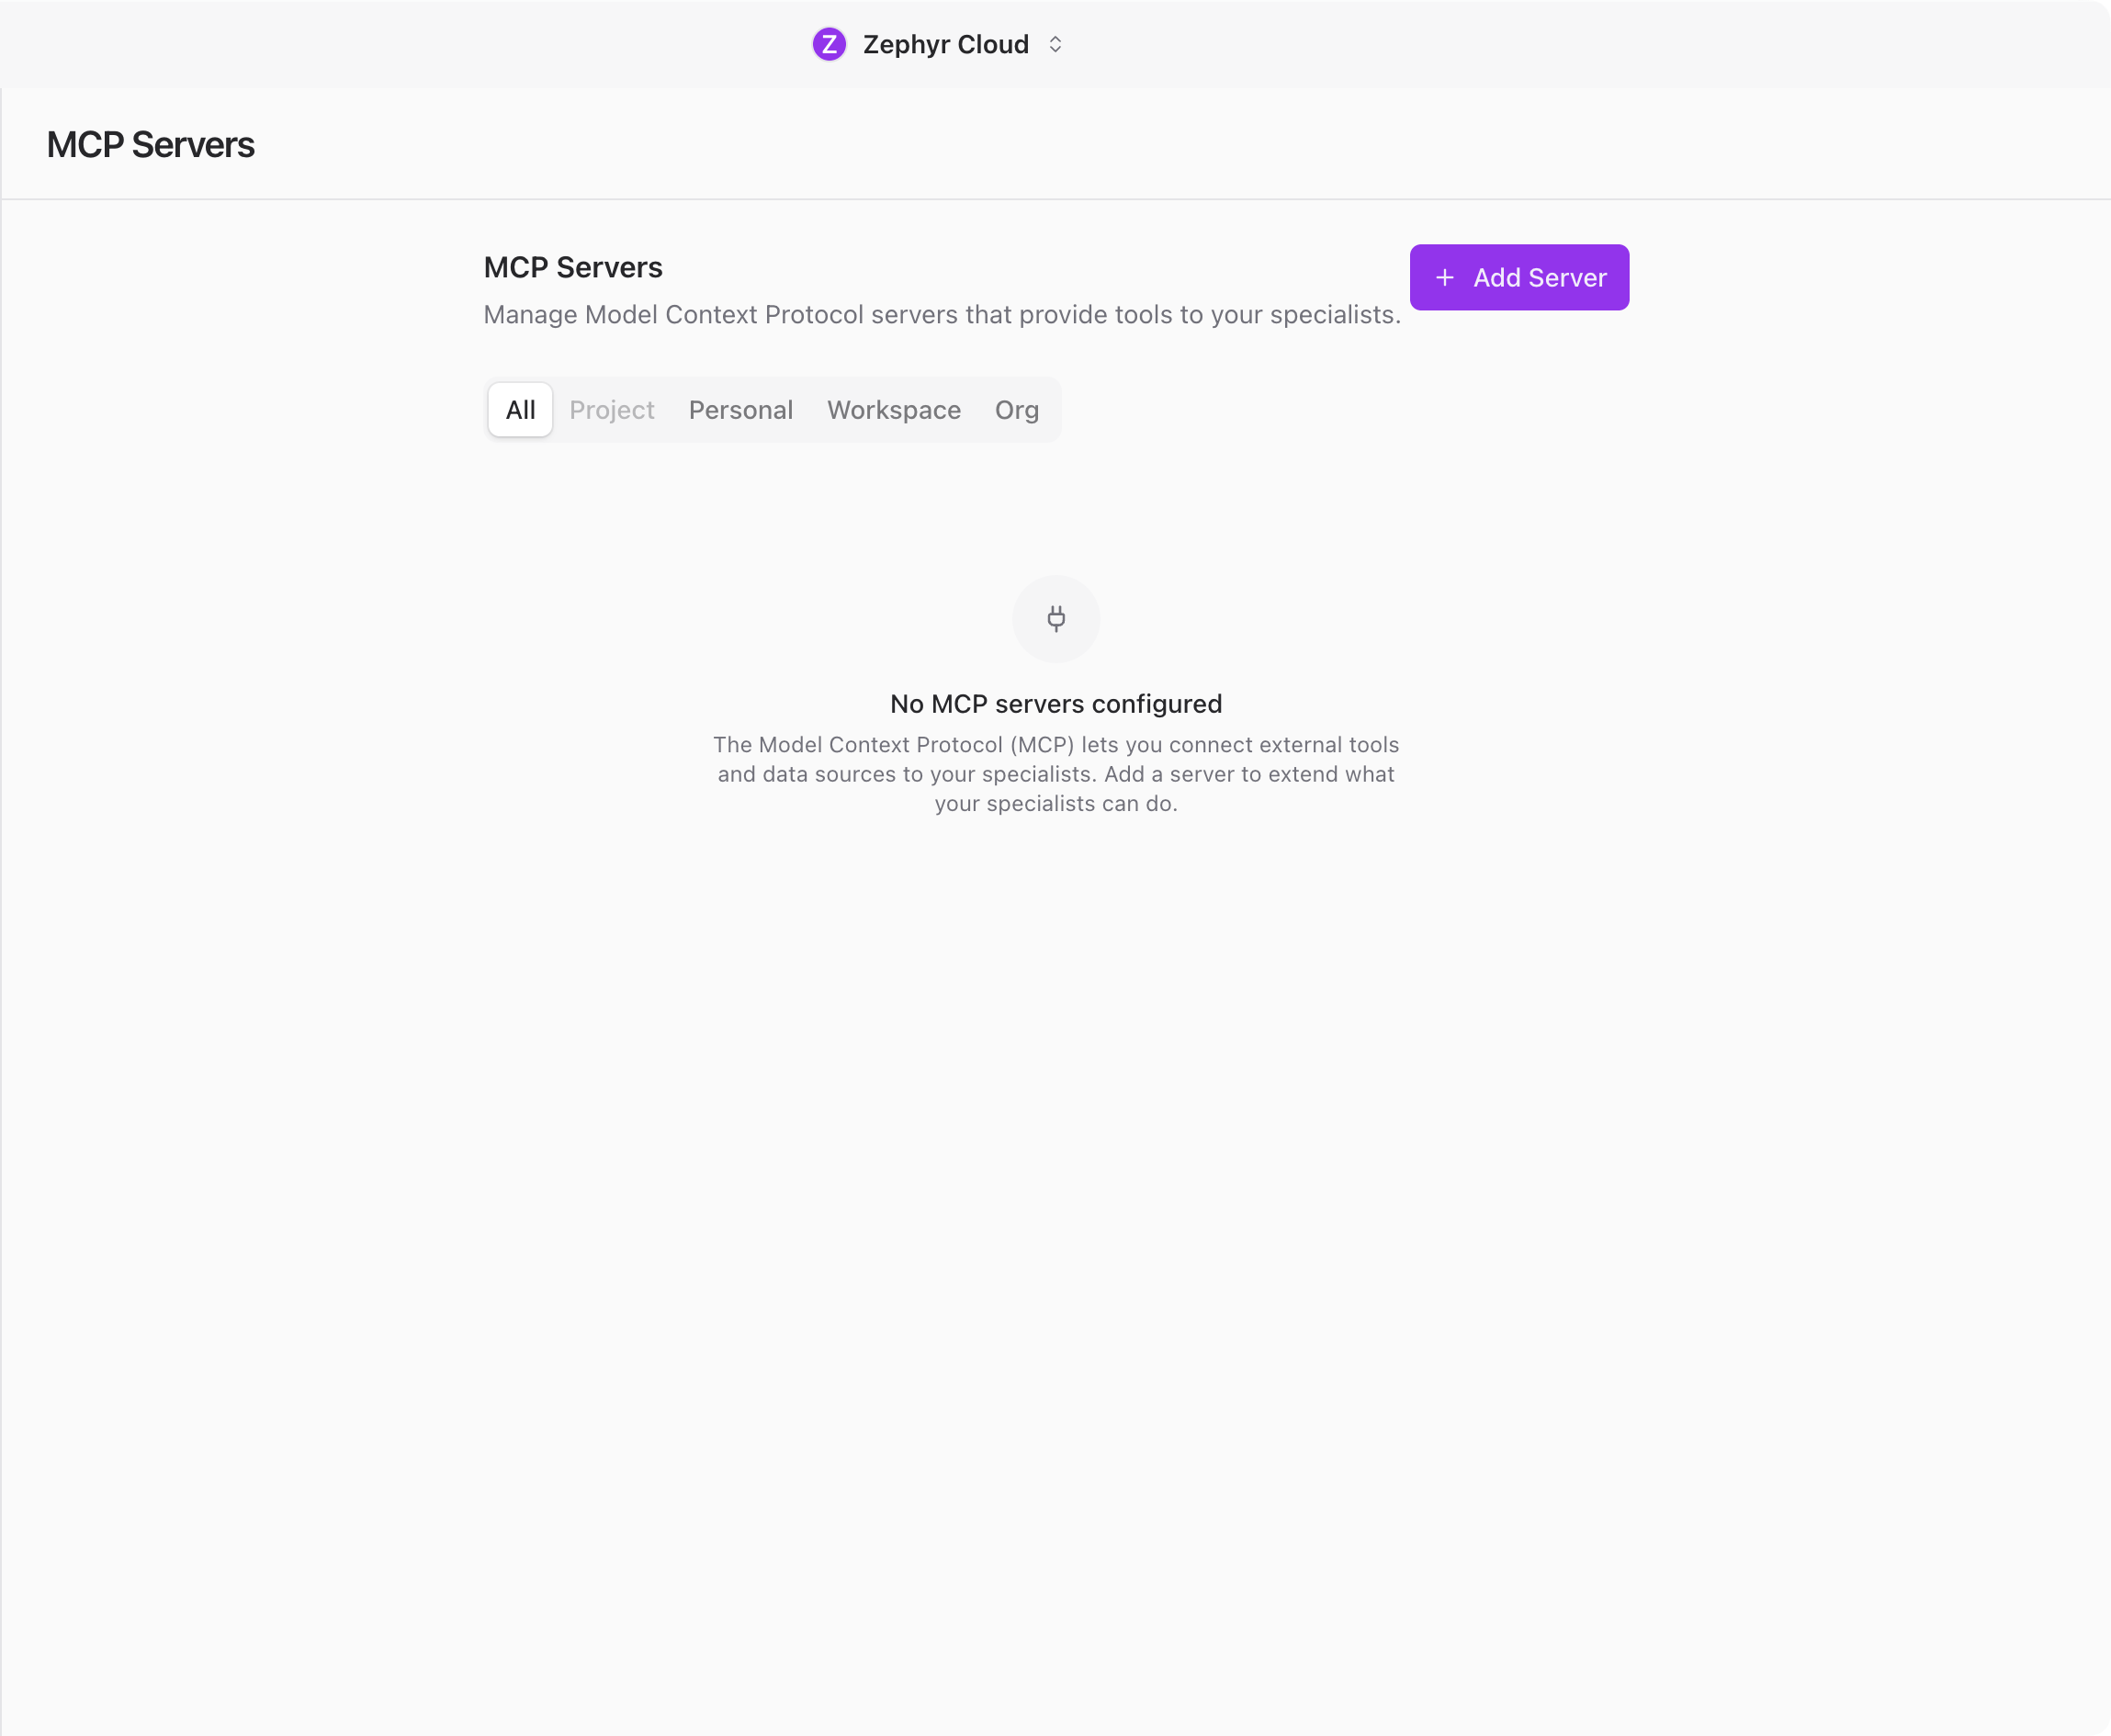
## Layout
The page shows a header with the title and an **Add Server** button. Below that, a row of scope filter tabs lets you narrow the list. The server list fills the rest of the page.
## Scope Filters
Tabs at the top filter the server list by scope:
* **All** shows every configured server.
* **Project** shows servers scoped to the current project. This tab is disabled when no project is open.
* **Personal** shows servers only available to you.
* **Workspace** shows servers available to everyone in the workspace.
* **Org** shows organization-wide servers.
## Scopes
Each MCP server belongs to a scope that controls who can use it:
* **Personal** servers are private to your account.
* **Workspace** servers are shared with everyone in the workspace.
* **Project** servers are tied to a specific project and only visible when that project is open.
* **Org** servers are available across the entire organization.
## Scope Overrides
When a project-scoped server has the same ID as a workspace-scoped server, the project entry takes priority. The UI shows labels to make this clear: "Overrides workspace entry" on the project server and "Overridden by project" on the workspace server.
This lets you customize server behavior per project without changing the workspace-wide configuration.
## Adding a Server
Click **Add Server** to open the configuration dialog. Fill in the server details and save. The new server appears in the list immediately.
## Editing a Server
Click any server in the list to open the edit dialog. Make your changes and save. The server list refreshes automatically to reflect the update.
## Related
* [Settings overview](/guide/settings/index.md) for a summary of all settings pages.
* [Specialists](/guide/specialists/index.md) to learn how specialists use MCP server tools.
---
url: /guide/settings/development.md
---
# Development
Tools for downloading and managing local AI models via Hugging Face. Find this under **Development** in the [Settings](/guide/settings/index.md) sidebar.
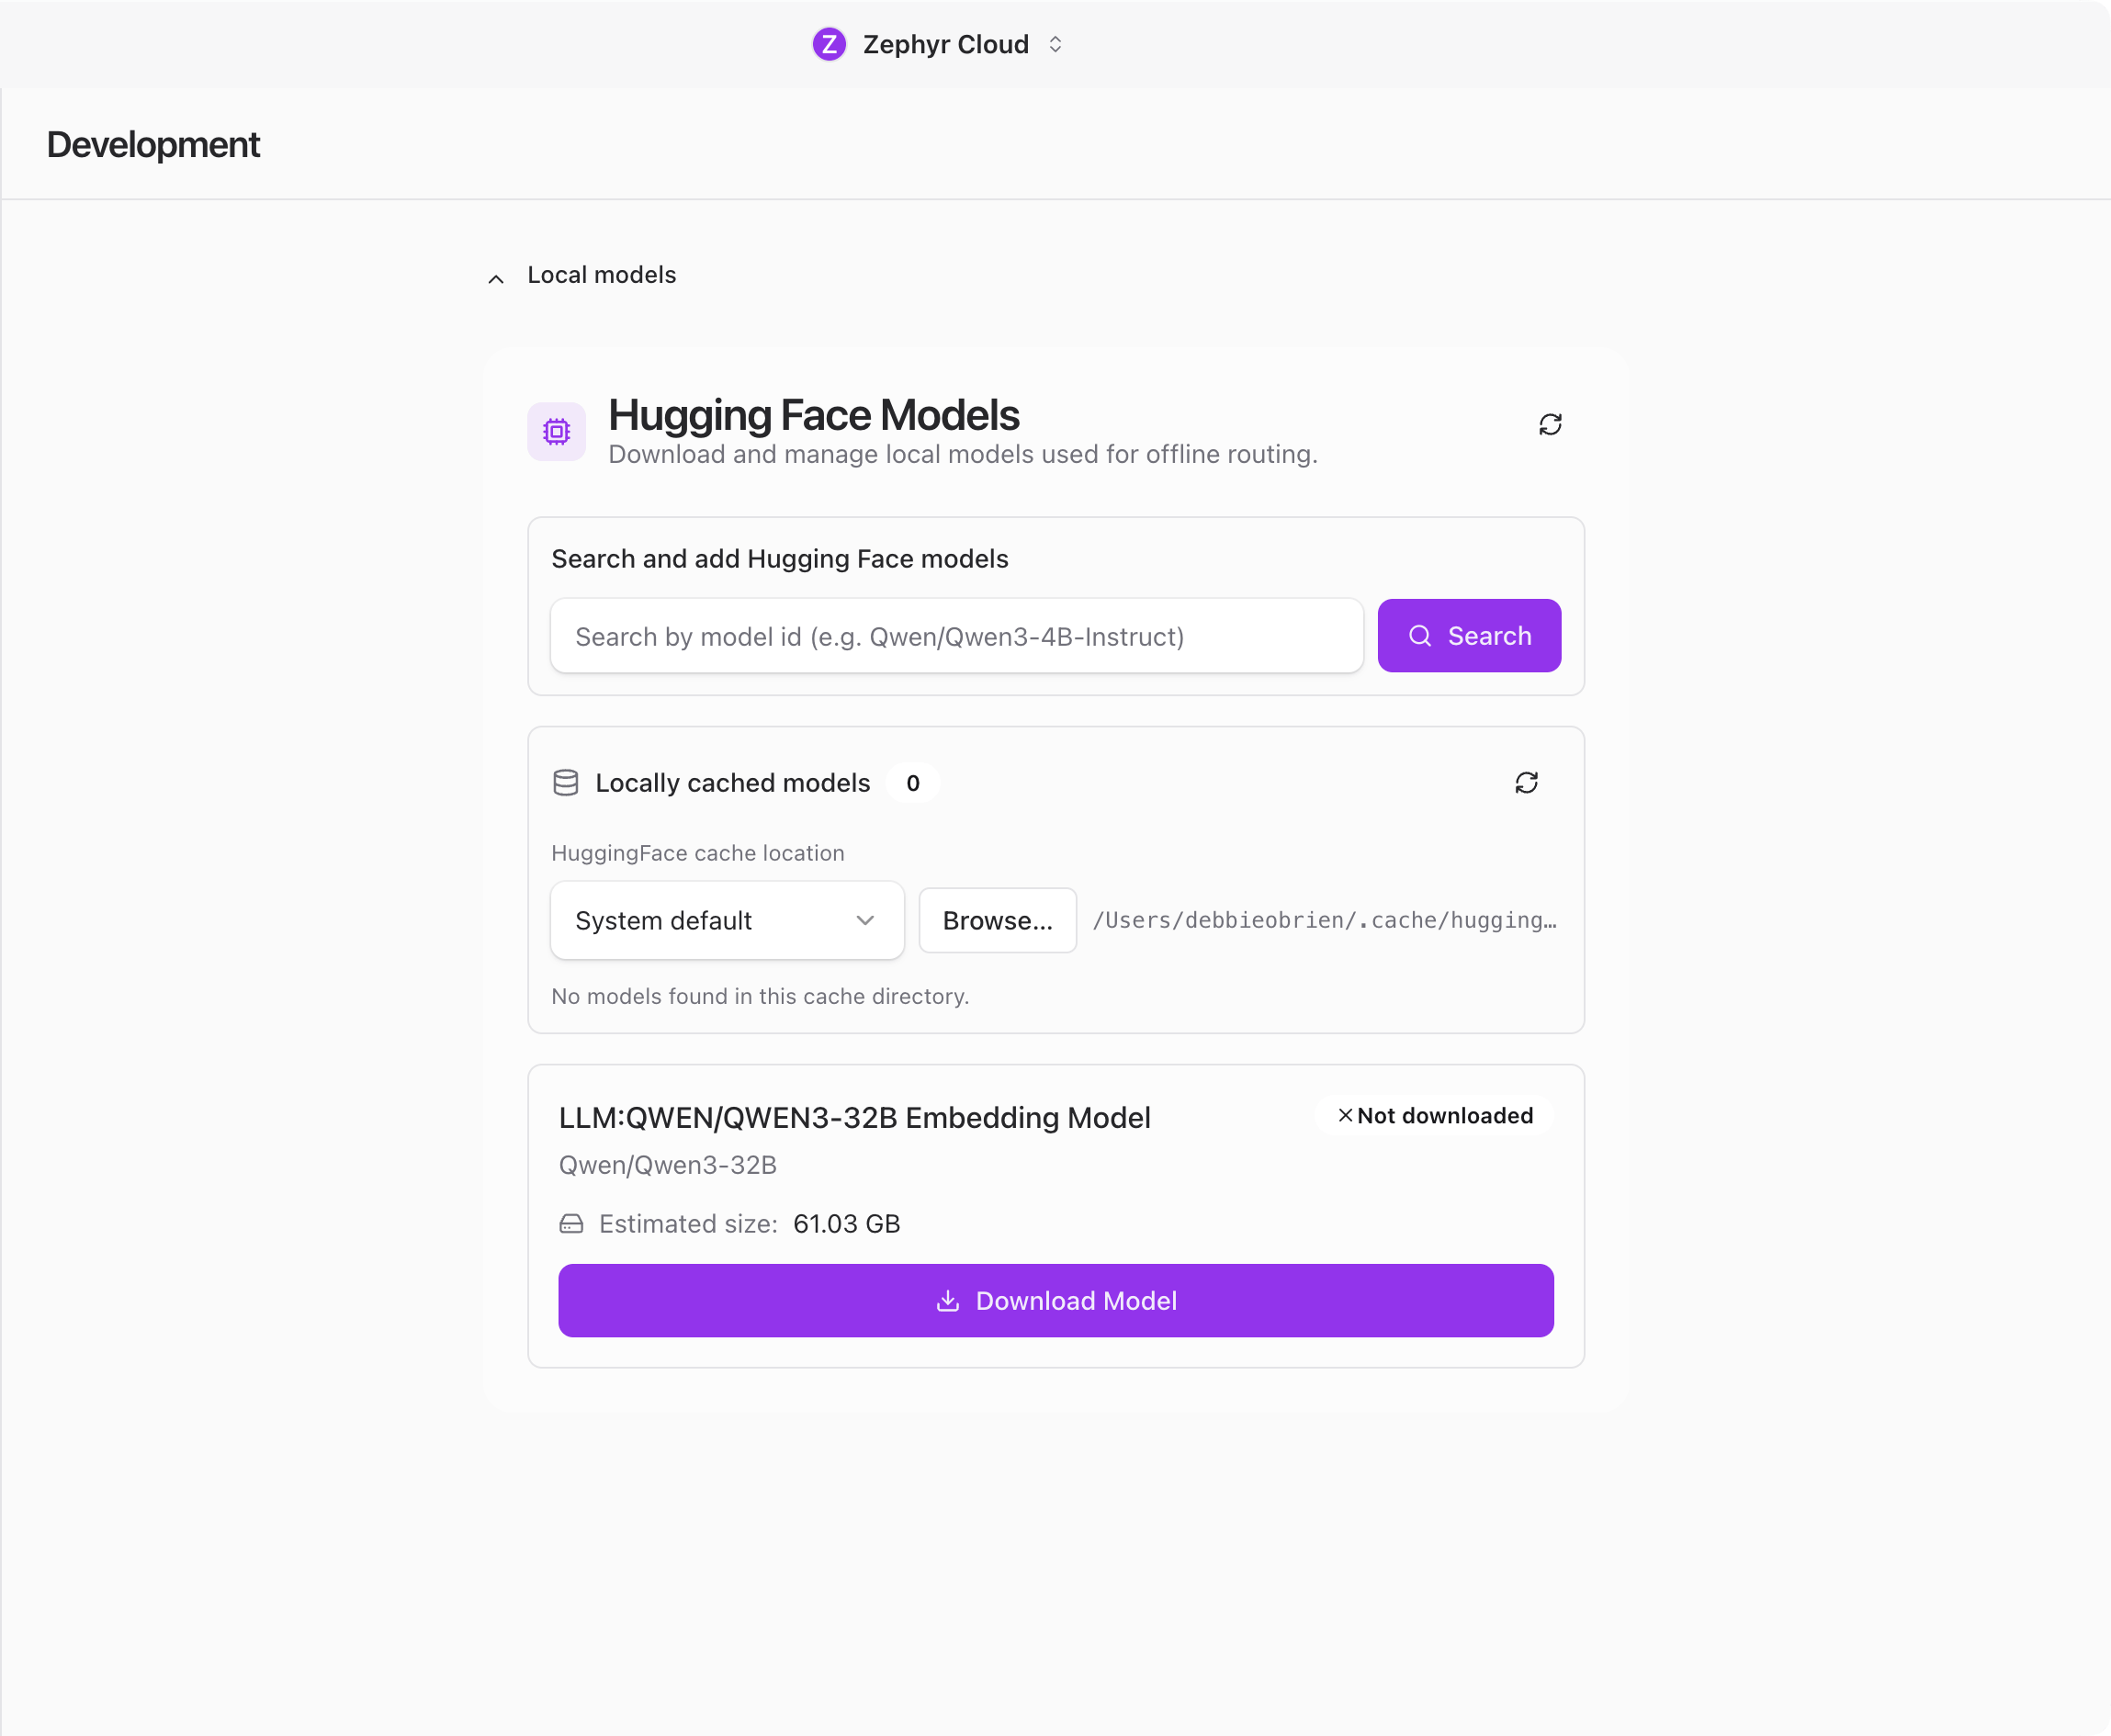
## Local Models
The main section is **Local models**, shown as a collapsible panel that is open by default. This is where you manage Hugging Face models that run directly on your machine.
### Search
Type a model name to search Hugging Face. Results show available models with their descriptions and sizes so you can pick the right one before downloading.
### Download
Click a model from the search results to start downloading it. A progress bar shows download status. Larger models can take a while depending on your connection speed.
### Cached Models
Below the search area, a browser shows models already downloaded to your machine. Each entry displays the model name, file size, and status. You can check for updates or remove cached models you no longer need.
### Why Local Models
Running models locally means you do not need an API key or internet connection during use. This is useful for offline work, sensitive data that should not leave your machine, or experimenting with models before committing to a provider.
For cloud-based model providers, see [Connections](/guide/settings/connections.md).
## Testing
A **Testing** section appears only when the app is running in development mode. Regular users will never see it. It contains debug utilities for developers building the app, including organization CRUD operations, sync testing, member listing, and local state clearing.
## Related
* [Settings overview](/guide/settings/index.md) for a summary of all settings pages.
* [Connections](/guide/settings/connections.md) for cloud-based model providers.
---
url: /guide/settings/browser-extensions.md
---
# Browser Extensions
The Browser Extensions settings page lets you install Chrome extensions into the desktop app's [embedded browser](/guide/chat/embedded-browser.md). This is useful when a specialist needs to drive a real Chrome experience that depends on a specific extension being active.
You will find this page under **Browser Extensions** in the [Settings](/guide/settings/index.md) sidebar. For how the embedded browser itself works, see [Embedded Browser](/guide/chat/embedded-browser.md).
## Desktop Only
Browser Extensions require the desktop app. The section is hidden on mobile and on the web version.
## Install an Extension
The page has an input field at the top labelled *"Enter a 32-character extension ID"*. Type or paste a Chrome Web Store extension ID and click **Install**.
The 32-character ID is the second-to-last segment of any extension's Chrome Web Store URL. For example, in `https://chromewebstore.google.com/detail/extension-name/abcdefghijklmnopqrstuvwxyz123456`, the ID is `abcdefghijklmnopqrstuvwxyz123456`.
After installation, the extension appears in the list below the input.
:::warning
Changes do not take effect until the app is restarted. Quit and reopen the app after installing or removing extensions.
:::
## Manage Installed Extensions
Each installed extension appears as a card with:
* The extension's icon and name.
* A short description.
* A **toggle switch** to enable or disable the extension without uninstalling it.
* A **remove button** to uninstall the extension entirely.
Disable an extension when you want to keep it installed but turn it off temporarily. Remove it if you do not plan to use it again.
## Related
* [Settings overview](/guide/settings/index.md) for a summary of all settings pages.
* [Sandbox](/guide/settings/sandbox.md) for controlling specialist filesystem and network access.
---
url: /guide/search.md
---
# Search
Press `Cmd+K` (macOS) or `Ctrl+K` (Windows/Linux) to open the command palette and jump to any conversation or person in your workspace.
## Open Search
Press `Cmd+K` on macOS or `Ctrl+K` on Windows/Linux to open the search dialog. Press the same shortcut again or `Escape` to close it.

## What You Can Search
Results are grouped into three categories.
**Channels** shows all non-archived channels in your workspace. Each result displays the channel name with a hash (#) icon.
**Direct Messages** shows all non-archived DMs. Each result displays the conversation title with a message icon. You can also find a DM by typing a participant's name or email.
**People** shows workspace members, excluding yourself. Each result displays the person's name and email with a people icon. Selecting a person opens an existing DM or creates a new one.
## Search for a Conversation
Type in the search field and results filter in real time using fuzzy matching. The placeholder text reads *"Search channels, DMs, and people..."*. If nothing matches, the dialog shows *"No results found."*
:::tip
Search is the fastest way to switch between conversations. Build the habit of pressing `Cmd+K` or `Ctrl+K` instead of scrolling through the sidebar.
:::
## Select a Result
Click a result or use the arrow keys to navigate and `Enter` to select. The dialog closes and navigates to the selected conversation.
If you select a person and no DM exists yet, a new DM is created automatically.
## Limitations
Search covers conversation names and workspace members only. It does not search message content, files, or task titles. To find a specific message, scroll through the relevant channel instead.
## Next Steps
* [Chat Overview](/guide/chat/index.md) for navigating conversations
* [Your First Channel](/guide/getting-started/your-first-channel.md) if you are just getting started
---
url: /guide/troubleshooting.md
---
# Troubleshooting
Common issues and how to resolve them.
## No provider configured
### Symptom
A specialist responds with *No provider configured* or a similar error when you send a message.
### Cause
No LLM provider API key has been set up in the app. Without at least one configured provider, specialists cannot generate responses.
### Solution
1. Open **Settings** and go to **Connections**
2. Configure at least one provider by entering a valid API key
3. Return to your channel and try sending the message again
See [Connections](/guide/settings/connections.md) for setup instructions.
## Provider returns an error
### Symptom
The specialist message card displays an error referencing the provider, such as an authentication failure or rate limit message.
### Cause
The API key may be invalid, the credentials may have expired, or the provider is rate limiting your requests. This can also happen if your account with the provider has run out of credits.
### Solution
1. Open **Settings** and go to **Connections**
2. Verify your API key is correct and has not been revoked
3. Check that your provider account has available credits or quota
4. If the issue persists, try switching to a different model
## Model not available
### Symptom
An error message states the model is not available or that no endpoints were found for it.
### Cause
The selected model is not supported by any of your currently connected providers. Each provider offers a specific set of models.
### Solution
1. Check which providers support the model you want to use
2. If you already have a matching provider connected, verify the API key is valid
3. Switch to a different model that your current providers support, or connect an additional provider
## Amazon Bedrock model access
### Symptom
An error mentions that model use case details have not been submitted, or that access to the model is not granted.
### Cause
AWS Bedrock requires you to submit a model use case form before certain models become available. Until the form is approved, those models cannot be used.
### Solution
1. Open the AWS Bedrock console in your browser
2. Navigate to the model you want to use and submit the required use case form
3. Wait approximately 15 minutes for the request to be processed
4. Return to the app and retry your message
## Specialist says "No specialists are connected"
### Symptom
You send a message in a channel and receive a response saying *No specialists are connected* or the message is not picked up by any specialist.
### Cause
The channel does not have any specialists added to it. Messages in a channel are only handled by specialists that are members of that channel.
### Solution
1. Mention a specialist directly using `@` followed by their name
2. Alternatively, open the right panel and go to the **Members** tab to add a specialist to the channel
See [Using Specialists](/guide/specialists/using-specialists.md) for more details.
## Session expired
### Symptom
The app stops responding to actions or displays authentication errors.
### Cause
Your login session token has expired. The app refreshes tokens automatically in the background, but this can occasionally fail due to network issues or extended inactivity.
### Solution
1. Log out of the app
2. Log back in
The session will be re-established with a fresh token.
## App not updating
### Symptom
The update notification does not appear, or the download fails partway through.
### Cause
A network issue or firewall rule may be blocking the connection to the update server.
### Solution
1. Check that your internet connection is working
2. If you are behind a corporate firewall, confirm that outbound connections to the update server are allowed
3. Try again after a few minutes
See [Updating](/guide/updating.md) for more information on how updates work.
## Secure credential storage unavailable
### Symptom
An error appears about permission being denied when accessing secure storage, or credentials fail to save.
### Cause
The operating system keychain is disabled, locked, or the app does not have permission to access it. The app uses the OS keychain to store sensitive data like API keys.
### Solution
1. Verify that your OS keychain is unlocked (Keychain Access on macOS, Credential Manager on Windows)
2. Re-enable keychain access for the app if it was previously denied
3. Restart the app
## Search returns no results
### Symptom
Opening search with `Cmd+K` (or `Ctrl+K` on Windows and Linux) and typing a query shows *No results found*.
### Cause
Search covers channels, DMs, and workspace members. It does not search message content. If your query does not match a channel name, DM, or member name, no results will appear.
### Solution
1. Search for the exact name of a channel, DM, or workspace member
2. If you are looking for a specific conversation, browse the sidebar to locate it manually
---
url: /guide/updating.md
---
# Updating
The AI Platform checks for updates automatically. When a new version is available, a notification card appears in the sidebar so you can update without leaving your conversation.
## How Updates Work
The app polls for new releases in the background. When a newer version is found, an **Update available** card appears at the bottom of the sidebar. Nothing is downloaded until you choose to update.
### Installing an Update
1. When you see the **Update available** card in the sidebar, click **Get update**
2. A progress bar shows the download status
3. Once the download finishes, the card changes to **Restart to apply update**
4. Click **Apply update** to restart the app with the new version
Your conversations, settings, and workspace data are preserved across updates.
### Dismissing a Notification
If you are not ready to update, click the **X** button on the card to dismiss it. The card will reappear the next time you open the app or when a newer version is released.
## Required Updates
Occasionally, an update is required to continue using the app. When this happens, the card says **Update required** and cannot be dismissed. Click **Get update** to download and install it. If the in-app updater is not available on your platform, the card will direct you to download the update from your app store or installer.
## Update Channels
You can choose which release channel the app follows. This setting is in **Settings → Personal → Update Channel**.
| Channel | Description |
| ---------- | --------------------------------------------------------------- |
| **Stable** | Default. Production-ready releases that have been fully tested. |
| **Beta** | Early access to upcoming features. May contain minor issues. |
Select a channel from the dropdown to switch. The app will check for the latest release on that channel and notify you if a newer version is available.
:::tip
Stick with **Stable** unless you specifically want to preview upcoming features or have been asked to test a beta release.
:::
## Update Errors
If a download fails, the card shows **Update failed** with an error message. Click **Try again** to retry the download. If the error persists:
1. Check that your internet connection is working
2. If you are behind a corporate firewall, confirm that outbound HTTPS connections are not being blocked
3. Restart the app and try again
## Checking Your Current Version
To see which version you are running, open **Settings**. The app version is displayed in the settings panel.
## Next Steps
* [Troubleshooting](/guide/troubleshooting.md) if you run into issues after updating
* [Settings](/guide/settings/index.md) for account and workspace configuration
---
url: /index.md
---
## Title and Status
The title is inline-editable. Click the pencil icon to change it. Below the title, two dropdowns let you set the task's current status (Backlog, To Do, In Progress, Blocked, Done) and priority (Low, Medium, High, Urgent).
## Description
The description field supports markdown formatting. Click to edit, then use the **Save** or **Cancel** buttons that appear. An empty description shows *"No description"*.
## Attachments
Drag and drop files onto the panel or click **Add Files**. Each file can be up to 10 MB. The attachment list shows a thumbnail or icon, filename, file size, uploader, and upload date. Image attachments get inline thumbnails and a full-screen preview.
## Metadata
The metadata section displays the owner name, created-by name and date, and a due date picker with a popover calendar.
## Assignees
A list of assigned users and specialists with avatars. Click **Add Assignee** to open a searchable picker where you can assign team members or [specialists](/guide/specialists/index.md).
## Project Link
Link a task to a [project](/guide/projects/index.md) to inherit its repository URLs, giving specialists code context. A project badge appears when linked, with an unlink button next to it. Click **Link to Project** to browse workspace projects.
## Acceptance Criteria
A checklist for defining when a task is complete. Each criterion has a checkbox, a description, and a delete button. Completed criteria get strikethrough text. Click **+** to add a new criterion.
## Channels
Link a task to [chat](/guide/chat/index.md) channels for additional context. Click **Link Channel** to open a searchable channel picker.
## Archive and Close
For new tasks, the footer shows **Cancel** and **Create** buttons. For existing tasks, it shows **Archive Task** (or **Restore Task** if the task is archived) and **Close**.
---
url: /guide/workflows/index.md
---
# Visual Workflow Editor
The workflow editor lets you build automation pipelines by connecting nodes on a visual canvas. Drag nodes from the palette, wire them together, configure each step, and run the whole thing without writing code.
This page covers how to open the editor and what each part of the screen is for. To learn how to build, save, and run a workflow end-to-end, see [Build & Run](/guide/workflows/build-and-run.md).
## Open the Editor
Click **Workflows** in the icon rail on the left side of the app. You land on a home page with a quick-start guide, your saved workflows in the sidebar, and a row of quick-action buttons.

From the home page you can:
* **Click *Visual Editor*** to open a fresh, blank canvas.
* **Click *Test Execution*** to run a sample workflow without building one yourself.
* **Click any saved workflow** in the sidebar to open it. Each card shows the workflow name and an execution-mode badge.
* **Click the `+`** in the sidebar header to create a new workflow.
## The Editor Layout
The editor fills the screen with a top toolbar and three vertical panels.

* **Top toolbar** for workflow-level actions (see [Toolbar](#toolbar) below).
* **Node palette** on the left. A searchable list of every node type, grouped by category.
* **Canvas** in the center. The work area where you place and connect nodes. It has a dot-grid background, zoom controls in the bottom-left, and a minimap in the bottom-right.
* **Configuration panel** on the right. Shows settings for the selected node. When nothing is selected it shows *"No node selected — click on a node to configure it"*.
## Toolbar
The top bar has these controls, left to right. Each one is covered in detail in [Build & Run](/guide/workflows/build-and-run.md).
* **← Back** returns to the Workflows home page.
* **Workflow name** is an inline-editable text field.
* **Execution mode** dropdown — Dataflow, State Machine, or Hybrid.
* **New** clears the canvas to start a fresh workflow.
* **Import** brings in workflows from JSON (Zephyr, n8n, or LangGraph format).
* **Export JSON** downloads the current workflow.
* **Save** persists the workflow.
* **▶ Execute** runs the workflow.
## Node Palette
The palette lists every available node, grouped into seven collapsible categories. Click a category header to expand or collapse it. The number in parentheses (e.g. *Triggers (4)*) is the count of nodes in that category.
| Category | Icon | Examples |
| ------------------- | :--: | -------------------------------------------------------------------------- |
| **Triggers** | ▶️ | Manual Trigger, Schedule Trigger, Webhook Trigger, Chat Trigger |
| **Actions** | ⚡ | HTTP Request, Code Execution, Conditional, Switch, Loop, Invoke Specialist |
| **Data Transform** | 🔄 | Transform, Aggregate, Sort, Filter, Limit, Group By, Time Series |
| **Database** | 🗄️ | PostgreSQL, MySQL, MongoDB |
| **File Operations** | 📁 | Read File, Write File, File Picker, Generate Assets |
| **Notifications** | 📧 | Email, Slack, Discord |
| **Utilities** | ⚙️ | No Operation, Error, Wait, Markdown Report |
Each category has its own color, which carries over to the node body on the canvas and the dot in the minimap, so you can see at a glance what kind of work each part of the flow does.
Use the **search box** at the top of the palette to filter nodes by name or description across every category.
## What to Explore Next
* [Build & Run](/guide/workflows/build-and-run.md). Add nodes, configure them, save, execute, and import/export.
* [Channels](/guide/chat/index.md). Trigger workflows from chat messages with the Chat Trigger node.
* [Specialists](/guide/specialists/index.md). Use the Invoke Specialist action node to delegate steps to an AI specialist.
* [Tasks](/guide/tasks/index.md). Have a workflow create or update tasks as it runs.
---
url: /guide/workflows/build-and-run.md
---
# Build & Run
Once you have [opened the editor](/guide/workflows/index.md), build your workflow by adding nodes, connecting them, configuring each step, and running it.
## Add Nodes
There are two ways to drop a node onto the canvas from the palette on the left:
* **Click** a node to place it in the center of the canvas.
* **Drag** a node onto the canvas to place it at a specific spot.
Once a node is on the canvas you can drag it around to reposition it. Use the search box at the top of the palette to filter the list before you pick.
## Connect Nodes
Each node has handles on its sides. Output handles sit on the right, input handles on the left. Trigger nodes only have output handles because they start the flow.
To connect two nodes, drag from an output handle on one node to an input handle on another. A curved line appears between them. This line represents the data path between the two steps.
Hover over a connection to highlight it and reveal a red delete button at the midpoint. Click the button or select the connection and press `Delete` to remove it.
## Configure a Node
Click any node on the canvas to open its settings in the configuration panel on the right. Every node has at least two fields:
* **Node Label.** A custom name for this step, shown on the node body.
* **Node ID.** A read-only identifier used in exports and logs.
Below those, each node type has its own configuration fields. An HTTP Request node asks for a URL and method. A Conditional node asks for a boolean expression. A Schedule Trigger asks for a cron expression and timezone. Required fields are marked with a red asterisk.
Some nodes have specialized pickers. **Invoke Specialist** includes a searchable specialist selector. **Chat Respond** includes a channel picker. **AI Content Analysis** includes a model picker for your connected providers.
To remove a node, scroll to the bottom of the configuration panel and click **Delete Node**. A confirmation dialog appears before the node is removed along with any connected edges.
## Choose an Execution Mode
The toolbar has a mode dropdown with three options:
* **Dataflow.** Pure data passing between nodes, similar to n8n. Each node receives input from the previous node and passes output to the next.
* **State Machine.** Shared state that nodes can read from and write to, similar to LangGraph. Good for workflows that need to track progress across steps.
* **Hybrid.** Combines both patterns in a single workflow.
Pick the mode that fits your use case. Dataflow is the simplest starting point for most workflows.
## Canvas Controls
The bottom-left corner of the canvas has standard controls:
* **Zoom in / Zoom out.**
* **Fit view** zooms to fit all nodes in the visible area.
* **Lock** freezes the canvas so you can scroll without accidentally dragging nodes.
The bottom-right corner shows a **minimap** with colored dots, one per node — colors match the [node category](/guide/workflows/index.md#node-palette). Drag the highlighted rectangle in the minimap to pan around large workflows.
## Save and Run
The toolbar provides these actions:
* **Save.** Persists the workflow. Disabled when there are no unsaved changes.
* **Execute** (green button). Runs the workflow. If there are unsaved changes, it saves automatically first. The button shows *"Running..."* while the workflow executes, and a status banner appears below the toolbar with the result.
* **Undo / Redo.** Step backward or forward through your edits. Keyboard shortcuts: `Cmd+Z` and `Cmd+Shift+Z` on macOS, `Ctrl+Z` and `Ctrl+Shift+Z` on Windows and Linux.
* **New.** Clears the canvas for a fresh start. Prompts to confirm if there are unsaved changes.
When the workflow runs, node states update in real time, and any errors surface directly on the failing node.
## Import and Export
### Export
Click **Export JSON** in the toolbar to download the workflow as a JSON file. The file uses Zephyr's native format and is named after your workflow.
### Import
Click **Import** in the toolbar to open a dialog with a large text area. Paste workflow JSON and choose one of three import formats:
* **Import as n8n** for workflows exported from n8n.
* **Import as LangGraph** for LangGraph workflow definitions.
* **Import as Zephyr** for Zephyr's native format.
The sidebar also has a collapsible **Import n8n Workflow** section for quick n8n imports without opening the full dialog.
## Attach to Channels and Specialists
Workflows can run automatically in response to chat activity. From a channel's right panel or a specialist's configuration, click **Add Workflow** to browse and attach a saved workflow.
When attaching to a channel, you pick a trigger type: Manual, Slash Command (users type a command like `/analyze`), Keyword Monitor (watches for specific words), Event Trigger, or Scheduled.
When attaching to a specialist, you pick an invocation mode: Manual, Automatic, or On Demand.
Each attachment has a priority (0 to 100) and an active/inactive toggle. Higher priority workflows execute first when multiple are attached.
:::tip
Start with a Manual Trigger node and the Dataflow execution mode. This is the simplest combination and lets you test your workflow by clicking Execute in the toolbar.
:::
---
url: /guide/workflows/run-history.md
---
# Workflow Run History
Workflow definitions and workflow runs are separate records.
The workflow definition CRDT stores the editable graph: metadata, nodes, edges, variables, and input schema. It answers "what should run?" and is saved only when the editor commits a workflow snapshot.
The `workflowRuns` CRDT stores execution telemetry: queued, running, terminal status, runner lease, per-node records, structured logs, and artifact references. It answers "what happened in this run?" and changes during execution.
Small local payloads can remain inline in `workflowRuns` for fast inspection. Large payloads and cloud-runner payloads are written to R2 using deterministic keys:
```text
workflow-runs/{workspaceId}/{workflowId}/{runId}/...
```
The CRDT keeps only the artifact reference, byte length, hash, content type, and preview, so run sync does not carry unbounded input/output data.
On desktop, the same run records are also mirrored into the app's local SQLite store through the CRDT persistence layer. That local mirror powers offline inspection and fast reopen behavior; it is a cache of the `workflowRuns` CRDT, not a separate source of truth.
Runner ownership follows a queue and claim flow:
1. A run is first recorded as `queued`.
2. A runner claims it by writing `running` with runner kind, runner id, version, attempt, and lease expiration.
3. Heartbeats renew the lease while work is in progress.
4. The final record becomes `succeeded`, `failed`, or `cancelled`.
Cloud APIs authorize run and artifact access through workspace membership and Cerbos workflow actions. The Durable Object socket receives authenticated user/workspace context from the API layer; clients cannot gain access by supplying only `userId` or `peerId` query strings.
---
url: /guide/settings/index.md
---
# Settings
Settings let you customize your account, manage your workspace, and configure the tools your specialists use. Open settings by clicking your workspace name at the bottom of the sidebar, then selecting **Settings**.
Settings open as a full-page view with a sidebar listing every section. The sidebar groups sections into three categories: Account, Workspace, and Configure.

## Account
Account settings apply to you personally and follow you across workspaces.
### Personal
Your profile card, display name, avatar, notification preferences, and account actions like logging out.
### Preferences
Appearance settings (theme and UI scale), language and translation options, notification toggles, and the release channel picker.
Both are covered on the [Personal and Preferences](/guide/settings/personal.md) page.
## Workspace
Workspace settings affect everyone in the workspace. Most sections here are admin-only.
### Details
The workspace icon and name. Only admins can edit these fields. See [Workspace](/guide/settings/workspace.md).
### Preferences
Workspace-level preferences including Code Knowledge Graph configuration. Admin only. See [Workspace](/guide/settings/workspace.md).
### Members
Invite members by email, manage roles (Admin, Member, Guest), set up domain-verified email join, and copy invite links. Admin only. See [Workspace](/guide/settings/workspace.md).
### Billing
Plan selection, credit balance, per-model usage breakdown, transaction history, and top-up options. Admin only. See [Billing](/guide/settings/billing.md).
## Configure
Configure sections control the tools and integrations that power your workspace.
### Connections
Set up LLM providers, pick default models, and connect external services like GitHub, Slack, Notion, Figma, and Linear. See [Connections](/guide/settings/connections.md).
### Language Servers
Install and manage Language Server Protocol providers for code intelligence. Desktop only. See [Language Servers](/guide/settings/language-servers.md).
### Permissions
Review active sessions, channel permissions, and specialist permissions. Revoke access when needed. See [Permissions](/guide/settings/permissions.md).
### Sandbox
Create sandbox profiles that control specialist filesystem and network access. Includes an onboarding wizard and violation logs. See [Sandbox](/guide/settings/sandbox.md).
### MCP Servers
Add, edit, and remove Model Context Protocol servers that give specialists additional tools and context. Filter by scope: All, Project, Personal, Workspace, or Org. See [MCP Servers](/guide/settings/mcp.md).
### Development
Download and manage local Hugging Face models. A testing section is visible in development mode only. See [Development](/guide/settings/development.md).
### Browser Extensions
Install and manage Chrome extensions inside the desktop app's embedded browser. Useful when a specialist needs to drive a real Chrome experience that depends on extension behavior. Desktop only. See [Browser Extensions](/guide/settings/browser-extensions.md).
## Admin-Only Sections
Workspace Preferences, Members, and Billing only appear in the sidebar if you are a workspace owner or admin. If you do not see these sections, ask an admin to check your role.
## Desktop-Only Features
Language Servers requires the desktop app with LSP support enabled. It appears grayed out with a tooltip on other platforms.
---
url: /guide/settings/personal.md
---
# Personal and Preferences
The Account group in [Settings](/guide/settings/index.md) has two sections: **Personal** and **Preferences**. These settings apply to your account and follow you across workspaces.

## Profile
At the top of the Personal section, a profile card shows your avatar, display name, and email address. Your profile details sync automatically from your login provider.
Click the avatar to upload a custom image or change it. If you do not upload one, the app uses your login provider picture or shows your initials.
## Display Name
Below the profile card, a text field lets you set a custom display name. This is how you appear to others in the workspace and how you can be @-mentioned in conversations.
The name can be up to 64 characters. Leave it blank to use your account name from the login provider. Click **Save changes** to apply.
## In-App Notifications
A toggle controls whether new message notifications play a sound. Turn it off if you prefer silent notifications.
## Account Actions
Two actions are available at the bottom of the Personal section:
* **Log out** signs you out of your account. If you have multiple accounts, you return to the next available one.
* **Delete account** permanently removes your account and all associated data. This feature is not available yet.
## Appearance
The Preferences section starts with appearance settings.
**Theme** lets you pick between three options: Light, Dark, and System. Each option is shown as a visual card with an icon. System follows your operating system setting.
**UI scale** adjusts the base font size with a slider. Drag it to make everything larger or smaller. Click **Restore default** to reset to the standard size.
## Language
Set your preferred language from a dropdown with 15 supported languages. A separate dropdown sets your region for date and number formatting.
**Auto-translate messages** toggles automatic translation of incoming messages into your preferred language. When enabled, you can also turn on **Show both original and translation** to see messages in both languages side by side.
**Translation model** lets you pick which AI model handles translations. Options include Claude Sonnet 4.5 (recommended), GPT-5.4, GPT-5 Mini, and Gemini 2.5 Flash.
## Notifications
Three toggles control how you receive notifications:
* **OS notifications** sends native desktop or mobile notifications for new messages.
* **Email notifications** sends email alerts for messages you missed.
* **Message sounds** plays audio for new messages. When enabled, four test buttons appear: **Test notification**, **Test error**, **Test success**, and **Test all**. Use these to preview each sound.
## Release Channel
A dropdown lets you pick your update channel: Stable, Beta, Development, or Nightly. Stable is the default and recommended for most users. Beta and Development channels receive features earlier but may be less stable.
This setting is only visible in the desktop app when the updater is available. You will not see it on mobile or in the web version.
---
url: /guide/settings/workspace.md
---
# Workspace
Workspace settings control your workspace identity and workspace-level preferences. These sections are only visible to workspace owners and admins. If you do not see them in the [Settings](/guide/settings/index.md) sidebar, ask an admin to check your role.

## Details
The Details page lets admins set the workspace icon and name.
### Workspace Icon
Click the workspace icon to open the icon picker. You can upload a custom image or choose a background color. The icon appears in the sidebar and workspace switcher so your team can tell workspaces apart at a glance.
### Workspace Name
Type a new name in the text field. The name is required and must be 64 characters or fewer. Click **Save** in the footer to apply the change.
Non-admins see these fields as read-only. The icon and name are visible but cannot be changed.
## Members
The Members section lets admins manage who has access to the workspace.
### Inviting Members
Type an email address into the invite field and click **Send invite**. The recipient gets an email with a link to join the workspace. You can also click **Copy invite link** to share a direct join URL.
### Roles
Each member has one of three roles:
* **Admin** can manage settings, members, billing, and all workspace configuration.
* **Member** can use all features but cannot change workspace settings.
* **Guest** has limited access to specific channels they have been invited to.
Change a member's role from the dropdown next to their name.
### Domain-Verified Email Join
Toggle **General access** to let anyone with a verified email from your organization's domain join the workspace automatically. This removes the need to send individual invites.
### Removing Members
Click the remove action next to a member's name to revoke their access. They lose access immediately.
## Workspace Preferences
Workspace Preferences contains settings for the Code Knowledge Graph (CKG). CKG indexes your codebase to give specialists deeper context when answering questions about your code.
### Enable CKG
Toggle the Code Knowledge Graph on or off for the entire workspace. When disabled, specialists still work but without the deeper codebase understanding that CKG provides.
### Performance Tuning
Controls how many resources CKG uses during indexing. Adjust this if indexing is slowing down your machine or if you want faster index builds on powerful hardware.
### Intent Synthesis
Configures how CKG infers developer intent from conversations. This helps specialists understand not just what you typed but what you are trying to accomplish.
### Historical Index
Manages the historical code index. This lets CKG reference past versions of your code, which is useful for understanding how a codebase evolved over time.
### Per-Project Priority
Set priority levels for different projects in CKG indexing. High-priority projects get indexed first and updated more frequently.
### Path Exclusions
Specify file and folder paths to exclude from CKG indexing. Use this for build artifacts, vendor directories, or any paths that add noise without value. Common exclusions include `node_modules`, `dist`, and `.git`.
## Related
* [Settings overview](/guide/settings/index.md) for a summary of all settings pages.
* [Billing](/guide/settings/billing.md) for plan and credit management.
---
url: /guide/settings/billing.md
---
# Billing
Workspace owners and admins manage plans, credits, and usage from this section. If it does not appear in your [Settings](/guide/settings/index.md) sidebar, ask an admin to check your role.
## Plan Selection
At the top of the page, you will see your current plan. Plans include Free, Pro, Team, and Enterprise tiers. Click to upgrade or change your plan. The checkout flow opens in-app or redirects to the billing portal depending on the plan.
## Credit Balance
Three stat cards give you a snapshot of your workspace credits:
* **Available** shows credits ready to spend.
* **Reserved** shows credits currently allocated to active operations.
* **Spent** shows total credits used so far.
## Usage Breakdown
Below the balance cards, a per-model token breakdown shows how much each model has been used. This helps you understand which models are consuming the most credits and plan accordingly.
## Transaction History
A list of credit transactions shows when credits were added, spent, or adjusted. Each entry includes a timestamp, amount, and description so you can trace any change.
## Top Up Credits
Click the **Top Up** button to open a popover where you can purchase additional credits. This is useful when your balance is running low and you need more credits before the next billing cycle.
## Invite Codes
Admins can create and manage invite codes for the workspace. Invite codes can give new members a credit bonus when they join, which is a good way to onboard teammates.
## Managing Your Subscription
A link to the billing portal opens your subscription management page. From there you can update payment methods, view invoices, or cancel your plan.
## Related
* [Settings overview](/guide/settings/index.md) for a summary of all settings pages.
* [Workspace](/guide/settings/workspace.md) for inviting and managing members.
---
url: /guide/settings/connections.md
---
# Connections
Before specialists can respond to messages, you need at least one LLM provider configured. The Connections page is where you set that up, along with default model preferences and external service integrations.
## Opening Connections
Click on your workspace name at the bottom of the sidebar to open the workspace menu, then select **Settings**. In the Settings panel, click **Connections** in the left column under Configure.
The page has two tabs: **Model Providers** and **Linked Accounts**.
## Model Providers
The **Model Providers** tab is split into three areas: default models, the model list, and provider configuration.

### Default Models
At the top of the tab, you can set a default model for specialists that do not have their own model defined. There are two levels:
* **Workspace default** applies to everyone in the workspace. Only workspace admins can change this.
* **Personal default** applies only to you and overrides the workspace default.
This means you can set a workspace-wide standard (like GPT-4) while individual team members choose something different for their own work.
### Available Models
Below the defaults, a searchable list shows every model available across your configured providers. This is a read-only view so you can see what is available before picking defaults or configuring specialists.
### Configure Providers
Scroll down to the **Configure Providers** section to add or manage your API keys. Each provider expands into a form where you paste your credentials.
The AI Platform supports these providers:
* **OpenRouter** accesses models from multiple providers through a single API key. This is the default fallback provider.
* **OpenAI** provides GPT models. Requires an OpenAI API key.
* **Anthropic** provides Claude models. Requires an Anthropic API key.
* **Generic OpenAI** supports any endpoint that follows the OpenAI API format. Useful for self-hosted models or smaller providers.
* **Amazon Bedrock** hosts AWS models. Requires an AWS access key, secret key, and region.
* **Cloudflare Workers AI** requires a Cloudflare account ID and API token.
* **Hugging Face** includes both API-hosted models and local models you can download and run on your machine.
* **NVIDIA NIM** provides NVIDIA inference endpoints. Requires an NVIDIA API key.
* **Zephyr Built-in** requires no API key. Powered by your Zephyr subscription. If your workspace has an active Zephyr plan, this provider is available immediately with no setup.
To add a provider, expand it under **Configure Providers**, fill in the required credentials, and save. The provider and its models appear in the model list immediately.
:::tip
If you are not sure which provider to use, start with **OpenRouter**. It gives you access to models from multiple providers through a single API key.
:::
## Linked Accounts
The **Linked Accounts** tab lets you connect external services to your workspace. These connections give specialists additional context from your existing tools.
Available integrations:
* **GitHub** provides repository access, pull requests, and code context. You can also configure a personal access token for enhanced features.
* **Slack** provides channel and message context.
* **Notion** provides page and database access.
* **Figma** provides design file context.
* **Linear** provides issue and project tracking.
Click a service to see its details and connect it. Workspace admins can enable or disable integrations for the entire workspace.
## Next Steps
With a provider connected, you are ready to start chatting. Head to [Your First Channel](/guide/getting-started/your-first-channel.md) to create a channel and talk to a specialist.
---
url: /guide/settings/language-servers.md
---
# Language Servers
Language servers provide code intelligence (autocompletion, go-to-definition, diagnostics) for specialists working with code. They power the experience inside the [Code Editor](/guide/chat/code-editor.md) panel and any file work specialists do behind the scenes. This settings page lets you install and manage Language Server Protocol (LSP) providers.
You will find this page under **Language Servers** in the [Settings](/guide/settings/index.md) sidebar.

## Desktop Only
Language Servers are only available in the desktop app with LSP support enabled. On mobile or in the web version, this section appears grayed out in the sidebar with a tooltip explaining the requirement.
## Provider List
The page shows a list of available LSP providers. Each entry displays:
* The provider name.
* Its current status: installed, not installed, or updating.
* Actions you can take.
## Installing a Provider
Click **Install** next to a provider to download and set it up. The install runs in the background, so you can keep using the app while it finishes. Once complete, the status updates to show the provider is ready.
## Refreshing Providers
Click **Refresh** to check if a provider has updates available. If an update is found, it downloads and applies automatically.
## How Language Servers Help
When a language server is installed, specialists and the code editor gain deeper understanding of your codebase. They can provide more accurate code suggestions, find references across files, and catch errors before you run your code.
Language servers are most useful when working inside [Projects](/guide/projects/index.md) where code intelligence can reference your full repository.
## Related
* [Settings overview](/guide/settings/index.md) for a summary of all settings pages.
* [Projects](/guide/projects/index.md) for working with code repositories.
---
url: /guide/settings/permissions.md
---
# Permissions
The Permissions page shows what access has been granted in your workspace. Use it to review and revoke permissions across sessions, channels, and specialists.
You will find this page under **Permissions** in the [Settings](/guide/settings/index.md) sidebar.

## Active Sessions
This section lists your currently active sessions. Each entry shows session details so you can see where you are logged in. If you spot a session you do not recognize, revoke it to sign out of that device.
## Channel Permissions
Shows channels that have specific permission overrides. Each entry displays the channel name and its current permission level.
If a channel has permissions that are too broad, click the revoke action to remove the override. The channel reverts to the workspace default permissions.
## Specialist Permissions
Lists permissions granted to individual specialists. Each entry shows the specialist name and what access it has.
You can revoke specialist permissions individually. This is useful when you want to tighten what a specialist can do without removing it from the workspace entirely.
## Revoking Access
All three sections follow the same pattern. Each item has a revoke action that removes access immediately. There is no undo, so double-check before revoking.
:::warning
Revoking a permission takes effect immediately and cannot be undone. Make sure you intend to remove access before clicking revoke.
:::
## Related
* [Settings overview](/guide/settings/index.md) for a summary of all settings pages.
* [Chat](/guide/chat/index.md) to learn about channels and conversations.
* [Specialists](/guide/specialists/index.md) to learn about specialist access and roles.
---
url: /guide/settings/sandbox.md
---
# Sandbox
Sandbox settings control how specialists interact with your filesystem and network. They provide a security layer that limits what specialists can access during conversations.
You will find sandbox settings under **Sandbox** in the [Settings](/guide/settings/index.md) sidebar.

## Sandbox Profiles
The main section of the page shows a list of sandbox profiles. Each profile is a reusable set of rules that you can assign to projects or conversations.
Profiles let you tailor security boundaries for different kinds of work. A web development project might need network access, while a data analysis project might only need local file reads. Each profile defines:
* **Network mode** controls whether specialists can access the internet and which endpoints are allowed.
* **File system access** sets which directories specialists can read from and write to.
* **Setup commands** are commands that run when a sandbox environment starts up.
* **PTY preferences** configure terminal behavior for the sandbox.
* **Git config** handles git-related configuration for the sandbox environment.
You can create, edit, and delete profiles from this page.
## Creating a Profile
Click the add button to open the profile form dialog. Give the profile a name and configure the rules you need.
Toggle network access on or off, specify allowed directories, and add any setup commands that should run when the environment starts. Click **Save** to add it to the list.
Once saved, the profile appears in your list and can be assigned to any project. See [Projects](/guide/projects/index.md) for details on assigning a sandbox profile.
## Editing and Deleting Profiles
Click on any profile in the list to open it for editing. Make your changes and click **Save** to update it.
To remove a profile, use the delete option. If the profile is currently assigned to a project, you will want to reassign a different profile first.
## Onboarding Wizard
The first time you open Sandbox settings, an onboarding dialog walks you through the setup. If you skipped it before, you may also be prompted again. The wizard has five steps:
1. **Mental model** explains what sandboxing does and why it matters.
2. **Scan** checks your system to detect existing configurations.
3. **SSH** configures SSH access rules for the sandbox.
4. **Custom paths** lets you define additional allowed paths beyond the defaults.
5. **Review** shows a summary of your configuration before saving.
This wizard helps you get a reasonable default configuration without needing to understand every option upfront. You can always adjust profiles manually afterward.
## Violation Logs
Below the profiles section, a violations panel shows when specialists tried to access something outside their allowed permissions. Each violation entry includes:
* What was attempted, such as a file path or network endpoint.
* When it happened.
* Which conversation triggered it.
You can dismiss individual violations or click **Clear all** to remove everything at once.
Violation logs are useful for tuning your sandbox rules. If you see violations for legitimate actions, your rules might be too restrictive. If you see unexpected access attempts, your rules are doing their job.
## Related
* [Settings overview](/guide/settings/index.md) for a summary of all settings pages.
* [Projects](/guide/projects/index.md) for assigning sandbox profiles to your projects.
---
url: /guide/settings/mcp.md
---
# MCP Servers
MCP (Model Context Protocol) servers extend what [specialists](/guide/specialists/index.md) can do by providing additional tools, resources, and context. For example, an MCP server might give specialists access to your database schema, a specific API, or custom business logic.
You will find this page under **MCP Servers** in the [Settings](/guide/settings/index.md) sidebar.

## Layout
The page shows a header with the title and an **Add Server** button. Below that, a row of scope filter tabs lets you narrow the list. The server list fills the rest of the page.
## Scope Filters
Tabs at the top filter the server list by scope:
* **All** shows every configured server.
* **Project** shows servers scoped to the current project. This tab is disabled when no project is open.
* **Personal** shows servers only available to you.
* **Workspace** shows servers available to everyone in the workspace.
* **Org** shows organization-wide servers.
## Scopes
Each MCP server belongs to a scope that controls who can use it:
* **Personal** servers are private to your account.
* **Workspace** servers are shared with everyone in the workspace.
* **Project** servers are tied to a specific project and only visible when that project is open.
* **Org** servers are available across the entire organization.
## Scope Overrides
When a project-scoped server has the same ID as a workspace-scoped server, the project entry takes priority. The UI shows labels to make this clear: "Overrides workspace entry" on the project server and "Overridden by project" on the workspace server.
This lets you customize server behavior per project without changing the workspace-wide configuration.
## Adding a Server
Click **Add Server** to open the configuration dialog. Fill in the server details and save. The new server appears in the list immediately.
## Editing a Server
Click any server in the list to open the edit dialog. Make your changes and save. The server list refreshes automatically to reflect the update.
## Related
* [Settings overview](/guide/settings/index.md) for a summary of all settings pages.
* [Specialists](/guide/specialists/index.md) to learn how specialists use MCP server tools.
---
url: /guide/settings/development.md
---
# Development
Tools for downloading and managing local AI models via Hugging Face. Find this under **Development** in the [Settings](/guide/settings/index.md) sidebar.

## Local Models
The main section is **Local models**, shown as a collapsible panel that is open by default. This is where you manage Hugging Face models that run directly on your machine.
### Search
Type a model name to search Hugging Face. Results show available models with their descriptions and sizes so you can pick the right one before downloading.
### Download
Click a model from the search results to start downloading it. A progress bar shows download status. Larger models can take a while depending on your connection speed.
### Cached Models
Below the search area, a browser shows models already downloaded to your machine. Each entry displays the model name, file size, and status. You can check for updates or remove cached models you no longer need.
### Why Local Models
Running models locally means you do not need an API key or internet connection during use. This is useful for offline work, sensitive data that should not leave your machine, or experimenting with models before committing to a provider.
For cloud-based model providers, see [Connections](/guide/settings/connections.md).
## Testing
A **Testing** section appears only when the app is running in development mode. Regular users will never see it. It contains debug utilities for developers building the app, including organization CRUD operations, sync testing, member listing, and local state clearing.
## Related
* [Settings overview](/guide/settings/index.md) for a summary of all settings pages.
* [Connections](/guide/settings/connections.md) for cloud-based model providers.
---
url: /guide/settings/browser-extensions.md
---
# Browser Extensions
The Browser Extensions settings page lets you install Chrome extensions into the desktop app's [embedded browser](/guide/chat/embedded-browser.md). This is useful when a specialist needs to drive a real Chrome experience that depends on a specific extension being active.
You will find this page under **Browser Extensions** in the [Settings](/guide/settings/index.md) sidebar. For how the embedded browser itself works, see [Embedded Browser](/guide/chat/embedded-browser.md).
## Desktop Only
Browser Extensions require the desktop app. The section is hidden on mobile and on the web version.
## Install an Extension
The page has an input field at the top labelled *"Enter a 32-character extension ID"*. Type or paste a Chrome Web Store extension ID and click **Install**.
The 32-character ID is the second-to-last segment of any extension's Chrome Web Store URL. For example, in `https://chromewebstore.google.com/detail/extension-name/abcdefghijklmnopqrstuvwxyz123456`, the ID is `abcdefghijklmnopqrstuvwxyz123456`.
After installation, the extension appears in the list below the input.
:::warning
Changes do not take effect until the app is restarted. Quit and reopen the app after installing or removing extensions.
:::
## Manage Installed Extensions
Each installed extension appears as a card with:
* The extension's icon and name.
* A short description.
* A **toggle switch** to enable or disable the extension without uninstalling it.
* A **remove button** to uninstall the extension entirely.
Disable an extension when you want to keep it installed but turn it off temporarily. Remove it if you do not plan to use it again.
## Related
* [Settings overview](/guide/settings/index.md) for a summary of all settings pages.
* [Sandbox](/guide/settings/sandbox.md) for controlling specialist filesystem and network access.
---
url: /guide/search.md
---
# Search
Press `Cmd+K` (macOS) or `Ctrl+K` (Windows/Linux) to open the command palette and jump to any conversation or person in your workspace.
## Open Search
Press `Cmd+K` on macOS or `Ctrl+K` on Windows/Linux to open the search dialog. Press the same shortcut again or `Escape` to close it.

## What You Can Search
Results are grouped into three categories.
**Channels** shows all non-archived channels in your workspace. Each result displays the channel name with a hash (#) icon.
**Direct Messages** shows all non-archived DMs. Each result displays the conversation title with a message icon. You can also find a DM by typing a participant's name or email.
**People** shows workspace members, excluding yourself. Each result displays the person's name and email with a people icon. Selecting a person opens an existing DM or creates a new one.
## Search for a Conversation
Type in the search field and results filter in real time using fuzzy matching. The placeholder text reads *"Search channels, DMs, and people..."*. If nothing matches, the dialog shows *"No results found."*
:::tip
Search is the fastest way to switch between conversations. Build the habit of pressing `Cmd+K` or `Ctrl+K` instead of scrolling through the sidebar.
:::
## Select a Result
Click a result or use the arrow keys to navigate and `Enter` to select. The dialog closes and navigates to the selected conversation.
If you select a person and no DM exists yet, a new DM is created automatically.
## Limitations
Search covers conversation names and workspace members only. It does not search message content, files, or task titles. To find a specific message, scroll through the relevant channel instead.
## Next Steps
* [Chat Overview](/guide/chat/index.md) for navigating conversations
* [Your First Channel](/guide/getting-started/your-first-channel.md) if you are just getting started
---
url: /guide/troubleshooting.md
---
# Troubleshooting
Common issues and how to resolve them.
## No provider configured
### Symptom
A specialist responds with *No provider configured* or a similar error when you send a message.
### Cause
No LLM provider API key has been set up in the app. Without at least one configured provider, specialists cannot generate responses.
### Solution
1. Open **Settings** and go to **Connections**
2. Configure at least one provider by entering a valid API key
3. Return to your channel and try sending the message again
See [Connections](/guide/settings/connections.md) for setup instructions.
## Provider returns an error
### Symptom
The specialist message card displays an error referencing the provider, such as an authentication failure or rate limit message.
### Cause
The API key may be invalid, the credentials may have expired, or the provider is rate limiting your requests. This can also happen if your account with the provider has run out of credits.
### Solution
1. Open **Settings** and go to **Connections**
2. Verify your API key is correct and has not been revoked
3. Check that your provider account has available credits or quota
4. If the issue persists, try switching to a different model
## Model not available
### Symptom
An error message states the model is not available or that no endpoints were found for it.
### Cause
The selected model is not supported by any of your currently connected providers. Each provider offers a specific set of models.
### Solution
1. Check which providers support the model you want to use
2. If you already have a matching provider connected, verify the API key is valid
3. Switch to a different model that your current providers support, or connect an additional provider
## Amazon Bedrock model access
### Symptom
An error mentions that model use case details have not been submitted, or that access to the model is not granted.
### Cause
AWS Bedrock requires you to submit a model use case form before certain models become available. Until the form is approved, those models cannot be used.
### Solution
1. Open the AWS Bedrock console in your browser
2. Navigate to the model you want to use and submit the required use case form
3. Wait approximately 15 minutes for the request to be processed
4. Return to the app and retry your message
## Specialist says "No specialists are connected"
### Symptom
You send a message in a channel and receive a response saying *No specialists are connected* or the message is not picked up by any specialist.
### Cause
The channel does not have any specialists added to it. Messages in a channel are only handled by specialists that are members of that channel.
### Solution
1. Mention a specialist directly using `@` followed by their name
2. Alternatively, open the right panel and go to the **Members** tab to add a specialist to the channel
See [Using Specialists](/guide/specialists/using-specialists.md) for more details.
## Session expired
### Symptom
The app stops responding to actions or displays authentication errors.
### Cause
Your login session token has expired. The app refreshes tokens automatically in the background, but this can occasionally fail due to network issues or extended inactivity.
### Solution
1. Log out of the app
2. Log back in
The session will be re-established with a fresh token.
## App not updating
### Symptom
The update notification does not appear, or the download fails partway through.
### Cause
A network issue or firewall rule may be blocking the connection to the update server.
### Solution
1. Check that your internet connection is working
2. If you are behind a corporate firewall, confirm that outbound connections to the update server are allowed
3. Try again after a few minutes
See [Updating](/guide/updating.md) for more information on how updates work.
## Secure credential storage unavailable
### Symptom
An error appears about permission being denied when accessing secure storage, or credentials fail to save.
### Cause
The operating system keychain is disabled, locked, or the app does not have permission to access it. The app uses the OS keychain to store sensitive data like API keys.
### Solution
1. Verify that your OS keychain is unlocked (Keychain Access on macOS, Credential Manager on Windows)
2. Re-enable keychain access for the app if it was previously denied
3. Restart the app
## Search returns no results
### Symptom
Opening search with `Cmd+K` (or `Ctrl+K` on Windows and Linux) and typing a query shows *No results found*.
### Cause
Search covers channels, DMs, and workspace members. It does not search message content. If your query does not match a channel name, DM, or member name, no results will appear.
### Solution
1. Search for the exact name of a channel, DM, or workspace member
2. If you are looking for a specific conversation, browse the sidebar to locate it manually
---
url: /guide/updating.md
---
# Updating
The AI Platform checks for updates automatically. When a new version is available, a notification card appears in the sidebar so you can update without leaving your conversation.
## How Updates Work
The app polls for new releases in the background. When a newer version is found, an **Update available** card appears at the bottom of the sidebar. Nothing is downloaded until you choose to update.
### Installing an Update
1. When you see the **Update available** card in the sidebar, click **Get update**
2. A progress bar shows the download status
3. Once the download finishes, the card changes to **Restart to apply update**
4. Click **Apply update** to restart the app with the new version
Your conversations, settings, and workspace data are preserved across updates.
### Dismissing a Notification
If you are not ready to update, click the **X** button on the card to dismiss it. The card will reappear the next time you open the app or when a newer version is released.
## Required Updates
Occasionally, an update is required to continue using the app. When this happens, the card says **Update required** and cannot be dismissed. Click **Get update** to download and install it. If the in-app updater is not available on your platform, the card will direct you to download the update from your app store or installer.
## Update Channels
You can choose which release channel the app follows. This setting is in **Settings → Personal → Update Channel**.
| Channel | Description |
| ---------- | --------------------------------------------------------------- |
| **Stable** | Default. Production-ready releases that have been fully tested. |
| **Beta** | Early access to upcoming features. May contain minor issues. |
Select a channel from the dropdown to switch. The app will check for the latest release on that channel and notify you if a newer version is available.
:::tip
Stick with **Stable** unless you specifically want to preview upcoming features or have been asked to test a beta release.
:::
## Update Errors
If a download fails, the card shows **Update failed** with an error message. Click **Try again** to retry the download. If the error persists:
1. Check that your internet connection is working
2. If you are behind a corporate firewall, confirm that outbound HTTPS connections are not being blocked
3. Restart the app and try again
## Checking Your Current Version
To see which version you are running, open **Settings**. The app version is displayed in the settings panel.
## Next Steps
* [Troubleshooting](/guide/troubleshooting.md) if you run into issues after updating
* [Settings](/guide/settings/index.md) for account and workspace configuration
---
url: /index.md
---